
Oh, there’s nothing more frustrating than putting effort into delicious No-Bake Peanut Butter Chocolate Walnut Bars, only for them to turn out too soft, greasy, or just not hold together right! I used to struggle with getting that perfect, clean slice and satisfying texture.
But after a little trial and error, I finally cracked the code to making these peanut butter chocolate bars come out absolutely firm and smooth, every single time. You’ll love this simple trick for flawless, irresistible no-bake dessert bars!
For another delightful texture, check out chocolate caramel peanut crunch bars.
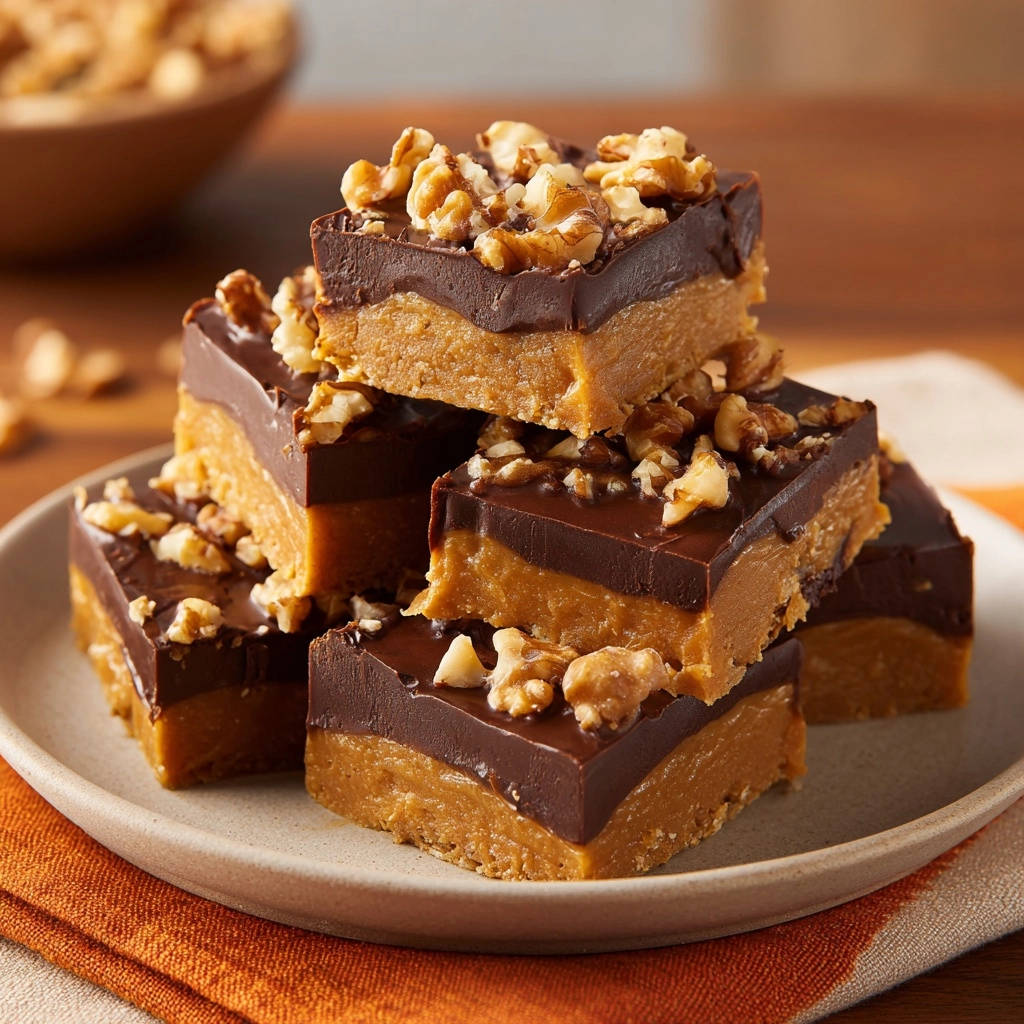
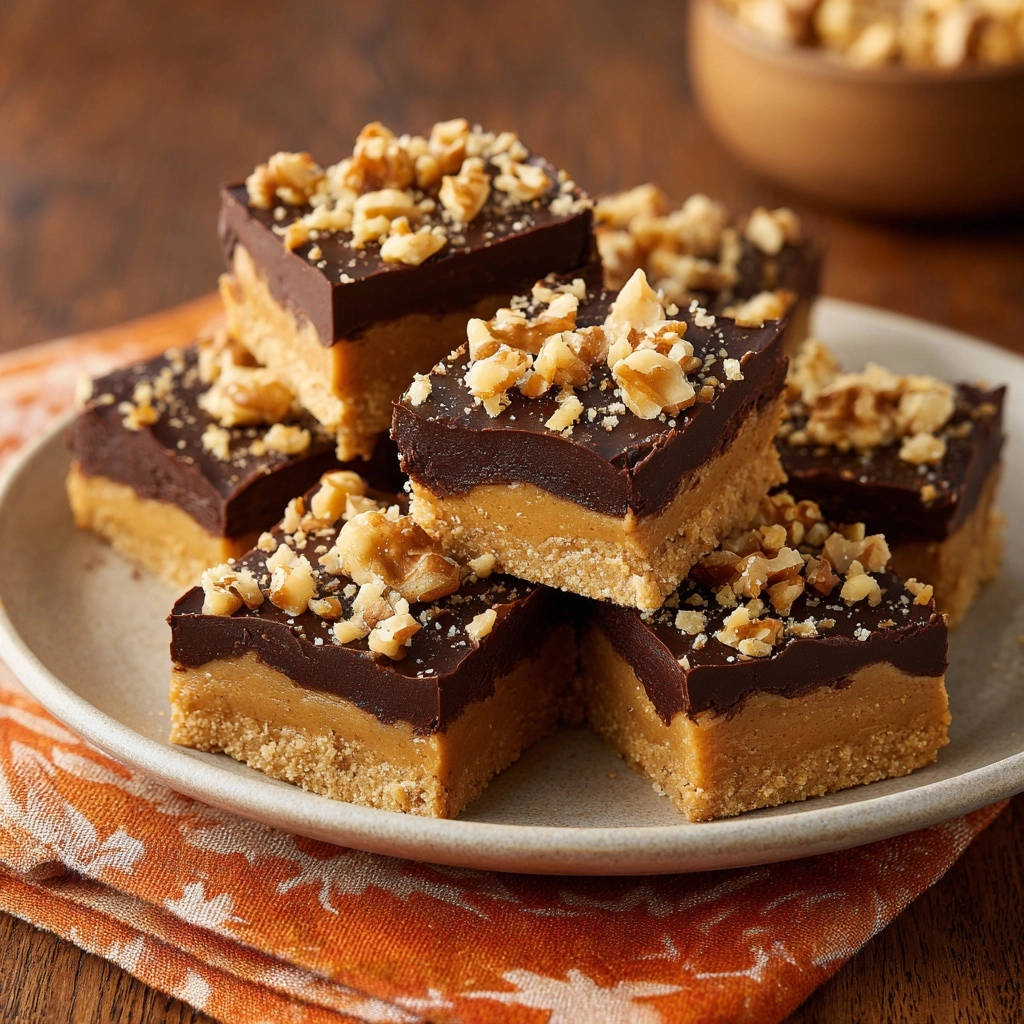
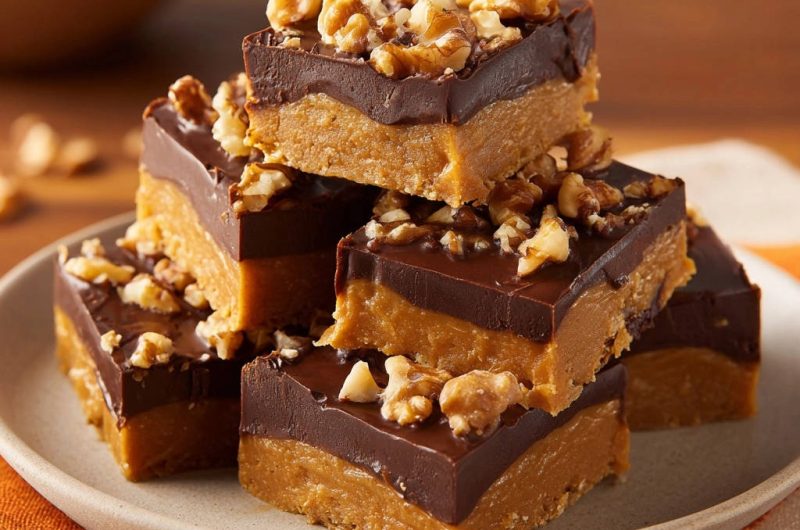
Finally! No-Bake Peanut Butter Chocolate Walnut Bars That Hold Their Shape
Many no-bake treats promise simplicity but deliver disappointment, often ending up as a crumbly mess or a greasy puddle at room temperature. My goal was always to achieve bars with a truly stable structure and a clean, satisfying bite.
This recipe for No-Bake Peanut Butter Chocolate Walnut Bars is designed to banish those frustrations. It focuses on precise ratios and crucial chilling steps, ensuring your homemade sweet treats are firm, smooth, and utterly delicious.
The “No More Crumbly Bars” Guarantee
The secret to a non-crumbly, firm base lies in the meticulous combination of ingredients and proper chilling. We ensure the powdered sugar fully dissolves into the fats, creating a dense and stable peanut butter layer.
For a truly stable base, consider the techniques used in chocolate chip cheesecake bars.
This careful balance prevents the common issues of bars falling apart or becoming too oily. The result is a sturdy foundation that perfectly supports the rich chocolate topping.
Effortless Elegance: Clean Slices, Every Time
Achieving bakery-perfect slices is incredibly satisfying. This recipe ensures your No-Bake Peanut Butter Chocolate Walnut Bars come out of the pan beautifully and cut with precision.
Using parchment paper with an overhang is a game-changer for easy lifting, and our expert tip for warming your knife guarantees crisp, clean edges on every single square.
The Secret Ingredient? Perfectly Balanced Chilling
Chilling isn’t just an afterthought here; it’s the most critical step for structural integrity and a smooth texture. We utilize two distinct chilling phases to achieve perfection.
The initial chill firms the peanut butter base, preventing the warm chocolate from softening it. The extended final chill allows both layers to fully set, resulting in bars that are firm, smooth, and maintain their shape beautifully.
Gathering Your Indulgent Ingredients
Every ingredient plays a vital role in the texture and flavor of these delightful No-Bake Peanut Butter Chocolate Walnut Bars. Quality matters, so choose your components wisely!
For the Rich, Creamy Peanut Butter Base
Creamy Peanut Butter: Provides the signature flavor and a foundational richness. Opt for smooth, good-quality peanut butter for the best texture and consistency.
Unsalted Butter (Melted): Acts as a crucial binder, helping the base set firmly without being greasy. Melting it allows for seamless incorporation with the other ingredients.
Powdered Sugar: Ensures a silky-smooth texture, dissolving easily into the fats for a non-gritty finish. It also adds necessary sweetness and contributes to the bar’s structure.
Vanilla Extract: Enhances the overall sweet profile, adding a warm, aromatic note that complements the peanut butter beautifully.
Salt: A small but mighty addition, salt balances the sweetness and amplifies the rich peanut butter flavor, making every bite more profound.
Crafting the Silky Smooth Chocolate Topping
Semi-Sweet Chocolate Chips: Form the decadent top layer, providing classic chocolatey goodness. High-quality chips melt more smoothly for a superior finish.
Unsalted Butter: Melts with the chocolate to create a pourable, glossy ganache that sets perfectly without cracking. It adds richness and helps achieve that desirable smooth texture.
The Essential Crunchy Walnut Finish
Chopped Walnuts: Add a delightful textural contrast and nutty flavor, completing the bar experience. Their slight bitterness beautifully complements the sweet chocolate and peanut butter.
For alternative toppings or to accommodate allergies, consider other nuts like pecans or even mini chocolate chips, sprinkles, or a sprinkle of flaky sea salt for a gourmet touch!
Essential Tools for Your No-Bake Peanut Butter Chocolate Walnut Bars Success
Having the right tools makes the process of creating these delicious peanut butter bars even smoother.
8×8 Inch Baking Pan: This standard size is perfect, ensuring your bars have the ideal thickness and yield consistent portions.
Parchment Paper: Absolutely essential for easy removal and clean, effortless slicing without any sticking to the pan.
Large Mixing Bowls: You’ll need separate bowls for combining the peanut butter base and for melting the chocolate topping.
Microwave-Safe Bowl or Double Boiler: For gently and smoothly melting the chocolate and butter without any risk of scorching.
Whisk or Spatula: Crucial for thoroughly mixing ingredients and achieving a uniform, smooth consistency for both layers.
Sharp Knife: A good, sharp knife is vital for making clean, precise cuts once your no-bake bars are fully chilled.
Step-by-Step: Crafting Your Flawless No-Bake Bars
Follow these detailed steps to ensure your No-Bake Peanut Butter Chocolate Walnut Bars come out perfectly every time.
-
Prepping Your Pan for Easy Release:
Line an 8×8 inch baking pan with parchment paper, ensuring there’s an overhang on all sides. This simple step is your secret weapon for lifting out the bars cleanly and making slicing a breeze later on.
-
Mixing the Peanut Butter Foundation:
In a large bowl, combine the creamy peanut butter, melted butter, powdered sugar, vanilla extract, and salt. Mix thoroughly until the mixture is completely smooth and uniformly combined.
Ensure all ingredients are evenly incorporated and the powdered sugar fully dissolves into the fats; this is key to a firm, non-crumbly, and perfectly set base for your no-bake dessert.
-
Pressing the Base:
Press the prepared peanut butter mixture evenly and firmly into the bottom of the lined pan. Use the back of a spoon or your hands to compact it across the entire surface.
This firm compression is crucial for creating a dense, stable foundation that will hold up beautifully when sliced.
-
Firming Up the Base: The First Chill:
Place the pan in the refrigerator for at least 30 minutes. This essential chilling time allows the peanut butter layer to set properly, forming a stable base that won’t become too soft or melt when the warm chocolate layer is added.
-
Melting Your Silky Chocolate Layer:
While the peanut butter base chills, melt the chocolate chips and 1/4 cup unsalted butter together. You can use a microwave-safe bowl (in 30-second intervals, stirring after each) or a double boiler over simmering water.
Stir until the mixture is completely melted, smooth, and glossy. The added butter helps the chocolate set smoothly but not too hard, which prevents cracking when you cut the bars.
-
Layering & Topping: The Final Touches:
Once the peanut butter layer is firm from chilling, remove the pan from the refrigerator. Pour the melted chocolate mixture evenly over the chilled peanut butter layer, spreading it gently to the edges.
Immediately sprinkle the chopped walnuts over the melted chocolate. Gently press them down a little if needed, ensuring they adhere well to the still-wet chocolate for that delicious walnut crunch.
-
The Extended Chill: Your Key to Perfection:
Return the pan to the refrigerator for at least 1 hour and 30 minutes, or until both layers are completely firm. This extended chill is the final, non-negotiable step to guarantee beautifully set, firm, and smooth bars that are effortless to cut.
-
Achieving the Perfect Slice:
Once fully chilled and firm, lift the bars out of the pan using the parchment paper overhang. Place them on a cutting board and slice into squares using a sharp knife.
For the cleanest cuts, a pro tip is to briefly run your knife under hot water and wipe it dry between slices. Enjoy your perfectly firm and smooth no-bake peanut butter chocolate walnut bars!
Expert Tips for No-Bake Peanut Butter Chocolate Walnut Bars Perfection
Elevate your no-bake dessert game with these crucial tips.
Temperature is Everything: Working with Butter and Chocolate
Ensure your melted butter for the peanut butter layer isn’t piping hot; just melted and slightly cooled is ideal. For the chocolate, melt it gently and slowly to avoid seizing or burning, which can drastically affect the final texture of your topping.
The Art of Pressing: Building a Stable Base
When pressing the peanut butter mixture into the pan, apply firm, even pressure across the entire surface. A well-compacted base is the foundation for bars that hold together and slice beautifully without crumbling.
Why Chilling Matters: Beyond Just Setting
Never rush the chilling times. The initial chill prevents the warm chocolate from melting the peanut butter base, and the final extended chill is vital for achieving that signature firm, non-greasy texture and incredibly clean slice.
Clean Cuts: A Chef’s Trick
To get those bakery-perfect slices, always use a sharp, thin knife. For extra clean and crisp edges, run your knife under hot water, wipe it completely dry, and then make each cut. Repeat this process for every single slice.
Troubleshooting Common No-Bake Bar Dilemmas
Even with the best recipes, sometimes things go awry. Here’s how to fix common issues with your peanut butter chocolate walnut bars.
“Why Are My Bars Too Soft or Greasy?”
This often happens if the butter wasn’t fully incorporated into the peanut butter layer, or if the bars weren’t chilled for long enough. Ensure thorough mixing and adhere strictly to the recommended chilling times for both layers for maximum firmness.
Using too much butter or not enough powdered sugar can also contribute to a softer, greasier texture. Double-check your measurements carefully and ensure your peanut butter isn’t an “oil separation” natural variety without stirring first.
“My Chocolate Layer Cracked!”
Cracking usually occurs if the chocolate layer sets too hard. The addition of butter helps prevent this by making it more pliable, but if your kitchen is very cold, the chocolate might firm up too quickly. Make sure you melt the chocolate with the specified amount of butter to achieve that perfect set.
Cutting cold bars with a cold knife can also cause cracking. Always warm your knife as suggested in the tips section for smoother cuts, which helps prevent this common issue.
“Help, My Bars Won’t Hold Together!”
If your no-bake peanut butter bars are crumbly, the peanut butter base likely wasn’t mixed thoroughly enough for the powdered sugar to dissolve and bind properly. Ensure a very smooth, well-combined mixture before pressing it into the pan.
Insufficient chilling can also lead to crumbling. The bars need to be completely firm from the extended chill before slicing to maintain their integrity and prevent any breakage.
Serving Suggestions & Storage Secrets
Make the most of your delicious No-Bake Peanut Butter Chocolate Walnut Bars with these helpful tips.
The Best Ways to Serve Your Bars
These No-Bake Peanut Butter Chocolate Walnut Bars are delightful served chilled, straight from the refrigerator. Their firm texture makes them easy to pick up and enjoy as a satisfying snack, indulgent dessert, or a sweet treat with coffee or tea.
They make a perfect addition to dessert platters for parties, potlucks, or family gatherings due to their stability and crowd-pleasing flavors. Their robust flavor pairs wonderfully with a cold glass of milk or a scoop of creamy vanilla ice cream.
Making Ahead & Storage Guidelines
These bars are an excellent make-ahead dessert! They actually improve in texture and flavor as they chill, so preparing them a day in advance is highly recommended for optimal results.
Store leftover bars in an airtight container in the refrigerator for up to one week. For longer storage, you can freeze individual bars (wrapped tightly in plastic wrap) for up to 2-3 months. Thaw frozen bars in the refrigerator before serving for the best texture.
Creative Variations to Try
While delicious as is, feel free to experiment with these chocolate walnut treats! Consider adding a sprinkle of flaky sea salt over the chocolate layer for a trendy sweet and salty twist, or swap out walnuts for chopped pecans, peanuts, or even mini chocolate chips for an extra chocolatey crunch.
For a different flavor profile, you could try a thin layer of caramel or a beautiful drizzle of white chocolate on top of the dark chocolate layer before the final chill. If you’re a fan of unique peanut butter flavors, you might even enjoy trying this with whipped honey peanut butter for a subtly different base.
Frequently Asked Questions About No-Bake Peanut Butter Chocolate Walnut Bars
Can I Use a Different Nut Butter?
Yes, you can experiment with other smooth nut butters like almond butter or cashew butter, but be aware that the texture and firmness might vary slightly due to different fat and consistency levels. Peanut butter tends to be the firmest and easiest to work with for this specific recipe, guaranteeing the best set.
What About Other Toppings?
Absolutely! While walnuts provide a classic crunch, feel free to substitute with chopped pecans, chopped peanuts, mini chocolate chips, sprinkles, shredded coconut, or even a drizzle of caramel or white chocolate for an extra flourish. Choose what you love!
Are These Bars Gluten-Free or Vegan-Friendly?
This specific recipe is naturally gluten-free if using certified gluten-free peanut butter and ensuring all other ingredients are free from gluten. To make them vegan, you would need to use a plant-based butter substitute (ensure it’s suitable for baking/melting) and vegan chocolate chips. Adjustments might be needed for consistency, as vegan butter can behave differently.
Ready to Indulge? Your Perfect No-Bake Treat Awaits!
You now hold the “code” to creating truly firm, smooth, and perfectly sliceable No-Bake Peanut Butter Chocolate Walnut Bars every single time. Gone are the days of crumbly messes and greasy disappointments!
Whether you’re making them for a quick weeknight treat or to impress guests, this foolproof recipe guarantees a delicious outcome. Don’t hesitate to share your creations and tell us your favorite part of these irresistible no-bake bars!
More Sweet Ideas
If you enjoyed these no-bake bars, you might like these other chocolatey baked goods.
- For a different chocolate treat, try the Chocolate Swirl Muffins, which offer a delightful twist on classic chocolate flavor.
- If you appreciate moist baked goods, the Banana Chocolate Chip Muffins are a great choice for their soft texture.
Looking for more easy no-bake dessert ideas? Explore our collection of effortless sweet treats to satisfy any craving without turning on the oven!
Peanut Butter Chocolate Walnut Bars
Course: DessertCuisine: AmericanDifficulty: easy16
bars20
minutes240
kcal120
minutesTired of soft, greasy no-bake bars? This recipe guarantees firm, smooth peanut butter chocolate walnut bars every time with a simple trick. Achieve perfect, clean slices and satisfying texture effortlessly.
Ingredients
For the Peanut Butter Layer:
1 cup creamy peanut butter
1/2 cup unsalted butter, melted
2 cups powdered sugar
1 teaspoon vanilla extract
1/4 teaspoon salt
For the Chocolate Layer:
1 cup semi-sweet chocolate chips
1/4 cup unsalted butter
For the Topping:
1/2 cup chopped walnuts
Directions
- Prepare your pan: Line an 8×8 inch baking pan with parchment paper, leaving an overhang on the sides to easily lift the bars out later. This also helps with the clean set.
- Make the peanut butter layer: In a large bowl, combine the creamy peanut butter, melted butter, powdered sugar, vanilla extract, and salt. Mix thoroughly until the mixture is completely smooth and well combined. The key to a firm, non-crumbly base is to ensure all ingredients are evenly incorporated and the powdered sugar fully dissolves into the fats.
- Press the base: Press the peanut butter mixture evenly into the prepared pan. Use the back of a spoon or your hands to firmly pack it down across the entire bottom of the pan. This compression helps create a dense, firm base.
- Chill the base: Place the pan in the refrigerator for at least 30 minutes. This crucial chilling time allows the peanut butter layer to set properly, ensuring a stable foundation that won’t get too soft when the warm chocolate layer is added.
- Prepare the chocolate layer: While the peanut butter base chills, melt the chocolate chips and 1/4 cup unsalted butter together. You can do this in a microwave-safe bowl in 30-second intervals, stirring well after each, or in a double boiler until smooth. Stir until completely melted and glossy. The butter helps the chocolate set smoothly but not too hard, preventing cracking when cut.
- Pour the chocolate: Once the peanut butter layer is firm from chilling, remove the pan from the refrigerator. Pour the melted chocolate mixture evenly over the chilled peanut butter layer.
- Add topping: Immediately sprinkle the chopped walnuts over the melted chocolate. Gently press them down a little if needed, so they adhere well.
- Final chill: Return the pan to the refrigerator for at least 1 hour and 30 minutes, or until both layers are completely firm. This extended chill is the final step to guarantee beautifully set, firm, and smooth bars that are easy to cut.
- Slice and serve: Once fully chilled and firm, lift the bars out of the pan using the parchment paper overhang. Place on a cutting board and slice into squares using a sharp knife. For the cleanest cuts, you can briefly run your knife under hot water and wipe it dry between slices. Enjoy your perfectly firm and smooth no-bake bars!
Notes
- Includes important chilling times for optimal texture and firmness.


