
I spent years making tough, disappointing pot roasts, convinced that deep, savory aroma meant the beef would magically melt on the plate.
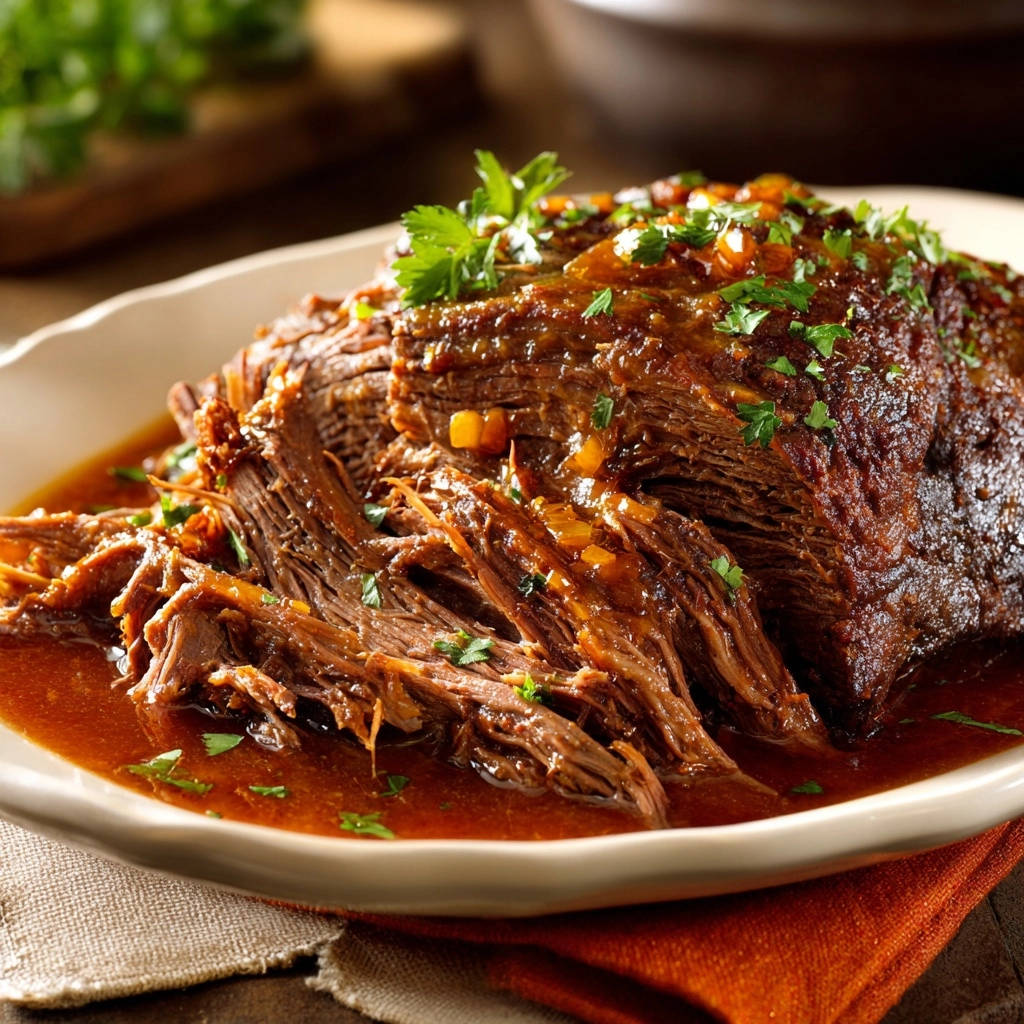
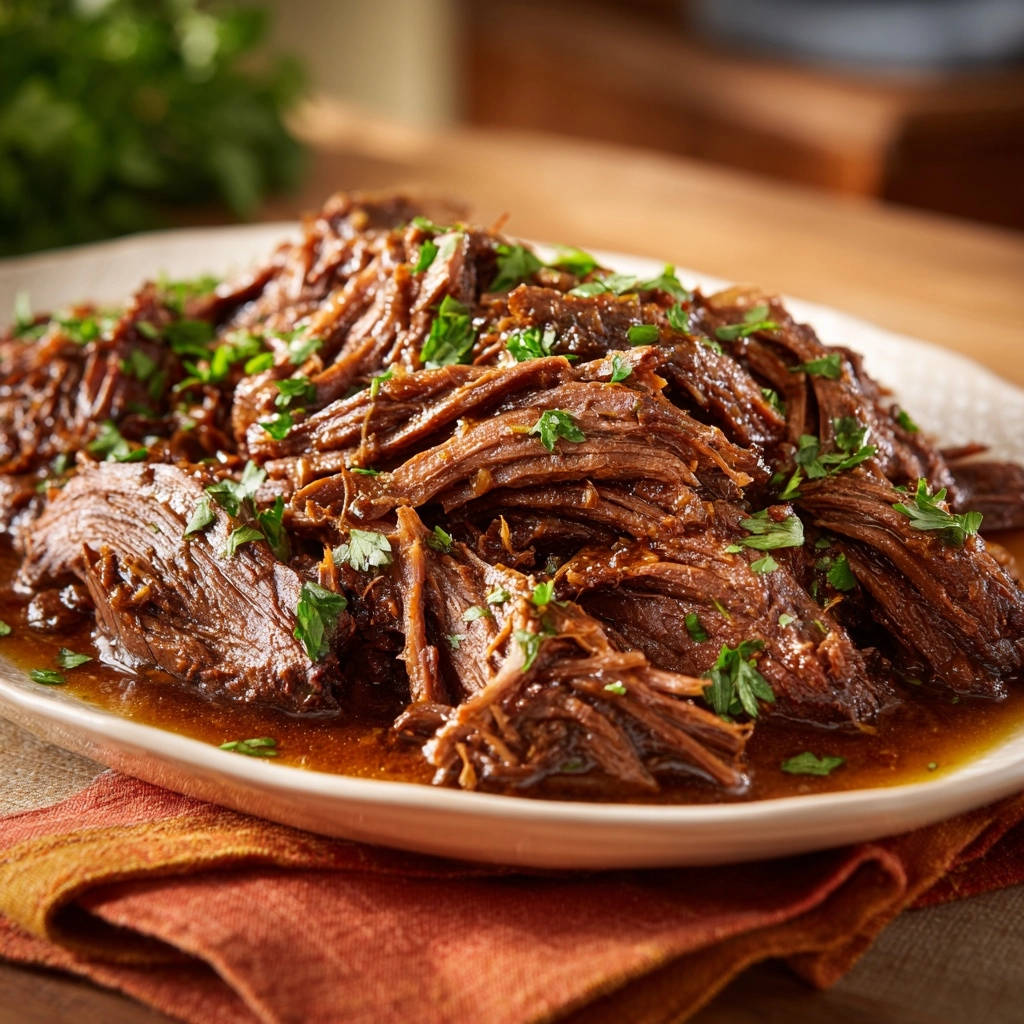
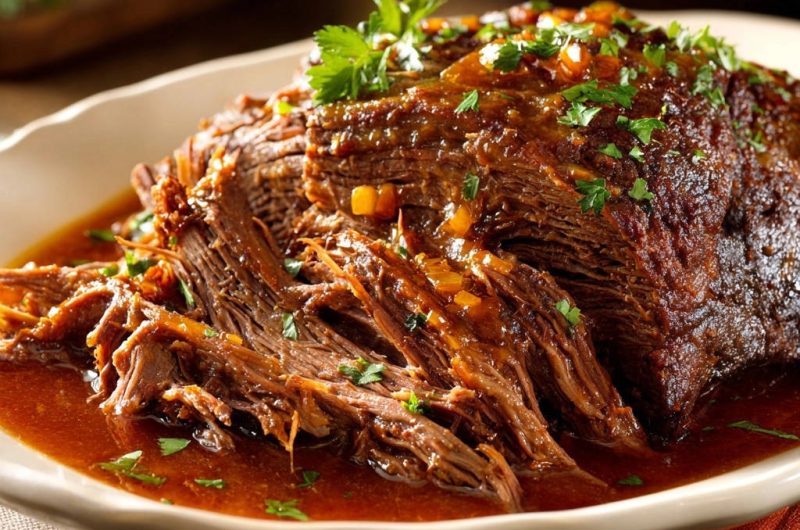
That disappointment stopped the moment I perfected the low-and-slow, 300°F oven technique required for a truly Rich Slow-Cooked Pot Roast.
This method guarantees that incredible, pull-apart, fork-tender beef every single time, making it the only recipe you will ever need for a flawless Sunday dinner centerpiece.
For another comforting meal that really shines, consider this tender beef pot roast.
The Guarantee: Why This Pot Roast Will Never Be Tough
The core philosophy behind this recipe ignores internal temperature as a measure of safety and focuses solely on the transformation of the meat itself.
We prioritize texture over speed, allowing the tough connective tissues in the chuck roast to completely break down, resulting in guaranteed tenderness.
Understanding the Chuck Roast Transformation (Collagen to Gelatin)
The beef chuck roast is rich in collagen, a dense connective protein that holds the muscle fibers together and makes the cut inexpensive but tough.
Cooking below 320°F (but above 160°F) for several hours causes the collagen to slowly dissolve into gelatin, which acts as natural moisture and sauce thickener.
This process of converting tough collagen into succulent gelatin is the absolute secret to achieving truly fork-tender beef.
The Magic Number: Why 300°F is Non-Negotiable for Braising
Braising at a steady 300°F oven temperature provides superior, consistent heat surrounding the entire Dutch oven, unlike variable stovetop or slow cooker settings.
This precise, low heat prevents the muscle fibers from seizing up and releasing excessive moisture too quickly, guaranteeing maximum internal juiciness and flavor retention.
Essential Building Blocks: Sourcing and Preparing Your Ingredients
Choosing the Best Cut: Chuck Roast vs. Other Options
The Importance of the Dry Pat and Liberal Seasoning
The 3-pound beef chuck roast is essential because its high concentration of intramuscular fat and connective tissue provides the necessary structure for successful braising.
Leaner cuts like sirloin or tenderloin lack sufficient collagen; if subjected to this method, they would simply dry out and turn stringy instead of becoming pull-apart soft.
Patting the chuck roast thoroughly dry with paper towels eliminates surface moisture, which is the biggest enemy of a high-quality, deep brown sear.
A liberal coating of kosher salt and black pepper provides a foundation of flavor, ensuring the deep crust that forms during the sear is seasoned to perfection.
Mastering the Method: A Step-by-Step Guide to Maximum Flavor
Step 1: Perfecting the Aggressive Sear (Crust is King)
Step 2: Building the Aromatic Base and Deglazing
Step 3: Setting Up The Fork-Tender Technique
Step 4: The Low and Slow Oven Braise
Step 5: Finishing Touches and Resting
Heat the olive oil in a heavy Dutch oven over medium-high heat until shimmering hot, then sear the seasoned roast aggressively on all sides for 4 to 5 minutes each.
Aim for a deep, dark brown crust on all surfaces; this Maillard reaction adds complexity and color that cannot be replicated later, making it the most critical step for incredible flavor depth.
After removing the meat, reduce the heat and sauté the diced onion and carrots until softened, then stir in the dried thyme, remaining seasoning, and tomato paste, cooking until fragrant (about 60 seconds).
Pour in the first cup of beef broth and immediately scrape up all the browned bits (the fond) stuck to the bottom of the pot using a wooden spoon.
This essential deglazing step incorporates those intense, concentrated flavors back into the liquid, forming the rich foundation for the final gravy.
Return the seared beef and the bay leaves to the Dutch oven, then add the remaining 3 cups of broth, ensuring the liquid comes at least halfway up the sides of the roast.
The liquid creates a moist, consistent braising environment, trapping steam and ensuring the meat heats evenly and remains submerged enough to convert the collagen.
Cover the pot tightly with a well-fitting lid and transfer it to your preheated 300°F oven, letting it braise undisturbed for 3.5 to 4.5 hours.
The meat is done when it shreds easily with a fork; the internal temperature should read between 200°F and 205°F, signaling that the connective tissues have fully melted into gelatin.
Remove the finished pot roast from the oven and transfer the meat to a cutting board, resting it lightly tented with foil for a crucial 15 minutes.
Resting allows the muscle fibers to relax, reabsorbing the flavorful juices that were forced out during the long cook time, guaranteeing a juicy final result before slicing or shredding.
Chef’s Secrets: Elevate Your Rich Slow-Cooked Pot Roast Game
Use Bone Broth for Extra Depth: Instead of regular beef broth, using high-quality bone broth adds gelatin naturally, thickening the final sauce and boosting the savory umami flavor.
Chill the Fat: For a cleaner, less greasy sauce, chill the liquid after cooking. The saturated fat will solidify on top, making it incredibly easy to skim off before reheating or reducing the gravy.
Adding Wine for Complexity: For a deeper, classic French flavor profile, substitute 1 cup of beef broth for a dry red wine, such as Cabernet Sauvignon, during the deglazing step.
The Power of Fresh Garnish: The generous application of fresh chopped parsley at the very end provides a necessary burst of color and bright, herbaceous flavor to cut through the inherent richness of the braise.
Troubleshooting Common Pot Roast Problems
Problem: The Roast Came Out Dry
Dryness is often caused by cooking too fast or at too high a temperature, which squeezes out moisture before the collagen has time to convert into gelatin.
Ensure your oven is accurately calibrated to 300°F and always keep the lid tightly sealed throughout the entire braise to retain crucial steam and moisture.
Problem: My Sauce is Too Thin
If the braising liquid is thin, the quickest fix is to remove the beef and simmer the liquid rapidly on the stovetop until it reduces by about one-third to a thick gravy consistency.
Alternatively, create a slurry by mixing 1 tablespoon of cornstarch with 2 tablespoons of cold water, whisk it into the simmering sauce, and cook until thickened.
Problem: The Flavor is Bland or Lacking Depth
Bland flavor almost always stems from a weak sear; you must develop a dark, aggressive crust on the chuck roast before adding any liquid for ultimate depth.
Also, make certain you thoroughly deglazed the pot, scraping up every bit of fond, and that the tomato paste was cooked for at least one minute until slightly darker and fragrant.
Perfect Pairings: What to Serve Alongside This Rich Slow-Cooked Pot Roast
Starchy Staples and Comforting Sides
A satisfying Rich Slow-Cooked Pot Roast demands something substantial to soak up the luxurious, savory gravy created during the braise.
For a deeply satisfying side, explore slow-simmered pot roast.
- Creamy Mashed Potatoes or Cauliflower Puree
- Wide Egg Noodles (Tossed simply with butter)
- Thick slices of Crusty Bread (Perfect for dipping into the gravy)
Green Vegetables for Balance
The intensity of the braised meat needs bright, slightly acidic, or bitter vegetables to cleanse the palette.
Round Out Your Meal
To complete your pot roast experience, consider these complementary dishes that bring out the best in beef.
- For a classic pairing that showcases the richness of the pot roast, try creamy mashed potatoes with rich gravy – they absorb every drop of the savory juices beautifully.
- To add a comforting, savory element that complements the tender beef, prepare thyme beef stuffing, offering a wonderful textural contrast.
Blanching green beans with a splash of lemon or serving roasted Brussels sprouts with balsamic vinegar cuts through the inherent richness beautifully, providing necessary contrast.
Maximizing Your Leftovers and Make-Ahead Strategy
Storage and Reheating Safely
Store leftover shredded pot roast submerged in its gravy in an airtight container in the refrigerator for up to four days.
For reheating, gently warm the meat and sauce together in a covered pot on the stovetop over low heat, or in a 300°F oven, ensuring the beef does not dry out.
Creative Uses for Leftover Rich Slow-Cooked Pot Roast
Transforming the substantial leftovers from your Sunday dinner is easy, thanks to the robust flavor already infused in the tender beef.
- Shredded Pot Roast Melt Sandwiches (with provolone and horseradish mayo)
- Savory Pot Roast Shepherd’s Pie (topped with cheesy mashed potatoes)
- Quick Pot Roast Chili (using the shredded beef as the smoky base)
Common Questions About Rich Slow-Cooked Pot Roast
Can I Use a Slow Cooker Instead of the Oven?
While you can use a slow cooker, the oven at 300°F provides more stable, consistent heat, which is vital for perfect, even collagen breakdown required for fork-tender beef.
If you choose a slow cooker, ensure you execute the deep sear and crucial deglazing steps on the stovetop before transferring everything to the cooker for best flavor.
How Long Can I Marinate the Beef Before Cooking?
Marinating the chuck roast in a slightly acidic mixture (like vinegar or wine) for 4 to 12 hours can help tenderize the exterior slightly and deepen the flavor profile.
However, since this braising method relies heavily on heat and time for tenderness, marination is not strictly necessary for achieving a successful, tender result.
Is a Dutch Oven Absolutely Necessary for Braising?
A heavy, thick-walled Dutch oven is highly recommended because its cast iron construction retains heat exceptionally well and distributes it evenly.
If you don’t own one, use any deep, heavy, oven-safe pot or roasting pan, ensuring it can be covered extremely tightly with a heavy lid or layers of aluminum foil to trap all the steam.
Ready to Impress? Your Rich Slow-Cooked Pot Roast Masterpiece Awaits
The quest for the perfect, melt-in-your-mouth pot roast ends here. By adhering to the principles of low, slow heat and prioritizing the aggressive sear, you have guaranteed success.
Forget tough, dry results. It is time to embrace the incredible satisfaction that comes from serving a centerpiece so tender, your knife is truly optional.
Try this recipe for Rich Slow-Cooked Pot Roast this weekend and experience the transformation-and don’t forget to tell me how much your family loved the deeply flavored gravy!
Pot Roast
Course: Main CourseCuisine: AmericanDifficulty: medium6
servings20
minutes4
hours450
kcal240
minutesThe single most important trick transforms cheap cuts into melt-in-your-mouth perfection. This braising method guarantees incredible, pull-apart texture every time. You will barely need a knife for this rich pot roast!
Ingredients
3 pound beef chuck roast
2 tablespoons olive oil
1 large onion, diced
1 cup carrots, diced
1 teaspoon dried thyme
1 tablespoon tomato paste
4 cups low-sodium beef broth
2 bay leaves
2 teaspoons kosher salt, divided
1 teaspoon black pepper, divided
1 tablespoon fresh parsley, chopped (for garnish)
Directions
- Prepare the Beef: Pat the chuck roast very dry using paper towels. This is crucial for a great sear. Season all sides liberally with 1 teaspoon of the salt and 1/2 teaspoon of the black pepper.
- Sear the Roast: Heat the olive oil in a large Dutch oven or oven-safe pot over medium-high heat until shimmering. Sear the roast aggressively for about 4 to 5 minutes per side until a deep, dark brown crust forms on all surfaces. Remove the beef and set aside.
- Build the Base: Reduce the heat to medium. Add the diced onion and carrots to the pot. Cook, stirring occasionally, until the onions soften, about 5 to 7 minutes. Stir in the thyme, remaining salt, pepper, and tomato paste. Cook for 1 minute until fragrant.
- Deglaze and Add Liquid: Pour 1 cup of the beef broth into the pot and scrape up any browned bits stuck to the bottom (this adds incredible flavor depth). Add the remaining 3 cups of beef broth and the bay leaves. Bring the liquid to a simmer.
- THE FORK-TENDER TECHNIQUE: Return the seared beef to the pot, ensuring the liquid comes at least halfway up the sides of the roast. Cover the Dutch oven tightly with a lid.
- Slow Cook: Transfer the covered pot to an oven preheated to 300 degrees F. Braise the roast slowly for 3 1/2 to 4 1/2 hours. The meat is ready not when it reaches a specific temperature for safety, but when the collagen has melted and it can be shredded easily with a fork (aim for an internal temperature of 200 degrees F to 205 degrees F). Do not rush this process; the long, low-temperature cook is the key to perfect tenderness.
- Finish and Serve: Remove the roast from the oven and transfer the meat to a cutting board. Let it rest for 15 minutes before gently slicing or shredding.
- Thicken Sauce (Optional): If the sauce is too thin, you can simmer the liquid left in the pot on the stovetop until reduced to your desired consistency. Pour the sauce over the sliced or shredded beef, garnish generously with fresh parsley, and serve immediately.
Notes
- The long, low-temperature cook (300°F) is crucial for melting collagen and achieving fork-tender results (aim for 200°F-205°F internal temp).


