
There’s nothing quite as disappointing as expecting soft, chewy treats and instead finding dry, crumbly cookie bars. I’ve spent years perfecting the art of the ultimate Salted Chocolate Chunk Cookie Bars, and I’m thrilled to share the simple secret to achieving that irresistible moist, chewy texture with a perfectly gooey center, every single time.
This recipe transforms a classic into an unforgettable dessert that’s guaranteed to impress with its rich flavor and delightful balance of sweet and salty. Get ready to bake a batch of cookie bars that truly lives up to its name!
Why You’ll Crave These Salted Chocolate Chunk Cookie Bars
The Secret to Irresistibly Moist and Chewy Texture
Our recipe for Salted Chocolate Chunk Cookie Bars relies on a precise balance of wet and dry ingredients, specifically the melted butter and packed brown sugar. This combination provides unparalleled moisture and contributes significantly to that sought-after chewy bite.
Beyond ingredients, the baking technique and crucial cooling period are tailored to lock in moisture, ensuring your bars are never dry or cakey.
Achieving That Signature Gooey Center
The magic of a truly great cookie bar lies in its gooey center, and this recipe delivers. We emphasize a specific visual cue during baking: golden edges with a slightly soft center.
This ensures the chocolate chunks melt into luscious pockets of gooeyness, which then sets perfectly as the bars cool, giving you that ideal texture every time.
Effortless Baking for Delicious Results
Despite their sophisticated flavor and texture, these homemade cookie bars are incredibly straightforward to make. With clear, concise steps, even novice bakers can achieve spectacular results.
The ease of preparation makes them perfect for any occasion, from weeknight treats to impressive potluck contributions.
A Taste Sensation: Sweet, Salty, and Chocolatey
The harmonious blend of rich semi-sweet chocolate, buttery cookie base, and a generous sprinkle of flaky sea salt creates a truly addictive flavor profile. Each bite offers a delightful contrast that keeps you coming back for more.
This classic sweet and salty combination elevates these gooey chocolate bars beyond an ordinary dessert.
Gather Your Flavorful Ensemble: Ingredients for Success
The Foundation: Butter, Sugars, and Eggs
Melted Unsalted Butter: Using melted butter is key for a dense, chewy texture, as it fully integrates with the sugars without aeration.
Packed Light Brown Sugar: This contributes deep molasses notes and essential moisture, which is fundamental for soft and chewy cookie bars.
Granulated Sugar: A touch of white sugar ensures crisp edges and a balanced sweetness, complementing the brown sugar’s depth.
Large Eggs: Eggs bind the ingredients, provide structure, and add richness, ensuring a cohesive and tender crumb.
Vanilla Extract: Pure vanilla extract amplifies all the other flavors, adding a warm, aromatic backbone to the cookie base.
Dry Essentials: Flour, Leavening, and Balance
All-Purpose Flour: The backbone of the bars, providing necessary structure without making them tough, assuming it’s measured correctly.
Baking Soda: This leavening agent creates a gentle lift and contributes to the bars’ characteristic soft texture, preventing them from becoming too dense.
Salt (Fine Grain): Crucial for balancing the sweetness and enhancing the overall flavor profile of the dough before the flaky sea salt topping is added.
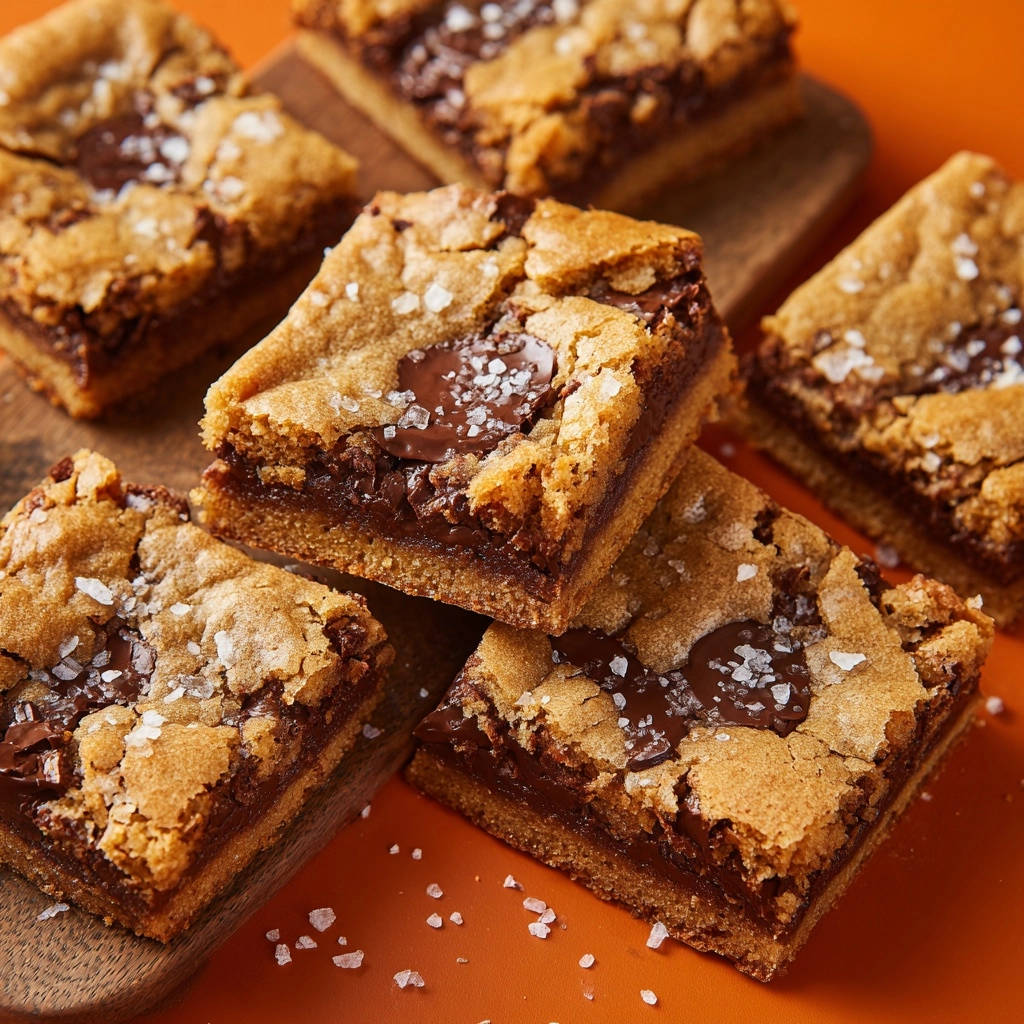
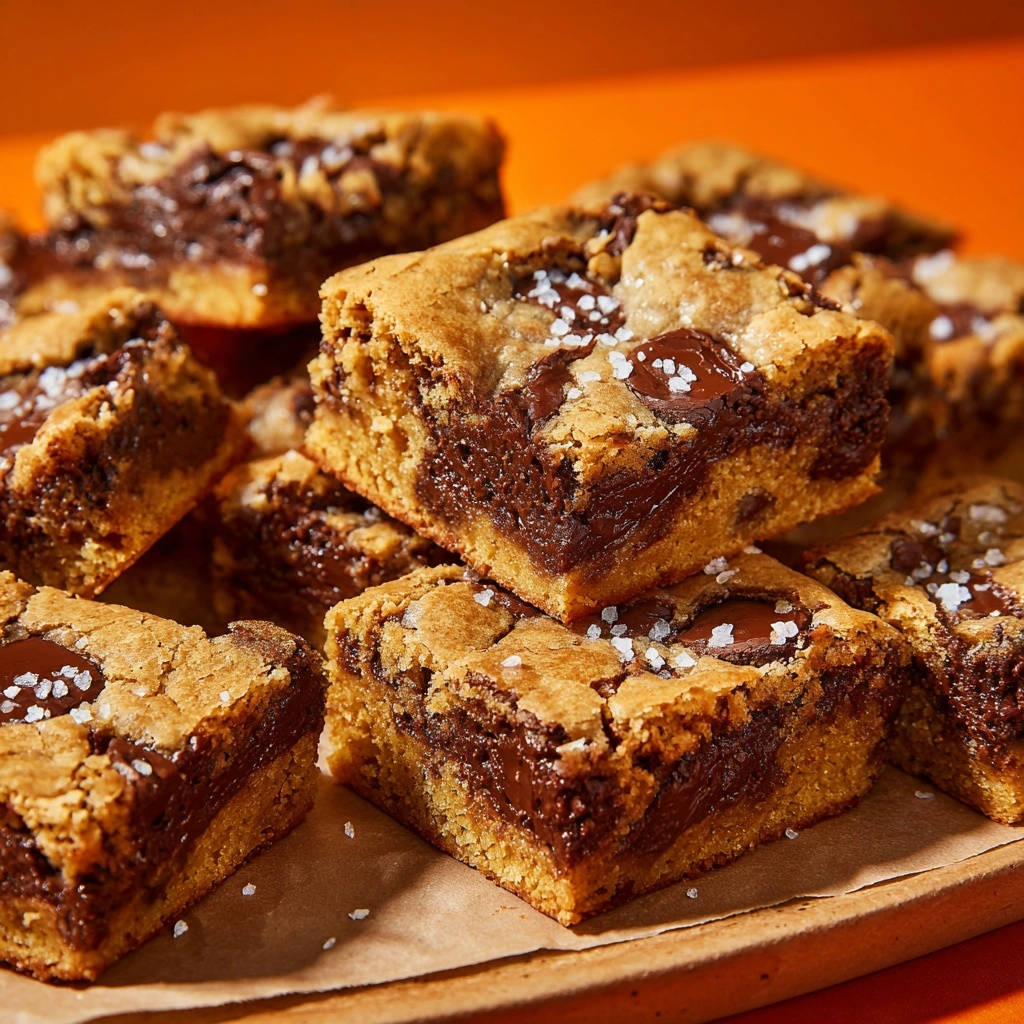
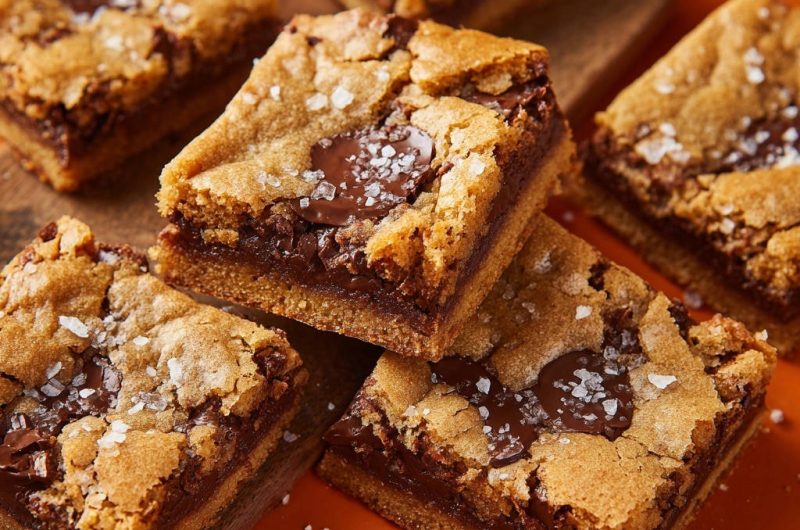
The Stars: Chocolate Chunks and Flaky Sea Salt
Semi-Sweet Chocolate Chunks or Chips: Chunks are preferred for their larger melt pockets, creating irresistible gooey rivers of chocolate throughout the bars. High-quality chocolate makes a noticeable difference.
Flaky Sea Salt: This isn’t just a garnish; it’s a flavor transformer. The delicate crunch and burst of salinity beautifully cut through the sweetness, defining these as true Salted Chocolate Chunk Cookie Bars.
Essential Tools for Your Cookie Bar Creation
Baking Pan and Parchment Paper
A 9×13 inch baking pan is ideal for achieving the perfect thickness for these cookie bars. It ensures an even bake and consistent chewy texture throughout.
Lining the pan with parchment paper, allowing for an overhang, is non-negotiable. This facilitates effortless lifting of the cooled bars and makes for clean, neat cuts.
Mixing Bowls and Whisk
You’ll need both a large bowl for your wet ingredients and a medium bowl for the dry. This separation allows for proper incorporation and prevents overmixing of the flour.
A sturdy whisk is essential for thoroughly combining ingredients like the melted butter and sugars, ensuring a smooth, uniform base.
Basic Measuring Tools
Accurate measuring cups and spoons are paramount in baking. Precise ratios ensure consistent results, preventing issues like overly dry or excessively spread cookie bars.
Your Step-by-Step Guide to Perfect Salted Chocolate Chunk Cookie Bars
- Prepare Your Baking Canvas:
Preheat your oven to 350°F (175°C) to ensure it’s at temperature before baking. Meticulously line your 9×13 inch baking pan with parchment paper, ensuring an overhang on the sides. This simple step is a game-changer for effortless lifting and clean cuts after cooling.
- Melted Butter & Sugar Harmony:
In a large bowl, combine the melted butter with both the packed light brown sugar and granulated sugar. Whisk vigorously until the mixture is perfectly smooth and well combined, creating the essential moist and chewy base for your perfect dessert bars.
- Enrich with Eggs & Vanilla:
Incorporate the eggs one at a time into the butter-sugar mixture, mixing thoroughly after each addition until fully emulsified. This ensures a rich, cohesive dough. Stir in the vanilla extract for a warm, aromatic base that enhances all the other flavors.
- Whisk the Dry Foundation:
In a separate medium bowl, whisk together the all-purpose flour, baking soda, and fine grain salt. This step ensures even distribution of leavening and seasoning, preventing pockets of unmixed ingredients in the finished bars.
- Combine Wet and Dry (Gently!):
Gradually add the dry ingredients to the wet mixture, mixing on low speed or by hand until just combined. Avoid overmixing at all costs; a few flour streaks are perfectly fine and preferred.
Overmixing develops gluten, leading to tough, dense cookie bars, which we want to avoid for that signature chewiness and soft texture.
- Fold in the Chocolatey Goodness:
Gently fold in your semi-sweet chocolate chunks or chips until they are evenly dispersed throughout the batter. You want generous pockets of melted chocolate in every single bite of these gooey chocolate bars!
- Spread, Sprinkle, and Prepare for Bake:
Pour the prepared batter into your parchment-lined pan and spread it evenly to the edges, ensuring a consistent thickness. Finish with a generous sprinkle of flaky sea salt over the top for that delightful sweet-salty contrast and beautiful visual appeal.
- The Critical Bake: Watch for Perfection:
Bake for 25-30 minutes, or until the edges are golden brown and set, but the center still appears slightly soft and gooey. This is the absolute most crucial step for achieving perfect chewiness – resist the urge to overbake!
Remember, the bars will continue to cook and firm up as they cool outside the oven, so trust the visual cues rather than simply the timer.
- Patience Cooling: The Key to Gooey Texture:
Remove the pan from the oven and allow the bars to cool completely in the pan on a wire rack. This slow, undisturbed cooling process is essential for the gooey center to set perfectly, locking in that amazing chewy texture and preventing crumbling.
Cutting warm bars will result in a messy, crumbling experience and a less defined texture; patience truly pays off here.
Expert Tips & Tricks for Ultimate Cookie Bar Success
Mastering the Mix: Preventing Tough Bars
The key to tender, chewy Salted Chocolate Chunk Cookie Bars is gentle mixing once the flour is added. Overworking the dough develops gluten, which leads to a tough, cake-like texture rather than the desired chewiness.
Stop mixing as soon as the dry ingredients are just incorporated; a few small streaks of flour are preferable to an overmixed batter.
The Art of the Bake: When to Pull Them Out
Identifying when your cookie bars are perfectly baked is a skill. Look for edges that are golden brown and appear set, while the very center still seems slightly soft, even a little wobbly when gently jiggled.
Err on the side of underbaking, as residual heat will continue to cook the bars as they cool, achieving that ideal gooey middle.
The Power of Patience: Cooling for Optimal Gooeyness
Allowing the bars to cool completely in the pan is critical for their final texture. This extended cooling period allows the melted chocolate and the sugars in the center to properly set, transforming a hot, liquid center into a perfectly gooey, chewy delight.
Resist the temptation to cut into warm bars, as they will fall apart and lack the signature chewiness.
Elevate with Sea Salt: Why Flaky Matters
Flaky sea salt is more than just a garnish; it’s an essential flavor component of these cookie bars. Its larger crystals provide bursts of salinity and a subtle textural contrast that perfectly balances the sweetness of the chocolate and cookie base.
Unlike fine salt, flaky salt adheres beautifully to the surface, delivering that desirable sweet-salty bite. For another fantastic sweet and salty dessert, try these salted caramel swirl brownies.
Troubleshooting Common Salted Chocolate Chunk Cookie Bar Woes
My Bars Are Dry and Crumbly
The most common culprit for dry, crumbly cookie bars is overbaking. Ensure your oven temperature is accurate and start checking for doneness at the lower end of the recommended baking time.
Also, ensure you’re measuring flour correctly, ideally by weight, as too much flour can also lead to a dry texture.
Why Did My Bars Spread Too Much?
Excessive spreading can occur if your melted butter was too warm when combined with the sugars and eggs. Using room temperature eggs also helps with emulsion.
Inaccurate flour measurement (too little flour) or an expired leavening agent can also contribute to bars spreading more than desired.
The Center Isn’t Gooey Enough
If your cookie bars lack that irresistible gooey center, it’s almost certainly due to overbaking. Trust the visual cues of slightly golden edges and a still-soft middle.
Even a few extra minutes in the oven can transform gooey into cakey.
My Bars are Too Cakey
A cakey texture, rather than chewy, often results from overmixing the batter once the flour is added. This develops the gluten, leading to a lighter, more crumbly crumb instead of a dense, chewy one.
Ensure you mix just until combined, and avoid excessive amounts of baking soda, which can also contribute to a cake-like rise.
Serving, Storing, and Enjoying Your Delicious Creation
The Best Ways to Serve Your Bars
Salted Chocolate Chunk Cookie Bars are delightful at room temperature, allowing their complex flavors to shine. For an extra indulgent treat, serve them slightly warm with a scoop of vanilla bean ice cream or a drizzle of caramel sauce.
These perfect dessert bars are wonderful for gatherings, bake sales, or simply as a comforting snack with a cup of coffee.
How to Store for Lasting Freshness
To maintain their optimal chewiness and freshness, store your cooled cookie bars in an airtight container at room temperature. They will keep beautifully for 3-4 days.
If stacking, place a sheet of parchment paper between layers to prevent sticking and preserve their texture.
Make-Ahead & Freezing Options
The prepared dough can be covered and refrigerated for up to 2 days before baking, allowing you to prep ahead. Once baked and completely cooled, these chewy cookie bars freeze exceptionally well.
Wrap individual bars tightly in plastic wrap, then place them in a freezer-safe bag or container for up to 3 months. Thaw at room temperature for a quick, delicious treat.
Frequently Asked Questions About Salted Chocolate Chunk Cookie Bars
Can I use different types of chocolate?
Absolutely! While semi-sweet chocolate offers a classic balance, feel free to experiment. A mix of milk chocolate and dark chocolate chunks can create a richer, more nuanced flavor. For more chocolatey inspiration, explore our easy chocolate lava cake recipe.
Is it okay to skip the flaky sea salt?
You can, but it will fundamentally change the character of these Salted Chocolate Chunk Cookie Bars. The flaky sea salt is crucial for that signature sweet-salty contrast and textural pop.
Without it, they will still be delicious chocolate chunk cookie bars, but they’ll lose the unique element that makes them truly special.
How do I make these gluten-free?
To make these cookie bars gluten-free, substitute the all-purpose flour with a high-quality 1:1 gluten-free baking flour blend that contains xanthan gum. The texture might be slightly different, but the overall flavor and chewiness will still be fantastic.
Can I make these in a different sized pan?
Yes, you can use a different sized pan, but you’ll need to adjust the baking time. A smaller pan (e.g., 8×8 inch) will yield thicker bars and require a longer baking time, while a larger pan might bake faster.
Always rely on the visual cues for doneness (golden edges, slightly soft center) rather than strictly adhering to the original bake time.
Ready to Bake? Share Your Salted Chocolate Chunk Cookie Bars Masterpiece!
Now that you have all the insider tips and tricks, you’re perfectly equipped to bake the most incredible Salted Chocolate Chunk Cookie Bars your kitchen has ever seen. We encourage you to dive in and experience the joy of these perfectly gooey, chewy, and utterly irresistible treats.
If you love baking delightful bars, you might also enjoy our recipe for blueberry crumble bars for another fantastic dessert. Don’t forget to share your baking journey and results with us! Tag us on social media or leave a comment below with your thoughts and any creative twists you added. Happy baking!
Chocolate Chunk Cookie Bars
Course: DessertCuisine: AmericanDifficulty: easy12
bars15
minutes25
minutes450
kcal40
minutesDiscover the simple trick to perfectly moist and chewy cookie bars with an irresistible gooey center, every single time. This easy recipe ensures ideal texture, preventing dry, crumbly, or cakey results. You’re going to love how easy it is to get that ideal texture!
Ingredients
1 cup (2 sticks) unsalted butter, melted
1 1/2 cups packed light brown sugar
1/2 cup granulated sugar
2 large eggs
2 teaspoons vanilla extract
2 1/4 cups all-purpose flour
1 teaspoon baking soda
1/2 teaspoon salt
1 1/2 cups semi-sweet chocolate chunks or chips
1 tablespoon flaky sea salt, for sprinkling
Directions
- Preheat your oven to 350°F (175°C). Line a 9×13 inch baking pan with parchment paper, leaving an overhang on the sides for easy lifting.
- In a large bowl, whisk together the melted butter, brown sugar, and granulated sugar until well combined and smooth.
- Beat in the eggs one at a time, mixing well after each addition. Stir in the vanilla extract.
- In a separate medium bowl, whisk together the flour, baking soda, and salt.
- Gradually add the dry ingredients to the wet ingredients, mixing on low speed or by hand until just combined. Be careful not to overmix; overmixing can lead to tough bars. A few streaks of flour are okay.
- Fold in the chocolate chunks until evenly distributed.
- Pour the batter into the prepared baking pan and spread it evenly. Sprinkle generously with flaky sea salt.
- Bake for 25-30 minutes, or until the edges are golden brown and set, but the center still looks slightly soft and gooey. This is the critical step for chewiness! The bars will continue to cook and set as they cool. Overbaking will result in dry bars.
- Remove the pan from the oven and let the bars cool completely in the pan on a wire rack before lifting them out using the parchment paper overhang and cutting them into squares. This slow cooling helps the gooey center set perfectly, locking in that amazing chewy texture.
Notes
- Do not overbake; the center should still look slightly soft for chewiness. Cool completely in the pan to achieve a perfect gooey center and amazing chewy texture.


