
For years, I struggled with single-skillet rice dishes, often ending up with a sticky, gummy mess instead of the fluffy, separate grains promised by recipes. My personal breakthrough came through perfecting a simple, two-step rinse-and-toast method, and it is the secret that makes this Savory Chicken and Yellow Rice Skillet reliably perfect every single time.
This recipe is built on deep flavor layering from spicy sausage and smoked paprika, ensuring a hearty, satisfying weeknight meal that is both exceptionally easy and deliciously complex.
Why This Savory Chicken and Yellow Rice Skillet is Your New Weeknight Hero
The Single-Skillet Solution for Easy Clean-Up
There is immense satisfaction in creating a full, nutritious dinner using only one piece of cookware, and this recipe is specifically designed to maximize that efficiency.
Starting and finishing in the same large, deep skillet or Dutch oven minimizes cleanup time, making this an ideal choice for busy weeknights when time is scarce.
Flavor Layering: Beyond Basic Chicken and Rice
The flavor profile here moves far beyond standard chicken and rice thanks to intentional layering, beginning with a heavy sear on the chicken to build a rich fond on the bottom of the pan.
For more ideas on bold flavors, explore this guide to Mediterranean mixed grill.
We then render the fat from spicy cured sausage, using that flavorful oil to toast the rice and bloom the earthy spices like smoked paprika and oregano, guaranteeing profound savory depth.
Fast & Reliable: A Sub-Hour Meal That Delivers
Clocking in at just under an hour, the hands-on time for this recipe is relatively low once the initial searing and prepping are complete.
The structured cooking method is designed for reliability, ensuring perfect rice texture and moist chicken without constant monitoring, even when you are rushed.
The Building Blocks: Ingredients and Flavor Decisions
Protein Power: Why Chicken Thighs Are Non-Negotiable Here
Boneless, skinless chicken thighs are the superior choice for this skillet dish due to their higher fat content and connective tissue.
Unlike chicken breasts, thighs remain incredibly moist and tender through the steaming process, preventing the dry, chewy texture that often plagues one-pot meals.
Crucially, ensure the chicken cubes are thoroughly patted dry before searing; this is necessary to achieve a deep brown crust instead of gray steaming.
The Golden Hue: Saffron Versus Turmeric
Saffron threads provide the classic, deeply floral flavor and a stunning red-gold color that defines authentic yellow rice dishes, but they are expensive.
If substituting, use ground turmeric; it delivers a brilliant yellow color and earthy flavor, but use slightly more to compensate for its milder aromatic impact.
The Heat Element: Spicy Sausage and Rendered Fat
Using a spicy cured sausage, such as Spanish chorizo or a spicy Andouille, contributes both a spicy kick and essential savory depth.
Most importantly, as the sausage browns, it releases flavorful, seasoned fat into the pan; this rendered fat is vital for successfully toasting and sealing the rice grains in the next step.
The Aromatic Foundation: Smoked Paprika, Oregano, and Garlic
Smoked paprika is non-negotiable for achieving that signature smoky, reddish-orange color and deep savory character that distinguishes this dish.
Dried oregano and fresh garlic provide the necessary herbaceous backbone, blooming quickly in the hot oil to release their potent aromas into the skillet base.
Stop the Mush: Mastering the Two-Step Method for Fluffy Rice
Step 1: The Essential Rinse to Eliminate Surface Starch
Long-grain white rice is coated in loose, pulverized starch from milling, which dissolves into the cooking liquid and creates a sticky, gummy texture.
To prevent this, place the rice in a fine mesh sieve and run cold water over it for a full 60 seconds, or until the water draining from the bottom is completely clear.
Step 2: Sautéing and Toasting (The “Pillaf” Technique)
After rinsing, the rice must be thoroughly dried and then sautéed in the seasoned oil for about three minutes, a technique known as toasting or the pilaf method.
This process flash-dries the exterior of each grain and seals it, preventing the grain from cracking or absorbing too much liquid too quickly during the simmering phase.
You are looking for a matte, slightly translucent edge on the grains, achieved through constant stirring over medium heat to prevent burning.
The Golden Rule of Steaming: Why You Should Never Stir
Once the hot broth is added and the lid is sealed, you must resist the temptation to stir the rice mixture under any circumstances.
Stirring releases the starches that you worked so hard to seal, instantly turning your fluffy, separate grains into a sticky, dense mess.
Stirring also prevents the necessary steam pocket from forming and disrupts the delicate layering of water, rice, and heat needed for even cooking.
The Cooking Flow: A Step-by-Step Guide to Skillet Perfection
-
Searing the Chicken and Building the Foundation:
Ensure your skillet is hot and the chicken pieces are dry before adding the oil; high heat guarantees a proper sear (browning) and creates the flavorful fond necessary for depth.
Sear the chicken for about 6 minutes, turning often, until browned but not cooked through, then remove and reserve it-it will finish cooking later during the steam phase.
-
Rendering the Sausage Fat and Aromatics:
Add the sliced cured sausage to the hot skillet and cook for approximately 5 minutes until the edges are crispy and sufficient fat has melted into the pan.
Reduce the heat to medium before adding the onions, followed by the garlic and spices; cook the aromatics for exactly one minute until they are intensely fragrant, blooming their oils into the cooking base.
-
The Rinse and Toast: Integrating the Rice:
Perform the crucial two-step technique now: rinse the 1.5 cups of rice under cold water until clear, then add the damp rice to the seasoned fat in the skillet.
Sauté the rice for a full 3 minutes, stirring constantly to toast the grains and ensure they are thoroughly coated in the spice and sausage fat mixture.
-
Liquid Addition and Final Assembly:
Pour the 3 cups of HOT chicken broth over the rice, immediately scraping the bottom of the pan to dislodge any browned bits (deglazing) which adds more flavor.
Bring the skillet mixture to a rapid boil, then immediately turn the heat down to the absolute lowest setting, distributing the reserved chicken and sausage pieces over the top of the rice, and DO NOT STIR.
-
The Dual-Phase Steam: Cooking and Resting:
Cover the skillet tightly and allow the mixture to simmer undisturbed for precisely 18 minutes; this is the initial cooking phase.
After 18 minutes, turn the heat off completely, but leave the lid sealed for an additional 10 minutes; this resting phase allows the residual heat to steam the rice evenly, ensuring no grains are hard or dry.
-
Fluffing and Serving:
After the rest period, remove the lid and gently fluff the rice using a fork, which lightly separates the grains without crushing them.
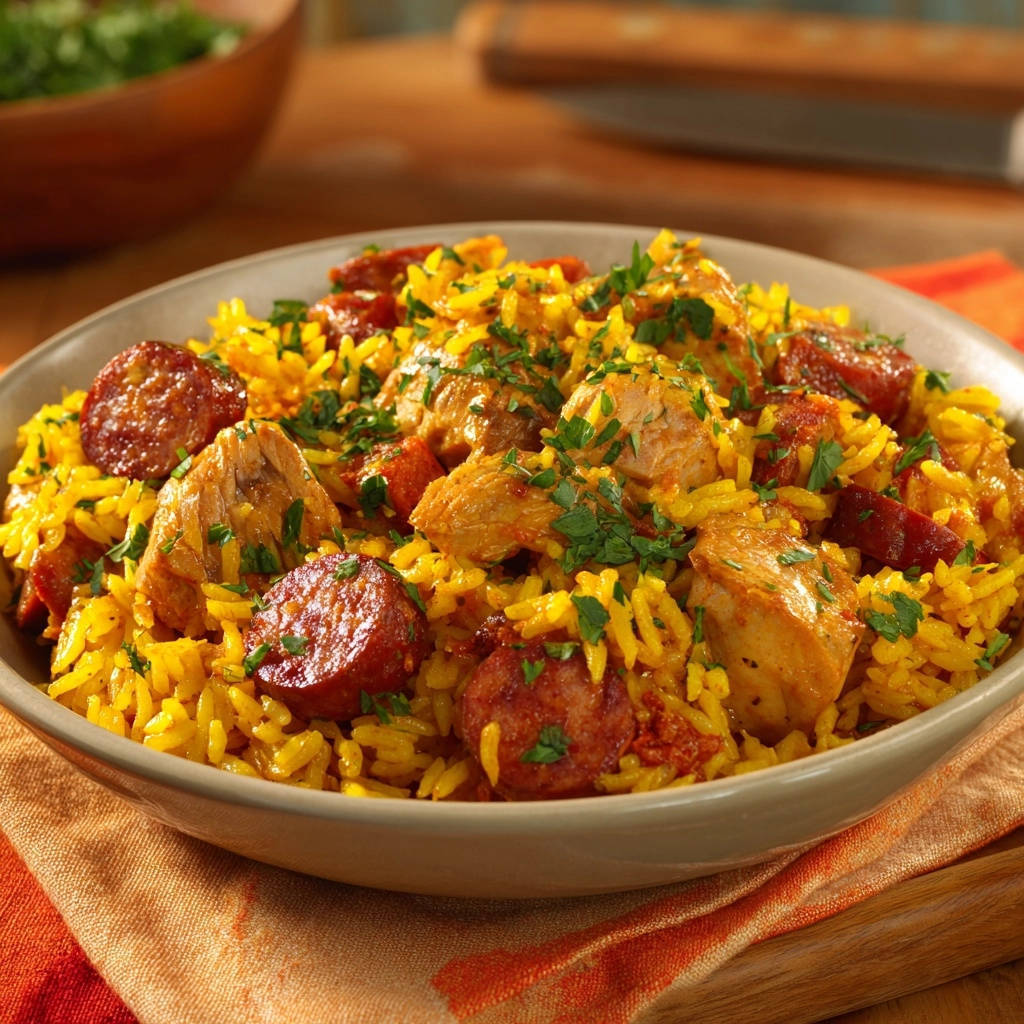
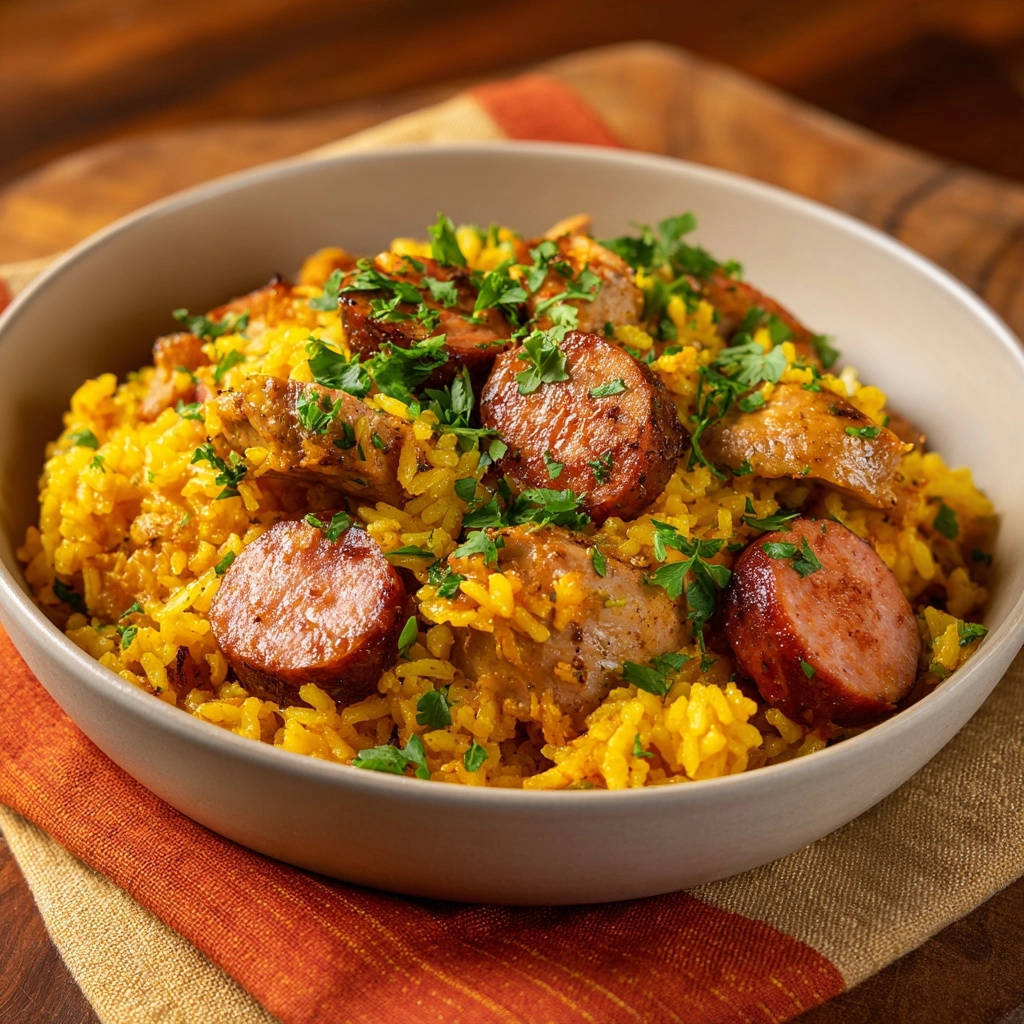
Gently fold the chicken and sausage into the rice and garnish generously with fresh chopped parsley to add a bright, fresh contrast to the rich Savory Chicken and Yellow Rice Skillet.
Chef’s Secrets: Elevating Your Savory Chicken and Yellow Rice Skillet Game
Temperature Control is King: For perfect steaming, the simmer must be minimal. If your lowest setting is still too high, use a heat diffuser mat placed between the burner and the skillet to ensure the rice on the bottom does not scorch.
Pre-heating the Broth: Always use hot or boiling broth. Adding cold liquid drastically drops the temperature of the skillet, which stops the starch setting process and leads to longer, uneven cooking times.
The Lid Seal: Maximum steam is required for fluffy rice. If your lid allows steam to escape, tuck a clean kitchen towel under the lid before sealing to create a tighter gasket, ensuring the edges of the towel are nowhere near the heat source.
Adding Vegetables: If incorporating quick-cooking additions like frozen peas, chopped green onions, or bell peppers, they should be added during the last 5 minutes of the covered simmering time.
Gently scatter them on top of the rice before the final 10-minute rest, allowing the steam to lightly cook them without stirring.
Did Something Go Wrong? Troubleshooting Common Rice Skillet Issues
The Rice is Cooked on Top, but Still Hard on the Bottom
This usually indicates that the heat was too low to generate sufficient steam, or the pot was uncovered too early, releasing necessary moisture.
Add 1/4 cup of boiling water or broth, place the lid back on tightly, and steam the dish on the lowest heat setting for an additional 5 minutes.
The Rice is Sticky and Mushy
The rice was either not rinsed properly to remove the surface starch, or, more likely, the rice was stirred after the liquid was added.
While mushy rice cannot be fully reversed, you must strictly adhere to the two-step rinsing and toasting technique for a flawless outcome in future attempts at this Savory Chicken and Yellow Rice Skillet.
The Meat Feels Dry
If the chicken is dry, it was either seared for too long initially, or the chicken pieces were too small and overcooked during the steaming phase.
Remember, the purpose of the initial sear is only to brown the exterior and build flavor; the meat should be removed while still partially raw, as the 28 minutes of steaming is what gently finishes the cooking process.
Quick Answers: Common Questions About Yellow Rice Dishes
Can I Make This Recipe Ahead of Time?
The aromatic base (seared chicken, cooked sausage, sautéed onions) can be prepared up to two days ahead and stored separately in the refrigerator.
However, the perfectly fluffy texture of the yellow rice is always best immediately following the final 10-minute resting period, so cook the rice right before serving.
Is it possible to use Brown Rice instead?
Yes, but brown rice requires significantly more liquid and a longer cooking time. You would need to increase the broth to approximately 3.75 cups and extend the simmering time to 45-50 minutes.
The rinsing and toasting method remains essential, but the overall result will have a heartier, chewier texture than the traditional long-grain white rice.
What Are the Best Side Dishes for This Savory Skillet?
Because the Savory Chicken and Yellow Rice Skillet is rich and hearty, pair it with light, contrasting sides to balance the meal.
A crisp green salad dressed simply with a bright vinaigrette, a side of fresh sliced avocado, or light seasoned black beans are excellent pairings.
What to Serve With Your Chicken Skillet
Round out your meal with these complementary dishes that go well with chicken and rice.
- For a fresh vegetable option, try these golden zucchini fritters, offering a lovely crispness alongside your chicken.
- To add more earthy flavors, consider pairing your chicken skillet with roasted garlic mushrooms and onions for a savory complement.
Ready to Impress? Share Your Skillet Masterpiece!
I hope this deep dive into the techniques behind guaranteed fluffy rice inspires you to make this Savory Chicken and Yellow Rice Skillet tonight.
Mastering the crucial rinse-and-toast method will not only perfect this dish but elevate all your future one-pot rice creations, delivering satisfying, separate grains every time. I encourage you to try the recipe and share your success!
If you enjoy the fluffy rice technique here, you’ll also appreciate the similar approach found in creamy golden chicken.

Chicken and Yellow Rice Skillet
Course: Main CourseCuisine: InternationalDifficulty: easy4
servings15
minutes40
minutes650
kcal55
minutesThis single-skillet recipe guarantees perfectly fluffy, separate rice grains every time, eliminating the dreaded mushy mess. Featuring seasoned chicken and savory chorizo, this dish is packed with flavor. The simple rinse-and-toast technique is the secret to weeknight success.
Ingredients
1.5 pounds boneless, skinless chicken thighs, cut into 1 inch cubes
6 ounces spicy cured sausage (like chorizo), sliced into 1/4 inch thick rounds
2 tablespoons olive oil
1 medium yellow onion, diced
3 cloves garlic, minced
1.5 cups long grain white rice (see directions below)
1/2 teaspoon saffron threads or 1 teaspoon ground turmeric
1 teaspoon smoked paprika
1/2 teaspoon dried oregano
3 cups chicken broth, hot
Salt and black pepper to taste
1/4 cup fresh parsley, chopped, for garnish
Directions
- Prep the Meat. Pat the chicken cubes completely dry and season liberally with salt and pepper. Heat 1 tablespoon of olive oil in a large, deep skillet or Dutch oven over medium high heat. Sear the chicken until browned on all sides, about 6 minutes. Remove the chicken and set aside.
- Cook the Sausage and Build the Base. Add the sliced cured sausage to the skillet and cook until it is nicely browned and has released its oil, about 5 minutes. Remove the sausage and set aside, leaving the rendered fat in the pan. Add the remaining 1 tablespoon of olive oil, if necessary. Reduce the heat to medium and add the diced onion. Cook until softened, about 5 minutes. Add the minced garlic, saffron or turmeric, smoked paprika, and oregano. Cook for 1 minute until fragrant.
- The Fluffiness Secret: Rinse and Toast. This is the crucial step for preventing gummy rice. Place the 1.5 cups of rice in a fine mesh sieve and rinse it thoroughly under cold running water for 60 seconds until the water runs clear. Add the rinsed rice to the skillet with the seasoning and onion mixture. Sauté the rice for 3 minutes, stirring constantly. This toasting process seals the starch and prevents the grains from sticking together later.
- Add Liquid and Cook. Pour the hot chicken broth over the rice. Scrape the bottom of the pan to dislodge any stuck bits. Bring the mixture to a rapid boil, then immediately reduce the heat to the lowest possible setting. Distribute the reserved chicken and sausage evenly over the top of the rice mixture. DO NOT STIR THE RICE from this point forward.
- Steam to Perfection. Cover the skillet tightly with a lid and simmer undisturbed for 18 minutes. After 18 minutes, turn off the heat but leave the lid on for an additional 10 minutes. The residual steam will finish cooking the rice and meat without drying out or burning the bottom.
- Serve. Remove the lid. Gently fluff the rice with a fork, incorporating the meat into the grains. Garnish generously with fresh parsley and serve immediately.
Notes
- The secret to the perfectly fluffy rice is rinsing the grains thoroughly and then toasting them in the pan before adding liquid.


