

The single greatest frustration when perfecting a Slow-Cooked Texas-Style Beef Brisket is spending hours developing a rich, black crust only to have it flake off when you slice it.
This recipe provides the professional secret-a simple, undetectable binder-that guarantees a flawless, durable bark every time, transforming your home-cooked brisket into a pitmaster-quality centerpiece.
Cracking the Pitmaster Code: Why This Brisket Bark Won’t Flake
The Common Challenge: Achieving Durable Bark
Bark flaking occurs because a heavy layer of coarse rub struggles to bond directly with slick, moist beef fibers.
We need a sticky foundation that dries out and locks the seasoning blend permanently to the meat during the initial low-and-slow phase, ensuring a deep, peppery texture.
Yellow Mustard: The Secret “Bark Anchor” Binder
Yellow mustard is the perfect adhesive, acting as a crucial binder that ensures the heavy rub adheres completely to the meat fibers.
Do not fear the flavor; the volatile compounds in the mustard completely evaporate during the 12+ hour cook, leaving behind a stable, crisp foundation only.
The Essential Dry Prep: Setting the Stage for the Rub
Patting the brisket completely dry using paper towels before applying the binder is critical.
Excess surface moisture prevents the binder and subsequent rub from forming an optimal, solid crust.
Building Blocks of Flavor: Essential Ingredients for the Perfect Brisket
Selecting and Prepping the Brisket Flat
Choose a high-quality, five-pound brisket flat; the flat cut is leaner, easier to slice consistently, and perfect for achieving this specific bark texture.
Ensure that if there is a fat cap, you trim it down to a thin, uniform layer, roughly one-quarter inch thick, for moisture retention without excessive greasiness.
Creating the Ultimate Texas Rub: Coarse Grind Spices
The texture of the bark relies heavily on using coarse ground black pepper (a full 1/2 cup) to create that signature rugged, peppery crust.
The combination of coarse kosher salt and smoked paprika is critical, adding deep flavor and a rich mahogany color to the exterior.
The optional teaspoon of cayenne pepper adds a very slight, traditional kick without overpowering the fundamental beef flavor.
Understanding the Role of Liquid (Beef Broth)
A half-cup of beef broth is introduced during the wrap phase (the Texas Crutch).
This liquid creates a high-humidity environment within the sealed foil packet, preventing the meat from drying out during the crucial final hours of cooking.
Essential Gear for Low and Slow Excellence
The Unsung Hero: Oven Thermometer vs. Meat Thermometer
An oven thermometer is vital because residential ovens are notoriously inaccurate; verifying your 225°F setting is the key to a true slow cook.
A reliable internal probe meat thermometer that remains in the brisket allows you to accurately monitor the internal temperature without opening the oven door, ensuring you hit the critical 200°F mark.
Must-Have Tools for Brisket Handling
Wire Rack and Baking Sheet: Essential for airflow and preventing the brisket from stewing in its own juices during the initial phase.
Heavy-Duty Aluminum Foil or Butcher Paper: Foil traps moisture and heat aggressively, speeding up the cook; butcher paper offers a slightly slower cook but helps preserve a crunchier bark texture.
The Low and Slow Method: Achieving Tender Slow-Cooked Texas-Style Beef Brisket
- Pat Dry and Apply Binder:
Ensure the meat is completely dry before applying the yellow mustard binder thinly across all surfaces.
This step anchors the massive amount of rub required for a proper Texas bark.
- Generous Rub Application:
Apply the dry rub mixture (pepper, salt, paprika, etc.) heavily and press it firmly into the mustard binder.
Allow the brisket to rest at room temperature for 30 minutes while the oven preheats to 225°F. This crucial rest allows the salt to begin its work.
- The Unwrapped Cook:
Place the brisket on a wire rack set over a baking sheet, typically fat side up (if applicable to the flat). Cook undisturbed at 225°F for exactly 6 hours.
Do not open the oven door. This extended, low-temperature cook dries the surface and sets the permanent, rigid bark.
- Checking Temperature and Texture:
After 6 hours, the internal temperature should be around 150°F. The bark should be dark, firm, and fully set.
- The Tight Wrap (Adding Moisture):
Place the beef broth onto the foil (or paper), then place the brisket on top. Wrap the brisket tightly, sealing all edges completely.
This wrap ensures the meat pushes through the temperature ‘stall’ (which often occurs around 150°F) and locks in moisture for the remaining cook.
- The Completion Cook:
Return the wrapped brisket to the 225°F oven and continue cooking until the internal temperature reaches 200°F to 205°F.
The meat should feel incredibly tender when probed-it should offer no resistance, like pushing a probe into butter.
For another take on achieving remarkable crispiness, explore these crispy spiced roasted chickpeas.
Phase 1: Preparing the Meat and Applying the Anchor
Phase 2: Initial Bark Setting (The 6-Hour Rule)
Phase 3: The Steam Wrap and the Stall Solution
Phase 4: Hitting the Perfect Internal Temperature (200°F to 205°F)
Do Not Skip This Step: Maximizing Juiciness Through the Two-Hour Rest
The Science of Juice Redistribution
During the long cook, muscle fibers contract and push moisture toward the center and surface.
Resting allows the muscle fibers to relax slowly, absorbing the released juices back into the meat cells, which prevents the brisket from “bleeding out” when sliced.
Insulating for Success: Coolers and Towels
Immediately after removing the brisket, keep it completely sealed in its cooking foil or paper.
Transfer the sealed brisket to an empty, dry cooler and fill the remaining space with clean towels to maintain the high internal temperature for the full two hours.
This process of insulating the sealed brisket allows the internal temperature to slowly drop, ensuring maximum moisture retention.
Chef’s Notes: Troubleshooting & Mastering Your Brisket Technique
Handling the Brisket Stall: When to Wrap
The “stall” is a point (usually between 150°F and 165°F) where evaporative cooling stops the internal temperature rise for hours, frustrating many cooks.
The steam wrap is timed for the 6-hour mark, when the bark is set, allowing the added moisture and trapped heat to efficiently push the temperature past the stall.
Preventing a Dry Brisket: Monitoring Temperature
The difference between a juicy, tender brisket and a dry one is only a few degrees; never let the internal temperature climb above 205°F.
Targeting the 200°F to 205°F range ensures that the tough connective tissues (collagen) have fully rendered into gelatin, guaranteeing melt-in-your-mouth tenderness.
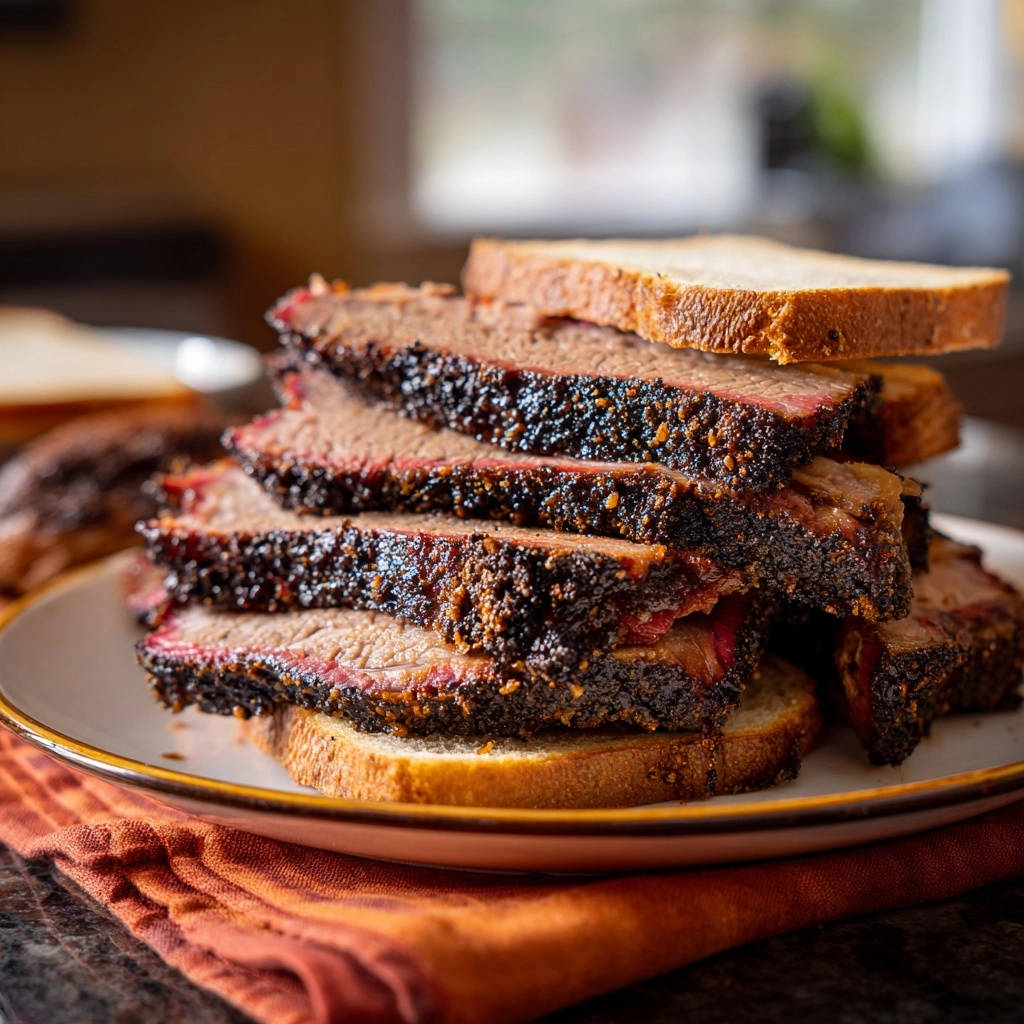
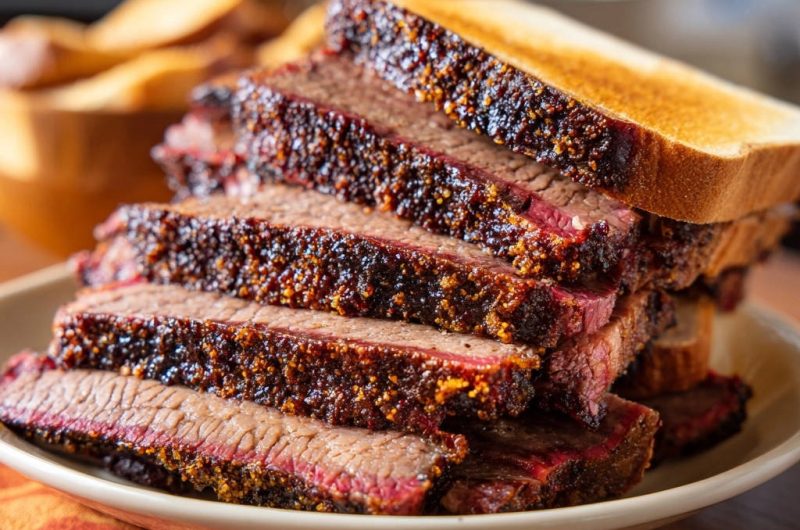
How to Slice Brisket Against the Grain (A Visual Guide)
Slicing against the grain cuts the long, tough muscle fibers short, which is the final, absolute key to achieving perceived tenderness, regardless of how perfectly it was cooked.
Look closely at the cooled brisket flat; the parallel lines of the meat fibers should be clearly visible. Place your knife perpendicular to those lines for slicing.
The Perfect Plate: Serving Suggestions and Pairings
Utilizing the Reserved Au Jus
After the rest, unwrap the brisket and reserve all the accumulated liquid (au jus).
Skim any excess fat from the liquid and serve the warm au jus in a small bowl for dipping or pouring over the sliced Slow-Cooked Texas-Style Beef Brisket to enhance moisture.
Classic Texas Sides for the Ultimate Spread
Coleslaw: A cool, crisp, vinegary slaw to cut the richness.
Potato Salad: Creamy, classic side dish.
Pickled Goods: Including pickled onions and jalapeños to balance the richness of the Slow-Cooked Texas-Style Beef Brisket.
Storage and Reheating Leftover Brisket
The best practice is to refrigerate leftover brisket whole or in thick pieces to minimize surface area exposure.
To reheat, place the brisket slices with a tablespoon of reserved au jus in foil, seal tightly, and warm slowly in a 300°F oven until just heated through.
Slow-Cooked Brisket FAQs: Quick Answers to Common Questions
Should I Trim All the Fat Cap Off the Flat?
No, you should leave a thin, uniform layer, approximately 1/4 inch thick.
This layer provides some moisture insurance and flavor during the exceptionally long cook, but too much fat can prevent bark formation.
Can I Substitute the Yellow Mustard Binder?
You can substitute with a thin layer of hot sauce or olive oil, but yellow mustard is superior.
Mustard offers the best balance of viscosity and moisture content to anchor the thick rub without introducing an unwanted flavor profile.
Is There a Faster Way to Cook the Brisket?
For a truly tender, fall-apart brisket, there is no substitute for low and slow cooking.
Rushing the process by increasing the heat will result in dry, tough meat because the internal collagen requires many hours at low temperatures (below 225°F) to fully break down.
What If My Internal Temperature Stops Rising?
This is the brisket stall, a normal occurrence in slow cooking.
The solution is the steam wrap described in Phase 3, which traps heat and moisture, quickly driving the internal temperature higher.
Your Next Brisket Masterpiece Awaits
The secret to a competition-worthy Slow-Cooked Texas-Style Beef Brisket lies in mastering a few simple techniques, particularly utilizing that yellow mustard binder to secure a flawless bark.
Trust the process, embrace the long rest, and prepare for the most tender, flavorful barbecue you’ve ever made; we encourage you to share your results and tag us when you slice into your masterpiece!
Beef Brisket
Course: Main CourseCuisine: AmericanDifficulty: hard8
servings20
minutes12
hours450
kcal870
minutesStop your brisket bark from flaking off! This pitmaster method uses a simple binder (yellow mustard) to ensure a deep, dark, peppery crust adheres perfectly to the meat during low-and-slow cooking. This foolproof recipe guarantees a tender, professional-quality Texas-style brisket.
Ingredients
1 5-pound beef brisket flat (trimmed)
2 tablespoons yellow mustard
1/2 cup coarse ground black pepper
1/4 cup coarse kosher salt
1 tablespoon smoked paprika
1 tablespoon granulated garlic powder
1 teaspoon cayenne pepper (optional)
1/2 cup beef broth
Directions
- Prepare the Brisket and the Binder: Pat the beef brisket flat completely dry using paper towels. This is crucial for bark formation. In a small bowl, combine the pepper, salt, smoked paprika, garlic powder, and cayenne (if using) to create your rub.
- Apply the Bark Anchor (The Pain Point Solution): Apply a thin, even layer of yellow mustard over all surfaces of the brisket. Do not worry; the mustard flavor cooks off completely. The purpose of the mustard is to act as a crucial binder that ensures the heavy rub adheres fully to the meat fibers, creating a stable foundation for the bark that will not flake off during cooking or slicing.
- Rub Application: Generously and thoroughly coat the brisket with the dry rub, pressing the seasoning into the mustard layer to create a thick crust. Let the brisket sit at room temperature for 30 minutes while you preheat your oven to 225 degrees F.
- Initial Cooking Phase: Place the brisket on a wire rack set over a baking sheet (fat side up, if applicable). Place in the preheated oven and cook low and slow for 6 hours. During this phase, the bark will dry out and set hard. Do not open the oven door during this time.
- The Steam Wrap: After 6 hours, the internal temperature should be around 150 degrees F and the bark should be firm and dark. Remove the brisket. Place the beef broth in the center of two large sheets of heavy-duty aluminum foil (or unbleached butcher paper). Place the brisket on top of the broth and wrap it tightly, sealing all edges to trap the moisture.
- Finishing the Cook: Return the wrapped brisket to the 225 degree F oven. Continue cooking until the internal temperature reaches 200 to 205 degrees F. This usually takes another 6 to 8 hours. The meat should feel tender and jiggle when poked.
- Crucial Rest Time: Remove the foil-wrapped brisket from the oven. Keep the wrapping completely sealed. Transfer the brisket to an empty cooler or wrap it in a clean towel and place it on the counter. Allow the brisket to rest for a minimum of 2 hours. This resting period redistributes the juices and further locks the bark structure in place.
- Slice and Serve: After resting, unwrap the brisket, reserving any remaining liquid (au jus). Slice the brisket thinly, against the grain, and serve immediately on toasted bread or rolls.
Notes
- Do not skip the 2-hour rest period; this is essential for juice redistribution and setting the bark.


