
For years, I found myself making white chicken chili that was good, but never truly great-it often lacked that deep, satisfying flavor. Then, a simple yet powerful technique transformed my recipe, elevating it to an incredibly aromatic and complex dish every single time. This ultimate White Chicken Chili recipe delivers rich, comforting warmth perfect for any gathering or cozy night in.
Why This White Chicken Chili Will Become Your Go-To Recipe
The “Bloom the Spices” Secret for Deep Flavor
The secret to this chili’s unparalleled depth lies in blooming the spices. By lightly toasting cumin, oregano, and chili powder in hot oil with aromatics, their essential oils are released, intensifying their flavor and aroma significantly.
If you enjoy the rich chicken base here, you’ll also appreciate the depth of flavor in this creamy white chicken chili.
This critical step creates a robust, fragrant foundation that permeates the entire dish. It ensures your chili boasts a complex, layered taste, far beyond what simply adding raw spices could achieve.
Quick Comfort: Deliciousness in Just 45 Minutes
Despite its rich flavor, this white chicken chili comes together in just 45 minutes from start to finish. This makes it an ideal choice for busy weeknights when you crave something satisfying but don’t have hours to spend in the kitchen.
The balance of quick prep and deep flavor means you can enjoy a hearty, homemade meal without compromise. It’s perfect for families, singles, or anyone seeking efficiency in their cooking.
A Versatile Favorite for Any Occasion
This creamy chicken chili is incredibly versatile and always a crowd-pleaser. It easily adapts to different palates and dietary needs, making it suitable for family dinners, casual get-togethers, or meal prepping for the week.
Whether you’re serving a small group or a larger party, this hearty white chili recipe is sure to impress. It’s a comforting meal that everyone will enjoy.
Gather Your Essentials: Key Ingredients for Flavor Success
Building Blocks: Aromatics and Green Chilies
Onion and garlic form the essential aromatic base, providing a sweet and pungent foundation for our flavorful chili. Their slow sautéing extracts maximum flavor.
Diced green chilies, especially fire-roasted, add a smoky depth and mild warmth. Fire-roasted varieties introduce a nuanced, charred note that elevates the chili’s complexity.
The Spice Symphony: Cumin, Oregano, and a Kick
Ground cumin provides an earthy, warm flavor, quintessential to chili. Dried oregano contributes a herbaceous, slightly peppery note, rounding out the spice profile.
Chili powder adds a foundational chili flavor without overwhelming heat. For those who enjoy a little extra warmth, cayenne pepper offers an optional but impactful kick, easily adjustable to taste.
Hearty Foundations: Beans, Corn, and Shredded Chicken
Cannellini beans lend a creamy texture and are a fantastic source of plant-based protein, adding substance to each spoonful. Rinsing them well removes excess starch and sodium.
Sweet corn provides bursts of natural sweetness and delightful texture, contrasting beautifully with the savory elements. Cooked shredded chicken makes this a protein-packed and satisfying meal.
The Creamy Finish: Heavy Cream or Dairy Alternatives
Heavy cream or full-fat milk enriches the chili with luxurious body and a smooth, velvety finish. It transforms the broth into a wonderfully creamy experience.
If opting for plain Greek yogurt, stir it in just before serving. This prevents curdling, ensuring the yogurt’s tanginess and creaminess integrate perfectly without affecting the chili’s texture.
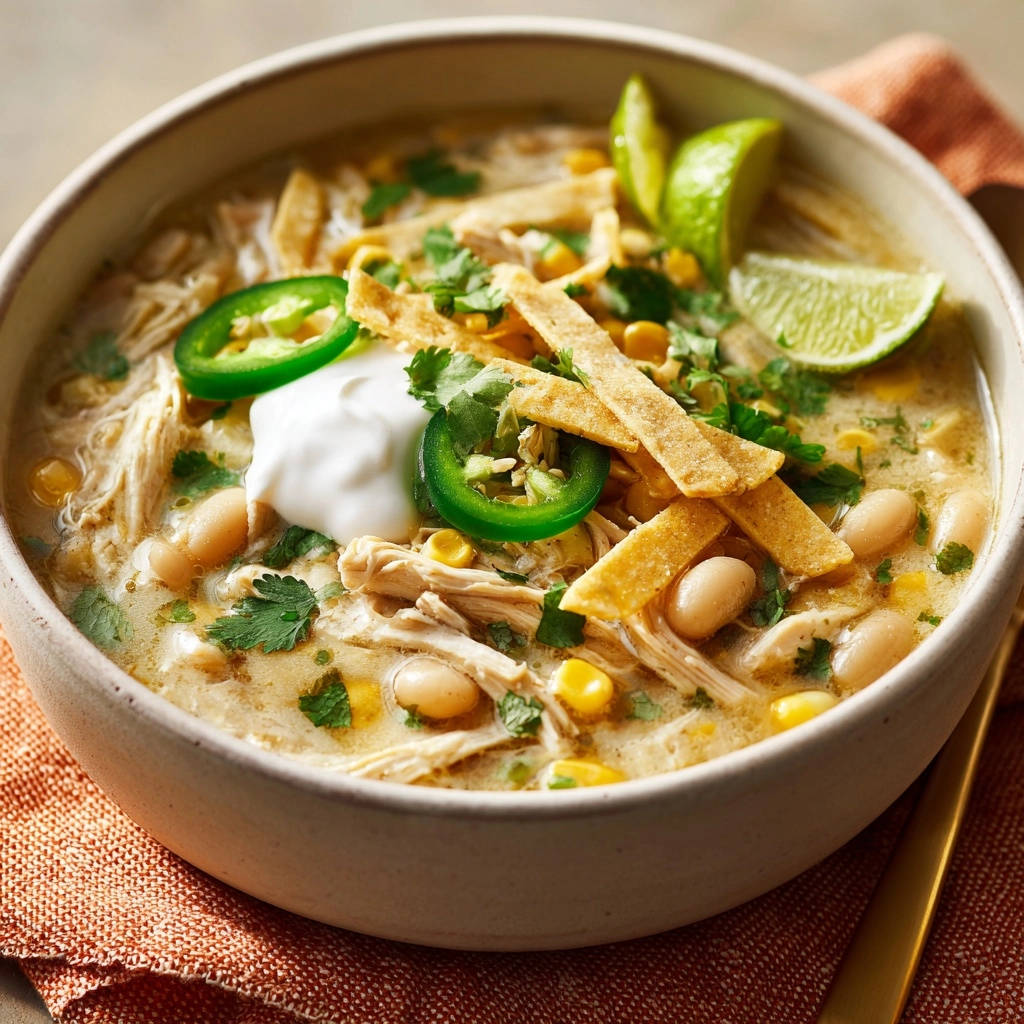
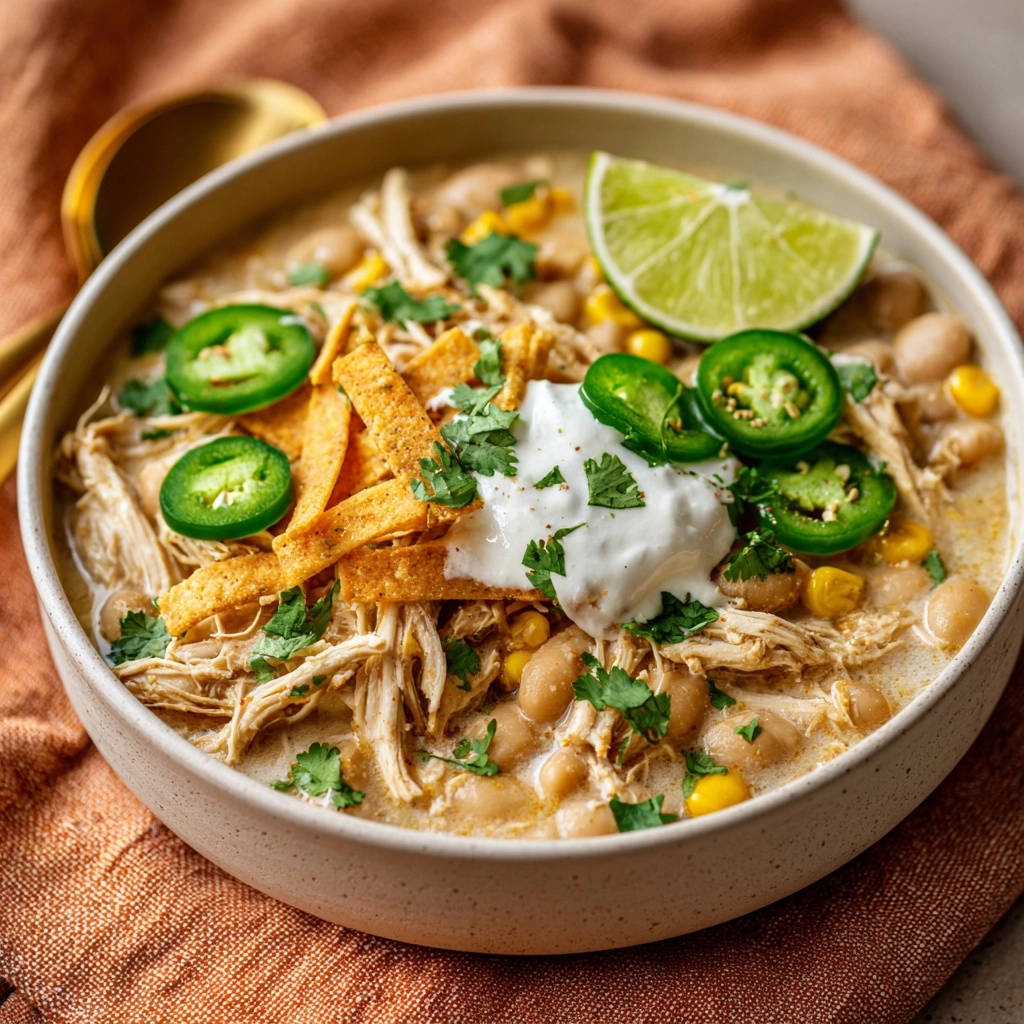
Fresh Toppings: Elevating Every Bowl
Toppings are not just garnish; they are integral to the white chicken chili experience. Tortilla strips add a crucial crunch, contrasting with the chili’s soft textures.
Fresh cilantro brightens the dish with herbaceous notes, while thinly sliced jalapeño offers a fresh, vibrant heat. A squeeze of lime juice cuts through the richness, and a dollop of sour cream or Greek yogurt adds cooling creaminess.
Essential Tools for Your White Chicken Chili Adventure
The Right Pot for Perfect Simmering
A large pot or Dutch oven is ideal for this recipe. Its wide base allows for even sautéing of aromatics and ample space for all ingredients.
Excellent heat retention ensures a steady simmer, crucial for flavors to meld beautifully without scorching. This foundational piece of equipment ensures consistent cooking.
Basic Kitchen Utensils for Easy Prep
You’ll need a sturdy cutting board and a sharp chef’s knife for efficient chopping of onions and garlic. Measuring spoons and cups are essential for accurate ingredient quantities.
A durable stirring spoon is necessary for sautéing and stirring the chili as it simmers. These basic tools ensure a smooth and enjoyable cooking process.
Your Step-by-Step Guide to Flavorful White Chicken Chili
Phase 1: Crafting the Aromatic Base
Heat the olive oil: In your chosen large pot or Dutch oven, warm the olive oil over medium heat. This sets the stage for building the initial flavor layers.
Sauté the onion: Add the chopped onion and cook for 5-7 minutes, stirring occasionally, until it softens and becomes translucent. This gentle cooking process extracts its natural sweetness, providing a sweet foundation.
Add the garlic: Stir in the minced garlic and cook for just 1 minute more until it becomes fragrant. Be extremely vigilant during this step; burnt garlic will impart a bitter taste to your entire chili, so watch it closely.
Phase 2: Unleashing Spice Potential (The Flavor Hack!)
Stir in the aromatics and spices: Add the diced green chilies, ground cumin, dried oregano, chili powder, and the optional cayenne pepper to the pot. Ensure all ingredients are well combined.
Bloom the spices: Cook for 1-2 minutes, stirring constantly. This crucial “spice blooming” step, where the spices toast in the hot oil with the aromatics, activates their essential oils. It unlocks their full potential, creating a deeply aromatic, complex foundation that defines this flavorful chili.
Phase 3: Simmering for Melded Tastes
Combine liquids and beans: Pour in the chicken broth, then add the rinsed cannellini beans and corn to the pot. Stir everything gently to combine.
Simmer and meld: Bring the mixture to a gentle simmer, then reduce the heat to low. Cover the pot and allow it to cook for at least 15 minutes. This simmering time is essential for the flavors to fully develop, integrate, and meld into a harmonious hearty white chili.
Phase 4: Incorporating Chicken and Creaminess
Add the chicken: Stir in the cooked shredded chicken. This addition ensures the chicken warms through evenly, becoming an integral part of the creamy chicken chili.
Introduce creaminess: If using heavy cream or milk, stir it in now. For plain Greek yogurt, it’s critical to hold off and stir it in just before serving to prevent any curdling due to the heat.
Gentle final simmer: Continue to simmer gently for another 5 minutes. This allows all ingredients, especially the chicken, to combine harmoniously and for the flavors to deepen further.
Phase 5: The Final Seasoning and Grand Serve
Season to perfection: Taste the chili and adjust with salt and freshly ground black pepper as needed. Balanced seasoning is key to bringing out all the complex flavors you’ve built.
Serve and garnish: Ladle the hot chili into bowls. Generously top each serving with crispy tortilla strips, fresh cilantro, thinly sliced jalapeño, a dollop of sour cream or Greek yogurt, and a refreshing squeeze of fresh lime juice. These garnishes add essential texture, freshness, and brightness.
Chef’s Notes: Elevating Your White Chicken Chili Experience
Chicken Choices: From Rotisserie to Home-Cooked
For convenience, a store-bought rotisserie chicken is an excellent choice; simply shred the meat. Leftover roasted or poached chicken breasts also work beautifully, offering a quick solution.
If cooking chicken from scratch, poach boneless, skinless chicken breasts in salted water or broth until cooked through, then shred them. This ensures tender, flavorful chicken for your white chicken chili.
Mastering the Heat: Adjusting Cayenne to Taste
The 1/4 teaspoon of cayenne pepper provides a mild, pleasant warmth. For less heat, omit it entirely, or reduce the quantity to a tiny pinch.
If you prefer a spicier chili, gradually increase the cayenne pepper by 1/8 teaspoon increments. Always taste as you go to achieve your desired level of heat in this flavorful chili.
Creamy Consistency: When to Add Dairy or Yogurt
For heavy cream or milk, adding it during the final simmer ensures it fully incorporates and heats through. This contributes to the creamy texture of the chili.
It is crucial to stir in plain Greek yogurt just before serving or off the heat. High heat can cause yogurt to curdle, resulting in an undesirable texture. Always temper yogurt first by stirring a small amount of hot chili into it before adding it to the pot.
Fire-Roasted vs. Regular: Why It Matters
Fire-roasted green chilies offer a distinctive smoky flavor and a hint of char that deepens the chili’s profile significantly. This adds complexity and a gourmet touch.
If fire-roasted are unavailable, regular canned diced green chilies are perfectly fine. You can also add a pinch of smoked paprika to your spices to mimic some of that smoky depth in your hearty white chili.
Serving & Pairing: What to Enjoy with Your White Chicken Chili
Beyond the Bowl: Classic & Creative Toppings
Beyond the listed toppings, consider creamy avocado slices for richness or a sprinkle of shredded Monterey Jack cheese for extra melty goodness. A dash of your favorite hot sauce can also add a personalized kick.
Crispy bacon bits provide a savory, crunchy element that pairs wonderfully. Fresh radish slices can offer a peppery, crisp contrast to the warm, creamy chicken chili.
Perfect Sides for a Complete Meal
Classic cornbread or jalapeño cornbread muffins are excellent for soaking up every last drop of flavorful chili. A simple, crisp green salad with a light vinaigrette offers a refreshing counterpoint.
Steamed rice can also be served alongside, allowing the chili to be ladled over it for an even heartier meal. Crusty bread is another great option for a satisfying complement.
Smart Prep: Storing and Making Ahead Your White Chicken Chili
Storing Leftovers for Optimal Freshness
Allow the White Chicken Chili to cool completely before transferring it to airtight containers. Store in the refrigerator for up to 3-4 days to maintain optimal freshness and flavor.
Proper storage prevents bacterial growth and keeps your chili delicious for future meals. Ensure containers are sealed tightly to avoid odor transfer.
Freezing for Future Quick Meals
White Chicken Chili freezes exceptionally well, making it perfect for meal prep. Cool the chili completely, then portion it into freezer-safe containers or heavy-duty freezer bags.
Freeze for up to 3 months. To reheat, thaw overnight in the refrigerator, then gently warm on the stovetop or in the microwave, adding a splash of broth if needed to restore consistency.
Make-Ahead Tips for Busy Weeknights
To save time on cooking day, chop your onion and mince your garlic in advance. You can also cook and shred your chicken a day or two before assembling the chili.
Having these components ready significantly reduces active cooking time, making this hearty white chili an even quicker weeknight solution. This planning streamlines the entire process.
Troubleshooting Common White Chicken Chili Challenges
Why Does My Chili Lack Depth of Flavor?
If your chili tastes bland, it’s likely the “spice blooming” step was missed or rushed. Ensure spices are toasted in oil with aromatics for the full 1-2 minutes, stirring constantly to release their essential oils.
Additionally, a squeeze of fresh lime juice at the very end can brighten flavors considerably. Don’t be shy with salt and pepper; proper seasoning elevates all ingredients in your white chicken chili.
How to Adjust Chili Consistency (Too Thick or Too Thin)?
If your chili is too thick, simply stir in an additional splash of chicken broth or water until it reaches your desired consistency. Add gradually to avoid over-thinning.
For chili that’s too thin, simmer it uncovered for a bit longer, allowing some liquid to evaporate. Alternatively, create a slurry with 1 tablespoon cornstarch mixed with 2 tablespoons cold water, then stir it into the simmering chili and cook until thickened.
Preventing Dairy from Curdling in Hot Chili
Dairy curdling typically happens when cold dairy hits a hot, acidic environment too quickly. If using heavy cream or milk, ensure it’s at room temperature before adding.
For Greek yogurt, always temper it first: whisk a spoonful of the hot chili into the yogurt before stirring the warmed yogurt back into the pot, just prior to serving. Avoid bringing chili with yogurt to a rolling boil.
FAQs: Everything Else You Need to Know About White Chicken Chili
Can I use different types of beans?
Absolutely! Great Northern beans or navy beans are excellent alternatives to cannellini beans. They offer similar mild flavors and creamy textures, ensuring your flavorful chili remains hearty and satisfying.
The key is to use white beans that break down slightly to contribute to the chili’s thick, comforting consistency. Always remember to rinse canned beans thoroughly before adding them.
What if I don’t have cooked chicken on hand?
No problem! You can quickly poach boneless, skinless chicken breasts in chicken broth for about 15-20 minutes until cooked through. Alternatively, a quick pan-sear of chicken thighs can also work.
For ultimate convenience, pick up a rotisserie chicken from your local grocery store. Simply shred the meat and it’s ready to go into your white chicken chili.
How can I make this recipe dairy-free or gluten-free?
To make this white chicken chili dairy-free, substitute the heavy cream or milk with full-fat canned coconut milk for a rich, creamy texture (it won’t impart a strong coconut flavor). Dairy-free cream alternatives also work.
For a gluten-free version, ensure your chicken broth is certified gluten-free. All other ingredients like spices, beans, corn, and green chilies are naturally gluten-free, making this an easy adaptation.
What’s the best way to reheat white chicken chili?
For stovetop reheating, gently warm the chili over medium-low heat, stirring frequently, until heated through. Add a splash of chicken broth or water if it has thickened overnight to restore its original consistency.
In the microwave, reheat individual portions in 1-minute intervals, stirring between each, until hot. Always ensure the chili is heated thoroughly and evenly for the best taste and food safety.
Embrace the Warmth: Your New Favorite White Chicken Chili
You now possess the secrets to crafting a truly exceptional White Chicken Chili that bursts with flavor and comforting warmth. This recipe is more than just a meal; it’s an experience designed to bring joy and satisfaction to your table.
Don’t just make chili-create a memorable dish that will be requested again and again. Dive in, savor every spoonful, and share your delicious creations with loved ones!

White Chicken Chili
Course: Soups-StewsCuisine: AmericanDifficulty: easy6
servings15
minutes30
minutes350
kcal45
minutesThis White Chicken Chili recipe offers incredible depth and warmth, thanks to a simple technique for blooming spices. It’s a comforting and flavorful dish that goes from good to absolutely amazing every time. You’ll love the rich, complex taste.
Ingredients
1 tablespoon olive oil
1 large onion, chopped
2 cloves garlic, minced
1 (4 ounce) can diced green chilies, fire-roasted if possible
1 teaspoon ground cumin
1 teaspoon dried oregano
1/2 teaspoon chili powder
1/4 teaspoon cayenne pepper (optional)
4 cups chicken broth
2 (15 ounce) cans cannellini beans, rinsed and drained
1 (15 ounce) can sweet corn, drained (or 1.5 cups frozen corn)
2 cups cooked shredded chicken
1/2 cup heavy cream or full-fat milk
Salt and freshly ground black pepper to taste
For Toppings:
Tortilla strips
Fresh cilantro, chopped
Fresh jalapeño, thinly sliced
Lime wedges
Sour cream or plain Greek yogurt
Directions
- Build the Flavor Base: Heat the olive oil in a large pot or Dutch oven over medium heat. Add the chopped onion and cook until softened and translucent, about 5-7 minutes. Add the minced garlic and cook for another minute until fragrant, being careful not to burn it.
- Bloom the Spices: Stir in the diced green chilies, ground cumin, dried oregano, chili powder, and cayenne pepper (if using). Cook for 1-2 minutes, stirring constantly. This step, where the spices toast in the hot oil with the aromatics, is the real flavor depth hack that unlocks their full potential and creates a deeply aromatic foundation for your chili.
- Combine Ingredients: Pour in the chicken broth, then add the rinsed cannellini beans and corn. Bring the mixture to a simmer, then reduce heat to low, cover, and let it cook for at least 15 minutes to allow the flavors to meld.
- Add Chicken and Creaminess: Stir in the cooked shredded chicken. If using heavy cream or milk, stir it in now. If using plain Greek yogurt, stir it in just before serving to prevent curdling. Continue to simmer gently for another 5 minutes, allowing the chicken to warm through and the flavors to fully combine.
- Season and Serve: Taste the chili and season with salt and freshly ground black pepper as needed. Ladle the hot chili into bowls and top with tortilla strips, fresh cilantro, sliced jalapeño, a dollop of sour cream or Greek yogurt, and a squeeze of fresh lime juice.
Notes
- Stir in Greek yogurt just before serving to prevent curdling.


