
Anyone who has ever cut into a seemingly perfect lemon bar, only to have the vibrant filling slide right off the crust, knows the frustration. I used to face this common baking woe with classic lemon bars, but I discovered a simple, foolproof trick that guarantees perfectly firm and sliceable Zesty Lemon Chili Bars every single time.
This recipe not only delivers on structure but also introduces an exciting, subtle warmth, transforming a beloved classic into an unforgettable experience. Prepare for a dessert that marries bright citrus with an unexpected, delightful kick.
For a reliably moist result, check out this recipe for foolproof carrot cake bars.
Why This Zesty Lemon Chili Bars Recipe Will Become Your New Obsession
Conquering the Ooze: Our Foolproof Method for Firmness
The days of runny, messy lemon bars are over. Our recipe for Zesty Lemon Chili Bars champions a critical, often-overlooked step: thorough chilling. This simple yet powerful technique ensures the filling sets beautifully, resulting in clean, firm slices every time.
You’ll achieve a professional-looking dessert that holds its shape, making serving a breeze and impressing everyone who tries it. Say goodbye to the common lemon bar problems!
The Unexpected Thrill: Zest, Tang, and a Hint of Heat
These Zesty Lemon Chili Bars offer more than just classic lemon flavor. They deliver a vibrant, tart citrus punch perfectly balanced with sweetness, followed by a surprising, subtle warmth from thinly sliced red chili.
The chili isn’t overpowering; it’s a gentle, intriguing kick that elevates the dessert beyond the ordinary, making it a perfect conversation starter and a unique treat for adventurous palates.
From Prep to Perfection: A Smooth Baking Journey
We’ve meticulously crafted these instructions to be exceptionally clear and easy to follow, making the process enjoyable for bakers of all skill levels. Each step comes with precise guidance and helpful tips to ensure your success.
From mixing the crust to achieving the perfect set for the lemon chili topping, you’ll feel confident and guided every step of the way to delicious homemade lemon bars.
Gather Your Flavor Artisans: Essential Ingredients for Lemon Chili Bars
For the Sturdy Foundation: The Crust Essentials
1½ cups all-purpose flour: Provides the main structure for a tender, crumbly base that perfectly supports the vibrant filling.
½ cup granulated sugar: Adds essential sweetness and contributes to the light golden-brown finish of the crust.
¼ teaspoon salt: Crucial for balancing the sweetness and enhancing the overall flavor profile of the crust.
1 cup unsalted butter, softened: Essential for achieving the perfect crumbly texture; ensures easy mixing and pressing into the pan.
The Star Attraction: Zesty Lemon Chili Topping Components
1½ cups granulated sugar: Sweetens the inherently tart lemon filling, creating a harmonious and delightful flavor.
¼ cup all-purpose flour: Acts as a critical thickening agent, preventing the filling from becoming runny and ensuring it sets beautifully.
4 large eggs: Essential for setting the filling, providing richness, and contributing to its smooth, custard-like texture.
½ cup fresh lemon juice (from 2-3 lemons): The vibrant, tart heart of these spicy lemon dessert bars. Freshly squeezed juice is paramount for the best, brightest flavor.
1 tablespoon lemon zest (from 1-2 lemons): Intensifies the lemon flavor and aroma significantly, adding crucial depth to the zestiness of the lemon chili topping.
1 small red chili, very thinly sliced, seeds removed for less heat: The surprising element! Seeds removed to temper the heat, adding a warm, subtle, and intriguing kick without being overpowering.
Optional: Extra lemon slices and finely diced red chili or chili flakes for garnish: Perfect for presentation, offering an extra pop of flavor and visual appeal to your finished Zesty Lemon Chili Bars.
Essential Tools for Your Zesty Lemon Chili Bars Adventure
8×8 or 9×9 inch baking pan: The ideal size for these bars, ensuring proper thickness and even baking for perfectly set lemon bars.
Parchment paper: Your secret weapon for easy lifting and removal of the entire slab of bars without sticking or breaking.
Medium and large mixing bowls: Necessary for keeping crust and filling ingredients separate during preparation, maintaining order and efficiency.
Whisk: Essential for combining both wet and dry ingredients smoothly, preventing clumps and ensuring a uniform, silky consistency for the topping.
Pastry blender or fingertips: For effectively cutting the softened butter into the flour mixture, creating the perfect tender, crumbly crust texture.
Zester: To quickly and efficiently extract potent lemon zest, which is crucial for intense lemon flavor and aroma.
Wire rack: For allowing your freshly baked bars to cool evenly and completely, which is vital for proper setting and preventing a soggy bottom.
Crafting Culinary Magic: Step-by-Step Zesty Lemon Chili Bars Perfection
- Prepare Your Pan & Preheat Oven:
Preheat your oven to 350°F (175°C), ensuring it’s at temperature before baking begins.
Lightly grease an 8×8 or 9×9 inch baking pan and line it with parchment paper, leaving a generous overhang on the sides for effortless removal of the entire slab later.
- Mix the Crust Ingredients:
In a medium bowl, combine the all-purpose flour, granulated sugar, and salt for the crust.
Cut in the softened butter using a pastry blender or your fingertips until the mixture resembles coarse, moist crumbs that hold together when lightly squeezed.
- Press & Bake the Crust:
Press the crumb mixture evenly and firmly into the bottom of the prepared pan, forming a compact, uniform layer.
Bake for 18-20 minutes, or until the edges are lightly golden brown, indicating it’s partially cooked but still tender.
- Combine Dry Topping Ingredients:
While the crust bakes, whisk together the granulated sugar and all-purpose flour for the lemon chili topping in a separate bowl.
This crucial initial whisking helps prevent any flour clumps from forming later in the liquid, ensuring a smooth and lump-free filling.
- Mix Wet Topping Ingredients:
In another bowl, lightly beat the eggs until just combined.
Then, gradually whisk in the fresh lemon juice and vibrant lemon zest until well incorporated.
Add the very thinly sliced red chili to this mixture, stirring gently to distribute the chili pieces evenly throughout.
- Combine Wet & Dry Topping Mixtures:
Slowly pour the prepared dry sugar and flour mixture into the wet egg and lemon mixture, whisking constantly as you pour until everything is completely smooth and well combined.
Continuous whisking during this step is key for a silky, non-grainy filling that will set beautifully.
- Pour Topping Over Hot Crust:
Once the crust is lightly golden from its initial bake, immediately and carefully pour the prepared Zesty Lemon Chili Topping evenly over the hot crust.
Doing this while the crust is still warm helps the layers adhere better.
- Second Bake to Perfection:
Return the pan to the oven and bake for another 15-18 minutes.
The center should be just set but still have a very subtle jiggle when gently shaken, and the edges should appear firm. This precise timing prevents an oozing center or a rubbery, overbaked texture.
- Cool at Room Temperature:
Remove the pan from the oven and place it on a wire rack.
Allow the Zesty Lemon Chili Bars to cool completely at room temperature; this initial, gradual cooling allows the filling to begin firming up without shocking it.
- The Chilling Secret: Firmness Guaranteed:
Once cooled to room temperature, transfer the pan to the refrigerator and chill for at least 3 hours, or ideally overnight.
This thorough chilling is the ultimate secret to perfectly set bars that slice beautifully without any mess or oozing, creating truly firm lemon bars.
- Slice, Garnish, & Serve:
Once completely chilled and firm, use the parchment paper overhang to lift the entire slab of bars from the pan onto a cutting board.
Slice into desired squares.
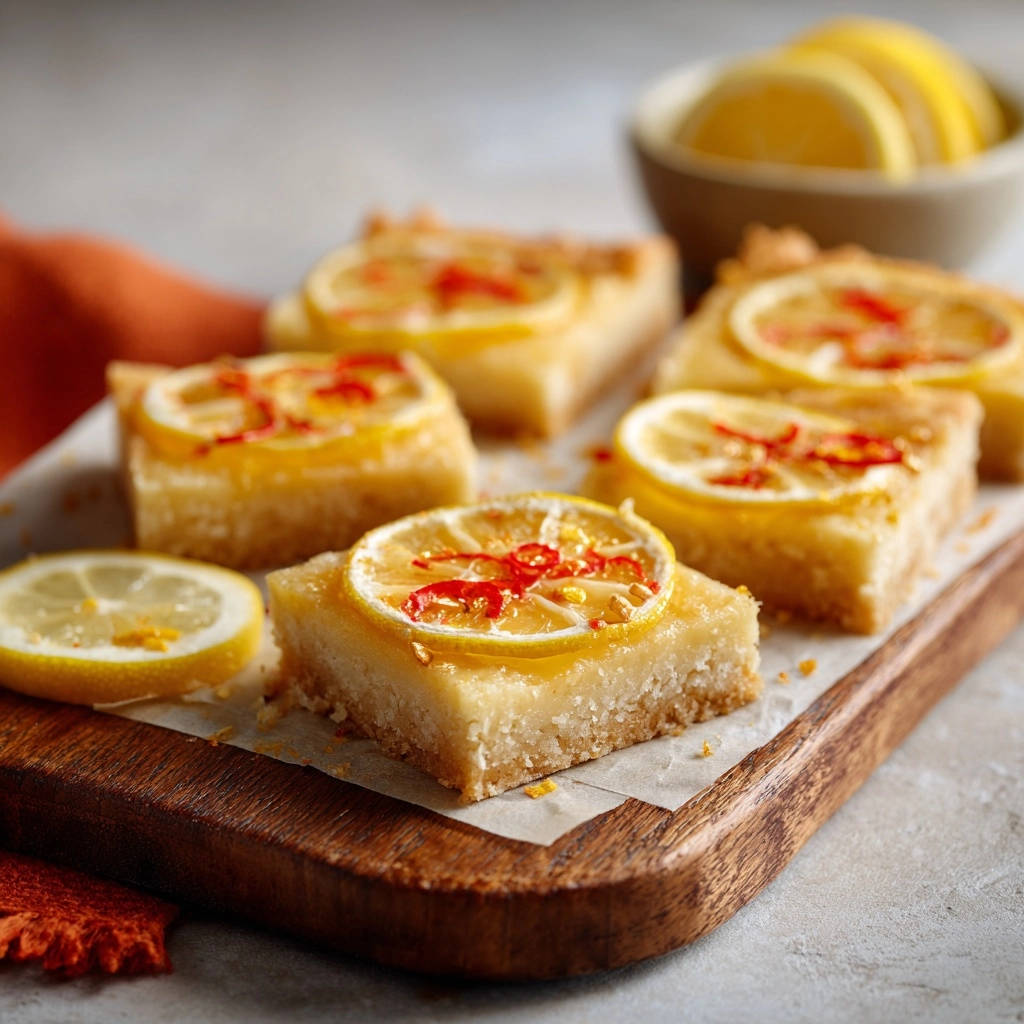
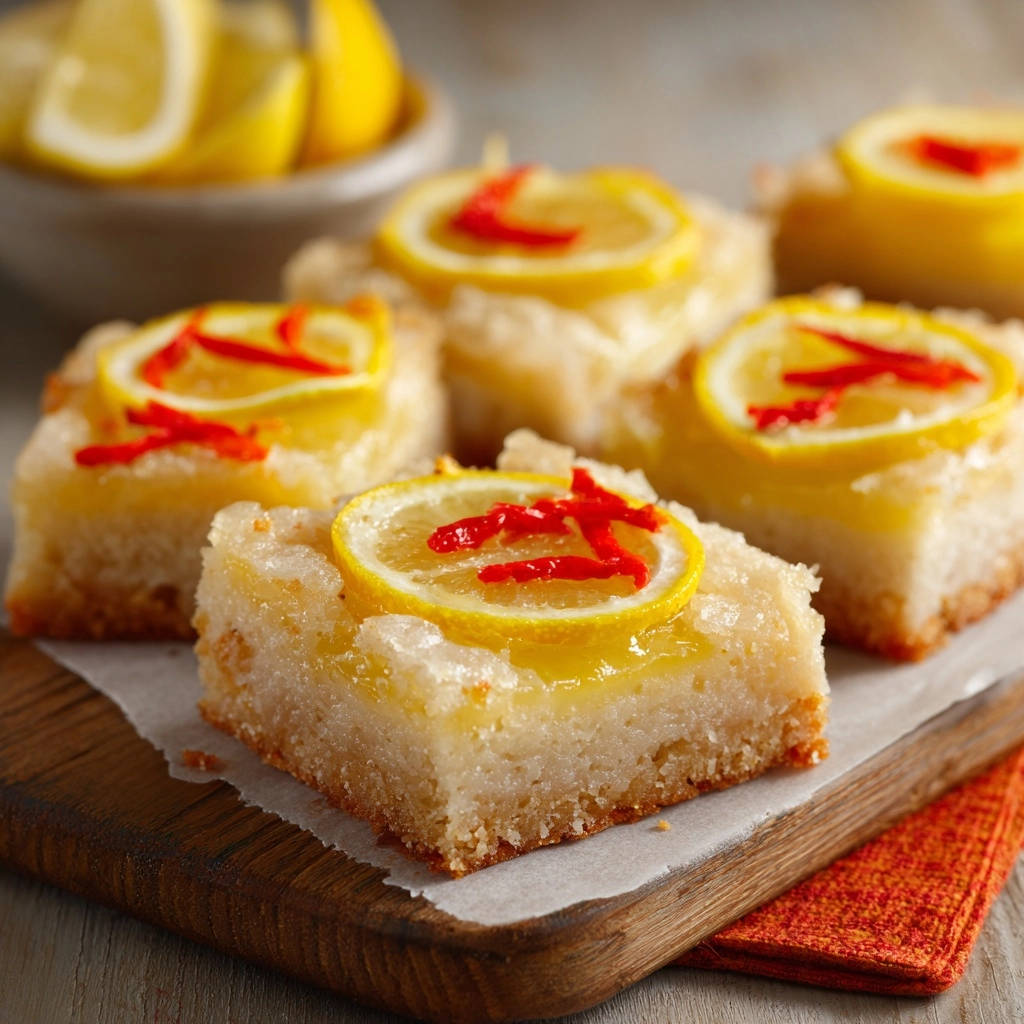
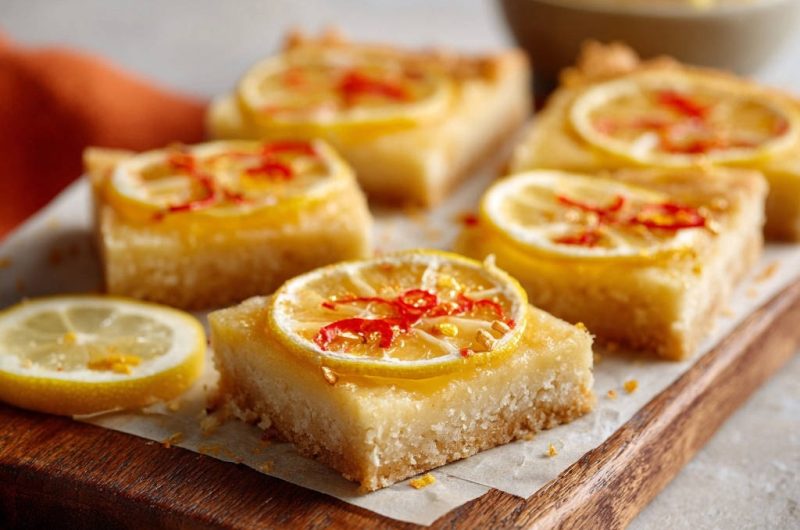
Garnish each bar with an optional thin lemon slice and a sprinkle of finely diced red chili or chili flakes for an extra flourish and visual appeal, highlighting the unique spicy lemon dessert.
Chef’s Secrets: Elevate Your Zesty Lemon Chili Bars Game
Don’t Skip the Chilling Step: This is the single most important factor for perfectly set bars that hold their shape. Patience is truly rewarded with clean, non-oozing slices, demonstrating true expertise!
Fresh Lemon Juice is Non-Negotiable: Bottled lemon juice lacks the vibrant, bright flavor and crucial acidity needed for truly zesty and balanced bars. Always use freshly squeezed juice for the best possible taste.
Seed the Chili for Balanced Heat: Removing all seeds and membranes from the red chili significantly reduces the heat, ensuring a pleasant warmth rather than an overpowering burn. Adjust by leaving some seeds in for more spice, if desired.
Mind the Bake Time for the Filling: Overbaking will lead to a rubbery, tough texture, while underbaking causes the filling to ooze. Watch carefully for that subtle jiggle in the center when gently shaken – it’s the perfect indicator.
Room Temperature Butter for the Crust: Ensure your butter is genuinely softened (but not melted) for the crust. Softened butter integrates better with dry ingredients, leading to a more tender, less tough crust.
Whisk Flour & Sugar Separately for Topping: For the lemon chili topping, mixing the dry ingredients (sugar and flour) first prevents flour from clumping when it hits the wet ingredients, guaranteeing a silky-smooth filling every time.
Troubleshooting Common Lemon Bar Conundrums
Why Did My Filling Ooze or Slide Off the Crust?
The most common culprit for runny Zesty Lemon Chili Bars is insufficient chilling time. Ensure you refrigerate the bars for at least 3 hours, or ideally overnight, allowing the filling to fully set and firm up properly. Underbaking the topping can also contribute; always check for that subtle jiggle during the second bake to ensure doneness.
My Bars Are Too Rubbery. What Went Wrong?
This usually indicates that the filling was overbaked. The precise baking time (15-18 minutes in our recipe) for the topping is crucial to avoid this. Remove the bars when the center still has a slight jiggle; they will continue to set and firm up as they cool completely on the wire rack.
The Chili Flavor is Too Strong (or Not Strong Enough)!
For less heat in your spicy lemon dessert, double-check that all seeds and internal membranes are completely removed from the red chili before slicing. For a bolder, spicier kick, you can intentionally leave a few seeds in or add a tiny pinch of extra chili flakes to the topping mixture.
Why Is My Crust Dry or Crumbly When Cut?
This can happen if the butter wasn’t adequately softened or if the crust was overbaked in the first step. Ensure butter is genuinely soft for proper incorporation into the dry ingredients, and bake the crust only until it’s a light golden brown, not dark or crisp.
Your Burning Questions Answered: Zesty Lemon Chili Bars FAQs
Can I Make These Zesty Lemon Chili Bars Ahead of Time?
Absolutely! These bars are perfectly suited for making ahead. In fact, they require significant chilling time (preferably overnight) to achieve their ideal texture, which makes them excellent for preparing the day before you plan to serve them. Store them in an airtight container in the refrigerator.
How Long Do Zesty Lemon Chili Bars Last?
When stored in an airtight container in the refrigerator, these bars will stay wonderfully fresh and delicious for 4-5 days. For longer preservation, freezing is an excellent option, as detailed below.
Can I Freeze Zesty Lemon Chili Bars?
Yes, you can! Once fully chilled and sliced, arrange the bars in a single layer on a parchment-lined baking sheet and freeze until they are completely solid (this usually takes about 2-3 hours). Then, transfer them to an airtight freezer-safe container, separating layers with parchment paper. They will maintain their quality for up to 2-3 months. Thaw them overnight in the refrigerator before serving.
What if I Don’t Like Spicy Food? Can I Omit the Chili?
Of course! The chili adds a unique and exciting twist to these Zesty Lemon Chili Bars, but they are equally delicious as classic Zesty Lemon Bars. Simply omit the thinly sliced red chili from the topping ingredients for a milder version. The lemon zest provides plenty of vibrant flavor on its own!
Can I Use a Different Size Baking Pan?
An 8×8 or 9×9 inch pan is specifically recommended for achieving the ideal thickness and proper setting for these firm lemon bars. If you use a larger pan (e.g., 9×13 inch), the bars will be thinner, and baking times for both the crust and filling will need to be significantly reduced. Conversely, a smaller pan will result in thicker bars, potentially requiring longer baking times.
Serving Suggestions for Your Zesty Lemon Chili Bars
Pairing Perfection: What Goes Well with Lemon Chili Bars?
These Zesty Lemon Chili Bars are fantastic on their own, offering a delightful balance of sweet, tart, and spicy. However, they also shine beautifully alongside a scoop of premium vanilla bean ice cream or a generous dollop of freshly whipped cream, which cools the subtle heat from the chili lemon topping.
For a refreshing balance, consider serving them with a cold glass of crisp iced tea, a sparkling lemonade, or even a light, fruity cocktail to complement their vibrant flavors.
Presentation Pointers for an Extra Touch
The optional garnish of a thin lemon slice and a sprinkle of finely diced red chili or chili flakes truly elevates their visual appeal and provides a delicious hint at the delightful flavor surprise within. A light dusting of powdered sugar can also add an elegant finish, making your Zesty Lemon Chili Bars truly stand out.
Ready to Impress? Share Your Zesty Lemon Chili Bars Masterpiece!
Now that you have the ultimate guide to creating perfectly set, vibrantly flavored, and uniquely spiced Zesty Lemon Chili Bars, it’s time to get baking and enjoy the fruits of your labor!
We absolutely encourage you to share your delicious creations with us on social media. Tag us and use #ZestyLemonChiliBars so we can see your masterpieces! Don’t forget to rate and review the recipe below – your valuable feedback helps fellow bakers and inspires us to create even more delicious and innovative recipes!
These bars are more than just a dessert; they’re an experience for the senses. Enjoy the satisfying journey of making them and the sheer joy of sharing a truly special, unforgettable treat with friends and family.
Lemon Chili Bars
Course: DessertCuisine: AmericanDifficulty: medium12
bars20
minutes35
minutes350
kcal240
minutesSay goodbye to runny lemon bars! This recipe shares a simple trick for perfectly firm, sliceable bars with a vibrant lemon flavor and an unexpected chili kick. Enjoy these bright and zesty treats that hold their shape beautifully.
Ingredients
For the Crust:
1 and 1/2 cups all purpose flour
1/2 cup granulated sugar
1/4 teaspoon salt
1 cup unsalted butter, softened
For the Lemon Chili Topping:
1 and 1/2 cups granulated sugar
1/4 cup all purpose flour
4 large eggs
1/2 cup fresh lemon juice (from 2-3 lemons)
1 tablespoon lemon zest (from 1-2 lemons)
1 small red chili, very thinly sliced, seeds removed for less heat
Optional: Extra lemon slices and finely diced red chili or chili flakes for garnish
Directions
- Preheat your oven to 350°F (175°C). Lightly grease an 8×8 or 9×9 inch baking pan and line it with parchment paper, leaving an overhang on the sides for easy removal later.
- To make the crust, combine the flour, sugar, and salt in a medium bowl. Cut in the softened butter using a pastry blender or your fingertips until the mixture forms coarse crumbs.
- Press the crumb mixture evenly into the bottom of the prepared baking pan. Bake the crust for 18-20 minutes, or until light golden brown.
- While the crust bakes, prepare the lemon chili topping. In a separate bowl, whisk together the sugar and flour. This helps prevent the flour from clumping when added to the wet ingredients.
- In another bowl, lightly beat the eggs. Then, gradually whisk in the lemon juice and lemon zest. Add the thinly sliced red chili to this mixture.
- Slowly pour the dry sugar and flour mixture into the egg mixture, whisking constantly until smooth and well combined. This is crucial for a smooth, non-grainy filling.
- Once the crust is lightly golden, carefully pour the lemon chili topping over the hot crust. Return the pan to the oven.
- Bake for another 15-18 minutes, or until the center is just set but still has a slight, very subtle jiggle when gently shaken. The edges should appear firm. This precise baking time is key to avoiding an oozing center while preventing a rubbery texture.
- Remove the pan from the oven and place it on a wire rack. Let the lemon bars cool completely at room temperature. This initial cooling allows the filling to start firming up without shocking it.
- Once cooled to room temperature, transfer the pan to the refrigerator and chill for at least 3 hours, or preferably overnight. This thorough chilling step is the ultimate secret to perfectly set lemon bars that slice beautifully without any oozing.
- Once completely chilled and firm, use the parchment paper overhang to lift the entire slab of bars from the pan. Place on a cutting board and slice into squares. Garnish each bar with an optional thin lemon slice and a sprinkle of finely diced red chili or chili flakes if desired. Store leftovers in an airtight container in the refrigerator.
Notes
- Features a unique chili kick and a chilling trick for perfectly set bars.


