
There’s a special kind of magic that autumn brings, and for me, it always whispers promises of warm spices and cozy treats. I used to struggle with homemade Autumn Spice Cake Pops – sometimes they were too crumbly, other times overly sticky, but I’ve finally perfected a method that guarantees consistently smooth, beautifully textured cake balls that hold their shape every single time.
This recipe transforms a simple cake mix into delightful, bite-sized confections, making them utterly foolproof and a joy to create, promising a perfect fall dessert experience without the usual fuss.
Beyond the Box: Why Our Autumn Spice Cake Pops Stand Out
This recipe isn’t just about mixing ingredients; it’s about mastering a few simple techniques that elevate your Autumn Spice Cake Pops from good to unforgettable. We’re solving common cake pop woes with clever, practical steps.
The Secret to Non-Crumbly, Smooth Cake Balls
This recipe ensures your cake pops hold their shape flawlessly by focusing on the precise cake-to-frosting ratio and strategic chilling. The gradual addition of cream cheese frosting creates a pliable, non-greasy dough, while thorough refrigeration sets their structure, preventing any crumbling during the dipping process.
Effortless Perfection: A Recipe You Can Trust
Our method guarantees beautiful, professional-looking results without requiring advanced baking skills. Each step is clearly explained with “why” and “how” to ensure even beginners can achieve perfect Autumn Spice Cake Pops every time, building confidence in the kitchen.
A Flavorful Fall Fiesta in Every Bite
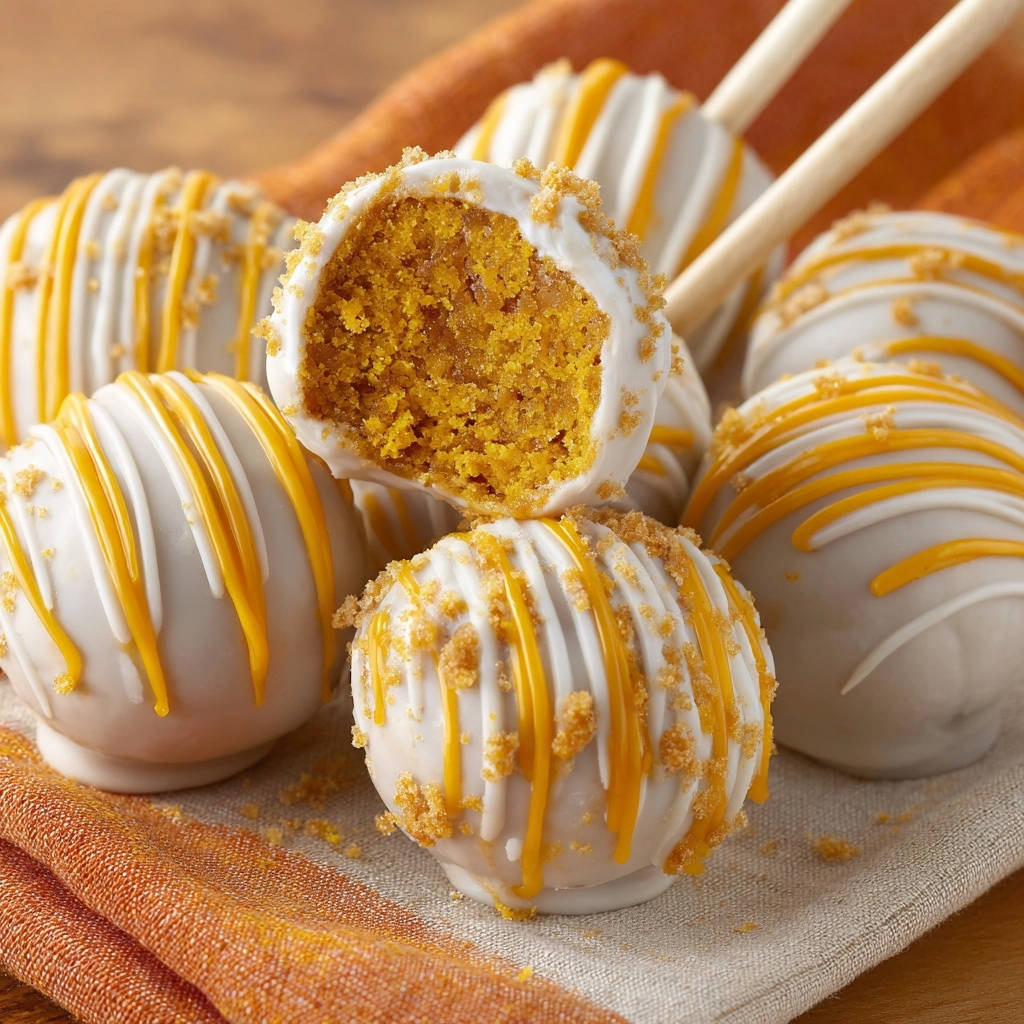
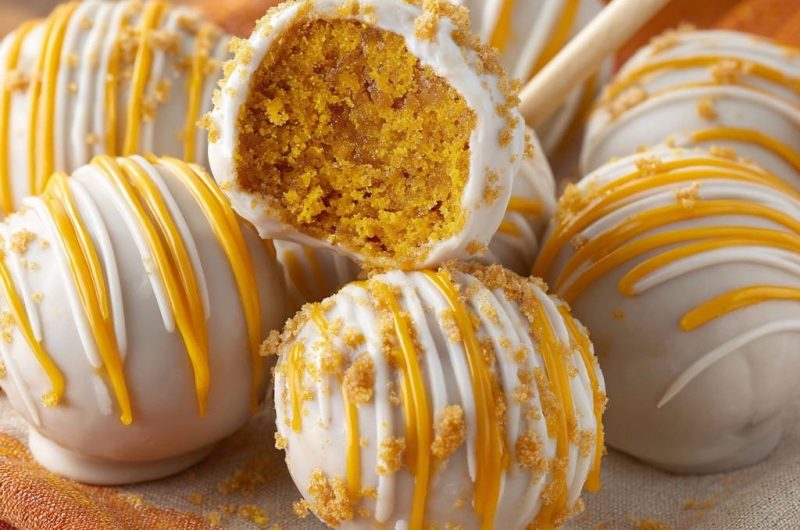
Experience the rich autumn flavors of pumpkin spice perfectly balanced with the tangy sweetness of cream cheese frosting. The delicate crunch of graham cracker crumbs adds a delightful textural contrast, making these Autumn Spice Cake Pops a true celebration of the season.

Essential Tools for Your Autumn Spice Cake Pops Adventure
Having the right tools makes the cake pop creation process much smoother and more enjoyable. These are the essentials you’ll need to get started.
Basic Baking Essentials
Large Mixing Bowls: Essential for combining the crumbled cake and frosting, allowing plenty of room for thorough mixing.
Rubber Spatula: Perfect for scraping down bowls and ensuring all ingredients are well incorporated.
Measuring Cups and Spoons: For accurate ingredient measurements, although this recipe is quite forgiving with the frosting.
Specialized Gear for Cake Pop Perfection
Baking Sheets: Needed for cooling the cake and for chilling the formed cake balls.
Parchment Paper: Crucial for lining baking sheets, preventing sticking and making transfer easy.
Cake Pop Sticks (Optional): If you want to serve them as traditional cake pops; otherwise, they make wonderful cake balls.
Microwave-Safe Bowls or Double Boiler: For melting your candy melts smoothly and efficiently.
Small Scoop (Optional): A cookie scoop or small ice cream scoop helps create uniformly sized cake balls.
Flavor Foundations: What Goes Into Our Autumn Spice Cake Pops
Every ingredient plays a vital role in the taste and texture of these delightful Autumn Spice Cake Pops. Understanding their purpose helps ensure your success.
The Heart: Pumpkin Spice Cake Mix
A quality pumpkin spice cake mix forms the convenient base, delivering a consistent, aromatic fall flavor. It simplifies the baking process without sacrificing that beloved spiced taste.
Using a mix ensures a tender crumb that is ideal for transforming into cake pop dough. While you can make your own, the mix saves significant time.
The Bonding Agent: Cream Cheese Frosting Magic
Cream cheese frosting isn’t just for flavor; it’s the secret to binding the cake crumbs into a pliable, firm dough. Its richness adds moisture and a slight tang, perfectly complementing the spice cake.
The fat content in cream cheese frosting helps create a smooth, rollable texture that resists crumbling. Using a good quality, full-fat frosting is recommended for the best results.
The Outer Shell: White Candy Melts
White candy melts provide a smooth, sturdy, and sweet exterior that locks in moisture and provides a beautiful canvas. They set quickly, creating a crisp shell for your Autumn Spice Cake Pops.
Choose good quality candy melts for easy melting and a consistent, non-streaky finish.
Decorative Touches: Yellow Candy Melts & Graham Crumbs
Yellow candy melts add a vibrant visual pop, creating a striking contrast against the white base. They contribute to the festive, autumn-inspired aesthetic.
Finely crushed graham cracker crumbs provide a delicate crunch and a rustic, autumnal look. They adhere beautifully to the wet candy drizzle, resembling fallen leaves.
Crafting Your Autumn Spice Cake Pops: A Detailed Journey
Follow these steps closely, paying attention to the details, and you’ll achieve perfect Autumn Spice Cake Pops every time.
- Bake and Cool the Cake:
Prepare the pumpkin spice cake mix according to the package directions, baking in a 9×13 inch pan until a toothpick inserted comes out clean.
Allowing the cake to cool completely is critical before crumbling; a warm cake can lead to a greasy, difficult-to-handle mixture that won’t form well. Patience here is paramount.
- Crumble and Combine with Frosting:
Once fully cooled, crumble the entire cake into a large mixing bowl, ensuring there are no large lumps.
Gradually add cream cheese frosting, starting with about half the container, mixing by hand until the mixture is moist enough to form a firm, non-greasy ball that holds its shape when squeezed.
This gradual addition is key to achieving the perfect, non-crumbly texture; you want a consistency like play-dough, not sticky batter.
- Roll Uniform Cake Balls:
Roll the cake mixture into consistent 1-inch balls. Aim for uniformity so they look professional and dip evenly.
Using a small scoop (like a cookie dough scoop) can help ensure even sizes, or you can eyeball them for a more rustic feel.
- Crucial Refrigeration Step:
Place the cake balls on a parchment-lined baking sheet and refrigerate for at least 30 minutes, or up to an hour.
This firming step is essential for preventing crumbling and maintaining shape during dipping; cold balls are less likely to fall apart in warm candy melts.
- Prepare for Sticks (Optional):
If using cake pop sticks, melt a small amount of white candy melts (about ¼ cup) until smooth.
Dip the tip of each stick into the melted candy, then gently insert it about halfway into a chilled cake ball. The melted candy acts as glue.
Place back on the parchment-lined sheet and refrigerate for another 5 minutes to set the sticks firmly in place before dipping the whole pop.
- Dip in White Candy Coating:
Melt the remaining white candy melts according to package directions until smooth and fluid, being careful not to overheat them.
Dip each thoroughly chilled cake ball (with or without a stick) completely into the melted white candy, rotating to coat evenly, then gently tap the stick (or your hand) against the side of the bowl to remove any excess coating.
- Allow White Coating to Set:
Return coated cake pops to the parchment-lined baking sheet. For cake pops on sticks, you can stand them upright in a styrofoam block.
Let the white candy coating set fully at room temperature for 10-15 minutes, or briefly refrigerate for 5 minutes. This ensures a clean, non-tacky base for subsequent decoration and prevents colors from bleeding.
- Drizzle with Yellow Candy:
Melt the yellow candy melts (or white melts colored with yellow food coloring) until smooth.
Using a spoon or a piping bag with a very small snip, drizzle the yellow candy decoratively over the set white coating. Create abstract lines or zigzags for an appealing pattern.
- Sprinkle with Graham Cracker Crumbs:
Immediately sprinkle the finely crushed graham cracker crumbs over the wet yellow drizzle before it has a chance to set.
This ensures the crumbs adhere perfectly, adding both texture and a visual element reminiscent of autumn leaves.
- Final Set and Serve:
Allow the Autumn Spice Cake Pops to set completely. This means the candy coatings should be firm to the touch.
Ensure all coatings are firm for the best eating experience and to prevent smudging. Then, arrange and enjoy your perfectly crafted Autumn Spice Cake Pops!
Phase 1: Preparing the Cake Base
Phase 2: Forming and Chilling for Structure
Phase 3: Dipping and Decorating with Flair
Pro Secrets for Autumn Spice Cake Pops That Impress
Master the Cake-to-Frosting Ratio: The ideal texture is like play-dough – firm enough to hold its shape when rolled, but not sticky or greasy. Start with less frosting and add gradually, kneading until the perfect consistency is reached.
Chill, Chill, Chill: Don’t skip or shorten the chilling times. A properly chilled cake ball is the foundation of a perfectly coated, non-crumbly cake pop. Cold cake balls help the candy coating set faster and more smoothly.
Temperature of Candy Melts: Ensure your candy melts are fully melted and smooth, but not too hot. Overheated candy melts can cause the cake pop to fall apart or create a thin, transparent coating that doesn’t fully cover.
Tap, Don’t Shake: When dipping, gently tap the stick (or your hand if no stick) against the side of the bowl to remove excess coating. Shaking vigorously can dislodge the cake ball from the stick or create an uneven coating.
Creative Customization: Experiment with different candy melt colors, festive sprinkles, or even finely chopped pecans or walnuts instead of graham cracker crumbs for varied Autumn Spice Cake Pops. For a delightful alternative fall treat, consider trying our Cozy Baked Apples with Crispy Crumble.
Solving Your Autumn Spice Cake Pops Quandaries: A Quick Fix Guide
“My Cake Balls Are Too Crumbly and Won’t Hold Shape!”
Solution: This usually means you haven’t added enough frosting. Gradually mix in another spoonful or two of cream cheese frosting, kneading it thoroughly, until the mixture is pliable like firm cookie dough. It should easily form a solid ball without falling apart.
“My Candy Coating Is Too Thick or Lumpy!”
Solution: Your candy melts might be too cool, or they could have been overheated, causing them to seize. Try reheating gently in short bursts (15-20 seconds in the microwave), stirring well after each. A tiny bit of vegetable shortening or coconut oil (about ½ to 1 teaspoon per 12 oz of melts) can help thin them to a smoother, dippable consistency.
“My Autumn Spice Cake Pops Keep Falling Off the Sticks!”
Solution: Ensure your cake balls are thoroughly chilled and firm. The small amount of candy melt used to secure the stick must be fully set before dipping the entire pop. If it’s still loose, re-dip the stick tip into fresh melted candy, reinsert, and re-chill until completely firm before proceeding.
“My Cake Pops Look Messy or Unevenly Coated!”
Solution: The trick is consistent chilling of the cake balls and quick, confident dipping into perfectly smooth candy melts. Make sure the candy melts are at the right temperature (not too hot, not too cold) and tap off excess immediately and gently. Remember, practice makes perfect when it comes to dipping!
Enjoying and Preserving Your Autumn Spice Cake Pops Masterpiece
Once you’ve mastered these delightful treats, you’ll want to ensure they’re enjoyed at their best and stored properly for lasting freshness.
Best Ways to Serve Your Festive Treats
Autumn Spice Cake Pops are perfect as a dessert at holiday gatherings, a charming addition to a dessert table, or a thoughtful edible gift. Serve them chilled for the best texture and flavor, allowing the candy coating to provide a satisfying snap.
They’re also excellent for school parties or as a special treat for lunchboxes, bringing a little bit of fall joy wherever they go.
Storing Leftover Autumn Spice Cake Pops
To keep your cake pops fresh, store them in an airtight container in the refrigerator. This preserves their texture and ensures the candy coating remains firm and unblemished.
They are best enjoyed within 5-7 days of preparation for optimal freshness and flavor.
Make-Ahead Magic: Preparing for Parties
You can prepare the cake balls several days in advance. Simply roll them, chill them thoroughly, and store them in an airtight container in the refrigerator for up to 3-4 days before coating.
This make-ahead strategy allows you to spread out the work, making party prep significantly less stressful. For another fantastic make-ahead dessert that impresses, check out our Classic Apple Pie Recipe (Never Soggy Bottom!).
Your Autumn Spice Cake Pops Questions, Answered!
Can I use a different cake mix flavor for these Autumn Spice Cake Pops?
Absolutely! While pumpkin spice is perfect for autumn, you can experiment with chocolate, vanilla, or yellow cake mixes. Just ensure the flavor complements the cream cheese frosting; a Carrot Cake base, for instance, would also be delicious with cream cheese frosting.
How can I make these cake pops dairy-free or gluten-free?
For a gluten-free version, use a certified gluten-free pumpkin spice cake mix. For dairy-free, look for dairy-free cream cheese frosting alternatives and ensure your candy melts are also dairy-free. Be aware that these substitutions may slightly alter the texture and flavor of the final Autumn Spice Cake Pops.
What’s the best method for melting candy melts for dipping?
The microwave is often the easiest and fastest. Melt in 30-second intervals, stirring well after each, until smooth and fluid. Be careful not to overheat, as this can cause them to seize or burn. A double boiler over simmering water is another excellent option for controlled, gentle melting.
How long do Autumn Spice Cake Pops last, and can I freeze them?
Stored in an airtight container in the refrigerator, Autumn Spice Cake Pops will last up to one week. While you can freeze the cake balls before coating, freezing finished cake pops can sometimes cause condensation to mar the candy coating when thawing, affecting their appearance.
Ready to Share Your Autumn Spice Cake Pops Creation?
We hope this guide empowers you to create the most delicious and perfectly smooth Autumn Spice Cake Pops! They’re ideal for holiday gatherings, fall festivals, or simply enjoying a sweet, spiced bite with a cup of coffee.
There’s immense satisfaction in crafting these beautiful treats. Don’t forget to share your beautifully crafted Autumn Spice Cake Pops on social media – we love seeing your creations!
Spice Cake Pops
Course: DessertCuisine: AmericanDifficulty: medium24
cake pops45
minutes30
minutes350
kcal120
minutesSay goodbye to crumbly cake pops! This recipe cracks the code to consistently smooth, perfectly textured cake balls that hold their shape every time. With a delicious pumpkin spice cake base and a creamy frosting, you’ll bake like a pro.
Ingredients
1 box pumpkin spice cake mix
Ingredients required on cake mix box (typically eggs, oil, water)
1 container (16 oz) cream cheese frosting
12 oz white candy melts
4 oz yellow candy melts (or white candy melts with yellow food coloring)
1/4 cup graham cracker crumbs, finely crushed
Optional: Cake pop sticks
Directions
- Prepare and bake the pumpkin spice cake according to the package directions. Once baked, let the cake cool completely in the pan. This is important for the next step.
- Once the cake is fully cooled, crumble it into a large mixing bowl. The key to our perfect, non-crumbly balls is in the frosting addition. Gradually add the cream cheese frosting to the crumbled cake, mixing with your clean hands. Start with about half the container and add more, a spoonful at a time, until the mixture is moist enough to form a firm ball that holds its shape, but is not overly wet or greasy. This gradual method ensures you achieve the ideal texture.
- Roll the cake mixture into uniform 1-inch balls. Place these balls onto a baking sheet lined with parchment paper.
- This step is crucial for guaranteed non-crumbly results: Refrigerate the cake balls for at least 30 minutes. Chilling them thoroughly makes them firm, prevents them from falling apart, and helps them maintain their shape perfectly when you dip them.
- If using cake pop sticks, melt a small amount of the white candy melts according to package directions. Dip the tip of each stick into the melted candy, then gently insert into a chilled cake ball. Place back on the parchment-lined sheet and refrigerate for another 5 minutes to set the sticks.
- Melt the remaining white candy melts according to package directions until smooth. Dip each chilled cake ball (with or without a stick) completely into the melted white candy, tapping gently against the side of the bowl to remove any excess coating.
- Place the coated cake pops back onto the parchment-lined baking sheet. Allow the white candy coating to set completely. This may take about 10-15 minutes at room temperature, or you can refrigerate briefly.
- Melt the yellow candy melts (or white melts colored with yellow food coloring) until smooth. Using a spoon or a piping bag with a very small hole, drizzle the yellow candy over the set white coating in a decorative pattern.
- Immediately sprinkle the finely crushed graham cracker crumbs over the yellow drizzle before it sets.
- Allow the cake pops to set completely before serving. Enjoy your perfectly textured, non-crumbly treats!
Notes
- Chilling is crucial for perfect texture and to prevent crumbling.


