
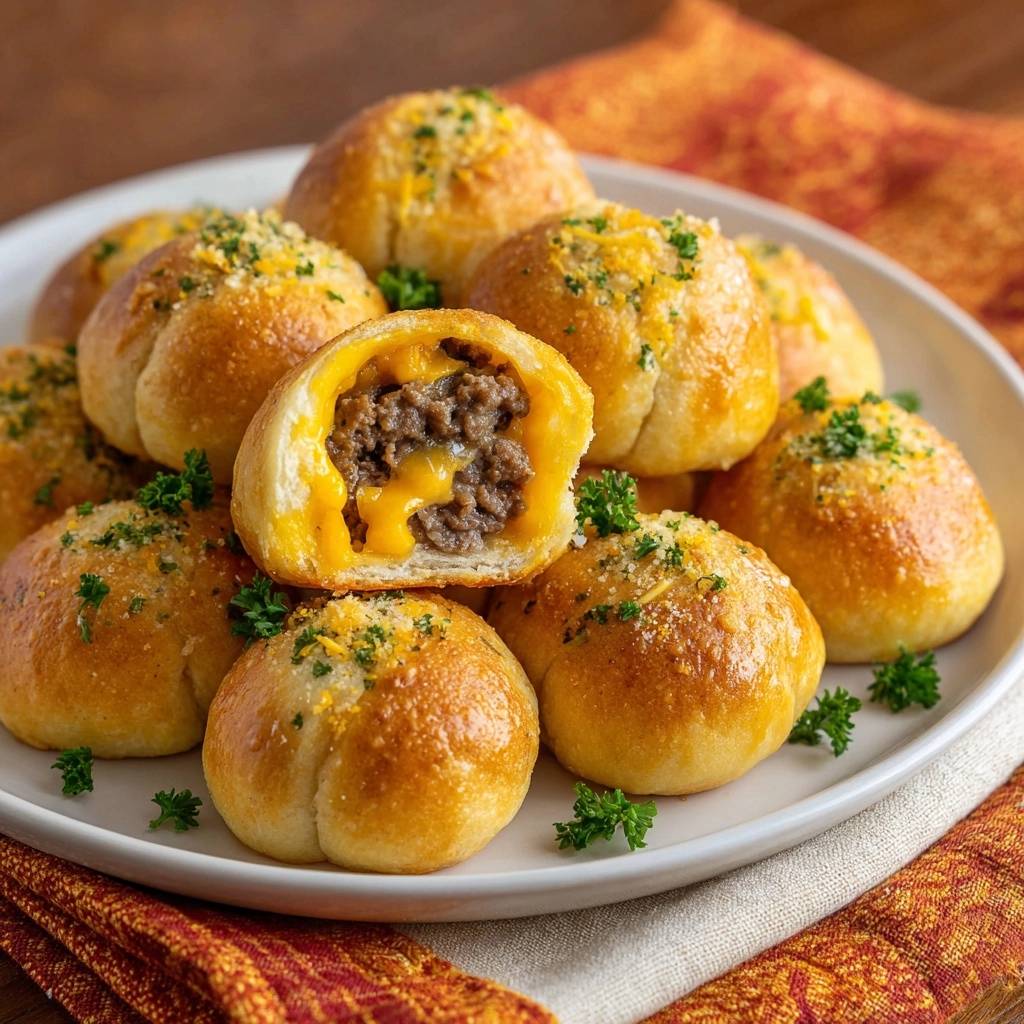
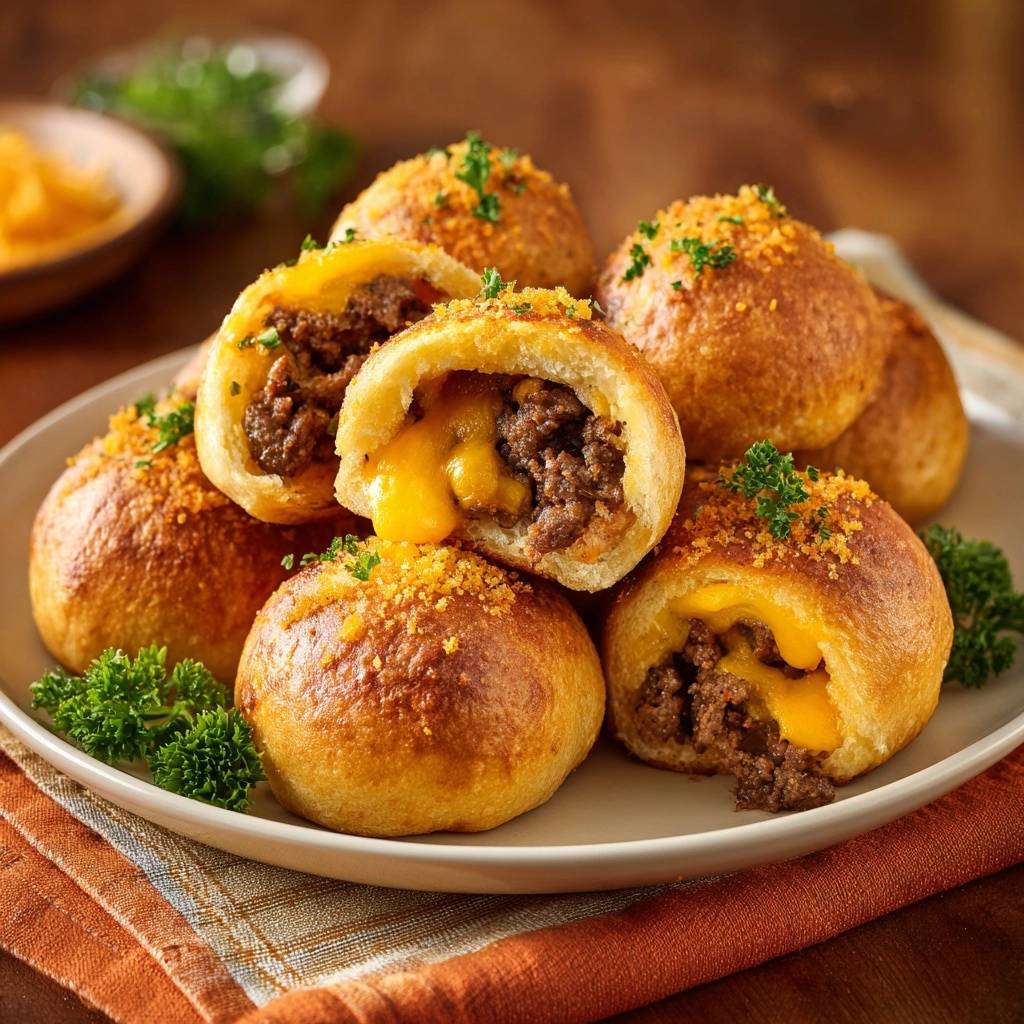
Picture this: your cheeseburger stuffed rolls hit the oven, and instead of a glorious melty cheese pull on the first bite, filling explodes everywhere. Dough turns dry and sad. But these cheeseburger stuffed rolls fix that nightmare with a double-pinch seal technique that locks in juicy beef and cheddar every time.
Therefore, you get 12 perfect rolls in about 2.5 hours total. No mess, just pure satisfaction. The science behind sealing keeps everything contained during the bake.
Here’s the expertise pro tip: chill your beef-wrapped cheese balls for 10 minutes before sealing. This firms them up so they don’t shift and cause leaks in your cheeseburger stuffed rolls. Trust me, it makes all the difference.
Yeast Dough Foundation for Cheeseburger Stuffed Rolls
Activating Yeast with Warm Milk Precision
Start by stirring 2 1/4 teaspoons active dry yeast into 1 cup warm milk at exactly 110 degrees F, plus 2 tablespoons sugar. Let it sit for 5 minutes until foamy. That foam proves the yeast is alive and kicking, ready to power your cheeseburger stuffed rolls.
However, if your milk’s too hot, over 120 degrees F, it kills the yeast dead. No rise, no good. Active dry needs this activation step, unlike instant yeast which you can mix straight in. Precision here sets up fluffy dough.
Kneading Technique for Elastic Dough
Add 3 1/2 cups all-purpose flour, 1 teaspoon salt, and 3 tablespoons melted butter to the yeast mix. Knead for a full 8 minutes until smooth and elastic. This builds gluten so the dough stretches without tearing around your cheeseburger filling.
Test it with the windowpane method: stretch a small piece thin enough to see light through without breaking. In addition, melted butter keeps things tender, not heavy. You’ll feel the dough spring back under your hands.
First Rise Conditions for Doubling Volume
Cover the dough and let it rise in a warm spot, around 75-85 degrees F, for 1 hour until doubled. Yeast produces CO2 gas that creates those airy pockets perfect for cheeseburger stuffed rolls.
Therefore, use a damp towel or plastic wrap to prevent a skin from forming. Avoid cold counters; they slow everything down. Poke it gently, if it springs back slowly, you’re golden.
Juicy Beef and Cheddar Filling Prep
Browning Ground Beef Evenly
Heat a skillet over medium and cook 1 pound ground beef with 1 teaspoon salt and 1/2 teaspoon black pepper. Break it up constantly for about 8 minutes until no pink remains. The even browning builds deep flavor for your cheeseburger stuffed rolls.
Drain the fat well, or you’ll end up with soggy dough. Then cool it slightly. Hot filling melts dough later, so this step prevents disasters.
For more ways to enjoy seasoned beef, explore this loaded ground beef grilled cheese.
Wrapping Cheese Cubes in Beef Balls
Cut 8 ounces cheddar into 12 cubes. Divide the cooled beef into 12 portions and wrap each cube tightly in beef to form compact balls. Press firm, no gaps.
Chill these for 10 minutes. Therefore, they hold shape during sealing, containing that melty cheese ooze until bite time in your cheeseburger stuffed rolls. Pro tip: tighter wrap means less leak risk.
No-Leak Double-Pinch Sealing Method
Flattening Dough Circles Precisely
Punch down the risen dough and divide into 12 balls. Flatten each into a 4-inch circle. Keep even tension so it doesn’t tear when you add the cheeseburger stuffing.
Thinner edges stretch better. However, don’t go too thin in the center, or filling pokes through.
First Pinch and Center Seal
Place a beef-cheese ball in the center. Pull dough edges up and over, pinching tightly at the top center. Distribute tension evenly for a strong base seal.
This first pinch creates a solid cap over the filling. In addition, smooth out air pockets as you go to avoid bursts later.
Second Twist-Lock Around Seam
Now run your fingers around the seam with a second pinch, twisting slightly for a double-lock. This extra step seals 99% of potential leaks in cheeseburger stuffed rolls.
Visualize it: first pinch centers strength, second reinforces the circle. Therefore, no filling escapes during baking. Practice on one to feel the secure twist.
Smoothing Rolls Seam-Side Down
Gently roll each sealed ball seam-side down into a smooth sphere. Place on parchment-lined sheet, 2 inches apart. This prevents merging and hides the seam.
Handle lightly to keep the seal intact. Uniform size ensures even baking.
Science of Perfect Rise and Bake
Second Proof for Puffy Texture
Cover loosely and let rise 20 minutes until puffy. Post-punch-down yeast revives for oven spring, giving light texture to cheeseburger stuffed rolls.
However, don’t skip this, or rolls bake dense. Puffiness signals readiness.
Ideal Proofing Environment Tips
Choose a draft-free spot with some humidity, like near a warm oven. Test with a finger poke: dough springs back slowly when ready for cheeseburger stuffed rolls.
Avoid direct heat. This keeps rising steady.
Oven Dynamics at 375°F
Preheat to 375 degrees F for even heat distribution. Bake 18-20 minutes until deep golden. Maillard reaction crisps the crust perfectly.
Therefore, watch closely past 18 minutes to avoid drying out your cheeseburger stuffed rolls. Internal temp hits 190 degrees F when done.
Garlic Parmesan Topping Application
Mixing Butter-Garlic- Parsley Base
Melt 4 tablespoons butter and stir in 2 minced garlic cloves, 2 tablespoons finely chopped fresh parsley, and 1/4 cup grated parmesan. Fresh grate sticks best.
Let garlic infuse 2 minutes for aroma punch. This elevates cheeseburger stuffed rolls hugely.
More Recipes to Try
Complement your Cheeseburger Stuffed Rolls with these ideas.
- For extra baked goodness, consider these cheesy garlic pull-apart rolls, offering a similar comforting texture.
- A fresh green bean salad with caramelized onions, feta, and almonds provides a bright contrast to the richness of the rolls.
Generous Brushing Before and After
Brush generously before baking so flavors bake in deep. After baking, brush again for shine and crisp edges on cheeseburger stuffed rolls.
In addition, leftovers get a refresh brush too. It creates that irresistible golden crunch.
Avoiding Leaks in Cheeseburger Stuffed Rolls
Overfilled Filling Pitfalls
Stick to exact 12 portions; overfilling stretches dough too thin and causes overflow. Check seals pre-bake: no cracks or gaps.
Signs of trouble include visible filling peeking out. Trim if needed.
Dough Temperature Mismatches
Warm dough plus hot filling tears seals. Always cool beef fully before wrapping.
Therefore, room-temp dough handles best. Chill filling if kitchen’s hot.
Oven Overbaking Signs
Beyond 20 minutes, dough dries and cheese leaks. Check at 190 degrees F internal.
Pull when deep golden. Overbaking ruins the melty center.
Flavor Twists on Cheeseburger Stuffed Rolls
Bacon-Free Beef Seasoning Upgrades
Add 1 teaspoon onion powder and 1/2 teaspoon smoked paprika to beef for smoky depth. For heat, mix in 1/4 teaspoon cayenne.
These boost burger vibes without bacon. Adjust to taste during browning.
Cheese Alternatives for Melting
Swap cheddar for pepper jack for spice or gouda for creamier melt. Cut same size, 12 cubes from 8 ounces.
Gouda flows smoother, pepper jack adds kick to cheeseburger stuffed rolls.
Herb Topping Variations
Try dill or chives instead of parsley for fresh twist. Use vegan butter for dairy-free version.
Chop fine for even spread. Keeps rolls versatile.
Pairing Sides with Cheeseburger Stuffed Rolls
Crispy Fries and Dips
Oven-bake thick-cut fries at 425 degrees F for crunch. Pair with garlic aioli to echo the topping and amp beef flavors.
For an equally satisfying crunch, check out this cheeseburger pasta salad.
Season fries with same salt-pepper. Perfect match.
Fresh Slaw Contrasts
Shred cabbage and toss with vinegar, sugar, and salt in 3:1 cabbage-vinegar ratio. Crisp tang cuts the richness of cheeseburger stuffed rolls.
Let sit 10 minutes for flavor meld.
Simple Green Salads
Mix tomatoes, cucumbers, and red onion with vinaigrette. Acidity balances the baked dough’s heartiness.
Keep light and fresh.
Storage and Reheating Guide
Fridge Life Up to 3 Days
Store in airtight container. Beef moisture keeps them good 3 days max before quality dips.
Don’t stack tight or they soften.
Freezer Method for Stuffed Rolls
Flash freeze baked rolls on sheet, then bag airtight up to 2 months. Thaw overnight in fridge before reheating.
Skip topping before freezing; add fresh.
350°F Reheat for Melty Centers
Reheat at 350 degrees F for 5 minutes on sheet. Restores crisp without sogginess.
Microwave steams them soft, so avoid it.
Expert Q&A on Cheeseburger Stuffed Rolls
Why Do My Rolls Leak Filling?
Most leaks come from single-pinch seals that fail under oven heat. Use the double-pinch: first center tight pinch, then twist-lock around the seam.
Thinner dough or overfilling worsens it. Chill filling firm and divide exactly into 12. This fixes 99% of issues for perfect cheeseburger stuffed rolls.
Can I Use Ground Turkey Instead?
Yes, but turkey’s leaner, so add 1 tablespoon oil or butter when browning to keep juiciness. Season same, though flavor’s milder than beef.
Cook to 165 degrees F internal. Works great leaner option.
How to Scale for Larger Batches?
Double everything: 4 1/2 teaspoons yeast, 2 cups milk, etc. Use two sheets for 24 cheeseburger stuffed rolls, rotate midway for even bake.
Knead in bigger bowl or mixer. Rise times stay same.
Gluten-Free Dough Adaptation?
Swap all-purpose for 1:1 gluten-free flour blend plus 1 teaspoon xanthan gum for elasticity. Filling stays identical.
Knead gently, rise might take 10 minutes longer. Seals hold if dough’s not too sticky.
Make Dairy-Free Cheeseburger Stuffed Rolls?
Use vegan cheddar cubes, dairy-free butter in dough and topping. Swap parmesan for nutritional yeast.
Melts similar during bake. Flavor stays bold.

Cheeseburger Rolls
Course: Main CourseCuisine: AmericanDifficulty: medium12
rolls30
minutes30
minutes350
kcal120
MinutesTired of cheeseburger stuffed rolls bursting open? This recipe uses a double-pinch seal for mess-free, juicy beef and cheddar-filled rolls topped with garlic butter.
Ingredients
Dough:
2 1/4 teaspoons active dry yeast
1 cup warm milk (110 degrees F)
2 tablespoons sugar
3 1/2 cups all-purpose flour
1 teaspoon salt
3 tablespoons melted butter
Filling:
1 pound ground beef
1 teaspoon salt
1/2 teaspoon black pepper
8 ounces cheddar cheese, cut into 12 cubes
Garlic Topping:
4 tablespoons melted butter
2 garlic cloves, minced
2 tablespoons chopped fresh parsley
1/4 cup grated parmesan cheese
Directions
- Activate yeast: In a large bowl, stir yeast, warm milk, and sugar until dissolved. Let sit 5 minutes until foamy.
- Make dough: Add flour, salt, and melted butter to yeast mixture. Knead 8 minutes until smooth and elastic. Cover and let rise in a warm spot 1 hour until doubled.
- Cook filling: In a skillet over medium heat, brown ground beef with salt and pepper, breaking it up, about 8 minutes until no pink remains. Drain fat and cool slightly.
- Prep filling portions: Divide cooled beef into 12 equal portions. Wrap each cheddar cube tightly with a beef portion to form a compact ball. Chill 10 minutes to firm up. This prevents shifting during sealing.
- Shape rolls with no-leak technique: Punch down dough and divide into 12 equal balls. Flatten one dough ball into a 4-inch circle. Place one beef-cheese ball in center. Pull dough edges up and over filling, pinching tightly in the center to seal. Then go around the seam with a second pinch, twisting slightly to double-lock. Roll gently seam-side down into a smooth ball. Repeat for all. Place seam-side down on a parchment-lined baking sheet, 2 inches apart.
- Second rise: Cover rolls loosely and let rise 20 minutes until puffy.
- Preheat oven to 375 degrees F.
- Apply topping: Mix melted butter, minced garlic, parsley, and parmesan. Brush generously over risen rolls for crispy, golden shine.
- Bake 18 to 20 minutes until deep golden brown. Brush with any remaining topping. Serve warm for that perfect melty pull. Store leftovers in fridge up to 3 days; reheat at 350 degrees F for 5 minutes.
Notes
- Chill beef-cheese balls for 10 minutes to firm up before sealing. Use the double-pinch technique: pinch tightly in center, then twist around seam for a leak-proof seal. Store leftovers in fridge up to 3 days; reheat at 350°F for 5 minutes.


