
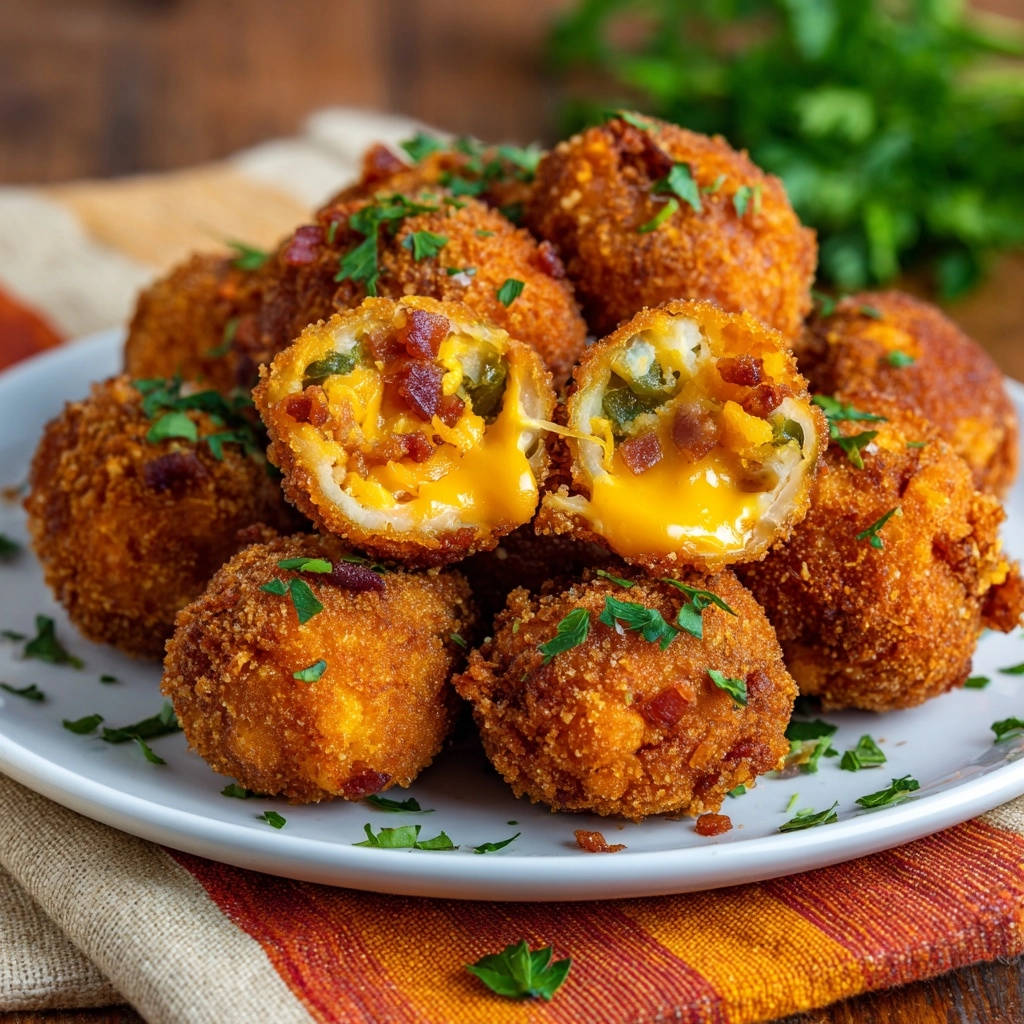
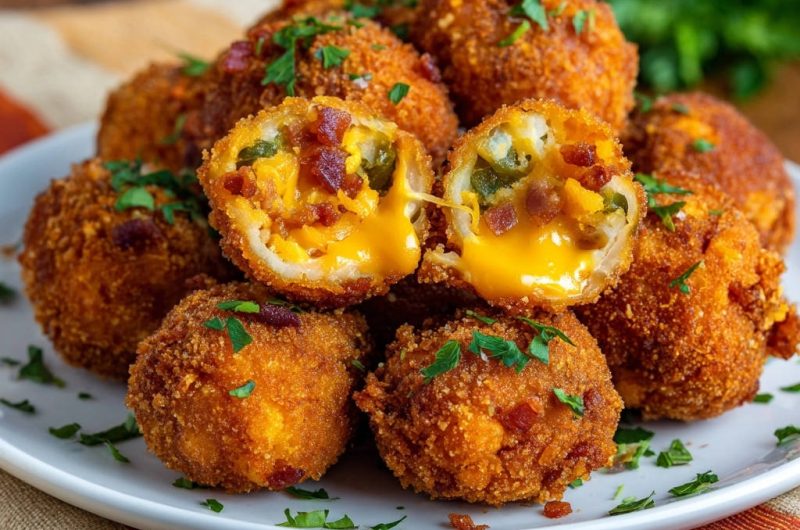
Ever experienced that frustrating moment when you bite into a supposedly gooey cheesy snack, only to find a solid, uninspired center? It’s a common disappointment, but with these Cheesy Jalapeño Popper Bites, that letdown is a thing of the past. My secret to achieving that perfect, irresistible ooze every time lies in a simple yet crucial chilling step, ensuring an explosion of flavor and texture that truly sets them apart.
Get ready to master the art of crispy exteriors and lusciously melted interiors, creating a show-stopping appetizer that will vanish from any plate the moment it lands. These are not just snacks; they’re an experience in balanced heat, savory bacon, and ultimate cheesy comfort.
For more crispy, cheesy goodness, check out these loaded bacon cheese fries.
The “Perfect Ooze” Promise: What Makes These Bites Special
No More Leaky Cheese: The Chilling Secret
The biggest challenge with cheesy fried snacks is often leakage. Our chilling step isn’t just a recommendation; it’s the bedrock of this recipe’s success.
By firming up the cheese mixture before frying, we create a robust core that resists melting out prematurely. This ensures your Cheesy Jalapeño Popper Bites hold their shape beautifully and deliver a perfect, contained molten center.
Irresistible Texture: Crispy Outside, Melty Inside
Achieving that coveted contrast between a golden, crunchy crust and a bubbling, molten interior is an art. We harness the power of a double-breading technique coupled with precise oil temperature.
This method creates a thick, protective barrier that fries to an incredible crispness, while simultaneously allowing the cheese inside to reach its ultimate gooey potential. Every bite offers an incredibly satisfying texture play.

Beyond Basic Appetizers: Flavor That Pops
These aren’t just any cheesy bites; they’re a symphony of bold flavors. The sharpness of cheddar, the gentle kick of fresh jalapeños, and the savory depth of crispy bacon create a harmonious profile.
It’s a balance of heat and richness that tantalizes the taste buds, making these Cheesy Jalapeño Popper Bites a truly addictive and memorable snack for any gathering.
For another crispy, cheesy delight, check out these loaded bacon cheese fries.
Gather Your Goods: Essential Ingredients
The Heart of the Bite: Cheese, Jalapeño & Bacon
2 cups shredded sharp cheddar cheese: Opt for sharp cheddar for its robust flavor and excellent melting properties. Shred it yourself if possible; pre-shredded often contains anti-caking agents that can affect melt.
2 medium jalapeños, finely diced (seeds and membranes removed for less heat): Fresh jalapeños provide both flavor and a vibrant pop. Removing seeds and membranes is key to controlling the spice level, ensuring a pleasant warmth rather than an overwhelming burn.
4 slices cooked bacon, crumbled: Crispy bacon bits add a crucial smoky, savory element that perfectly complements the cheese and jalapeño. Ensure it’s fully cooked and crumbled finely for even distribution.
Crafting the Golden Coat: Breading Essentials
1/2 cup all purpose flour: This acts as the first layer, providing a dry surface for the egg to adhere to, which is vital for a strong breading.
2 large eggs, beaten: Eggs form the liquid binder, allowing the panko breadcrumbs to stick securely and create a uniform, crispy crust.
1 1/2 cups panko breadcrumbs: Panko is non-negotiable here. Its larger, flakier crumb structure yields a significantly crispier, lighter exterior compared to traditional breadcrumbs, contributing greatly to the desired crunch.
Frying Medium: Choosing Your Oil
4 cups vegetable oil, for frying: A neutral-flavored oil with a high smoke point, like vegetable, canola, or sunflower oil, is essential. It allows for deep frying without imparting unwanted flavors or burning quickly.
Your Toolkit for Success: Recommended Equipment
Kitchen Staples: Bowls & Prep Gear
Mixing Bowls: You’ll need at least one medium bowl for the filling and three shallow dishes for your breading station. Efficiency starts with organization!
Cutting Board & Knife: Essential for finely dicing your jalapeños and crumbling bacon precisely.
Parchment Paper: Crucial for lining your plate or baking sheet, preventing the cheese balls from sticking during chilling and freezing.
The Frying Setup: Pot, Spoon & Thermometer
Large, Heavy-Bottomed Pot or Dutch Oven: A sturdy, deep pot is vital for safe and even deep frying. It helps maintain a consistent oil temperature and prevents splattering.
Slotted Spoon or Spider: For carefully lowering the bites into the hot oil and efficiently retrieving them once golden brown.
Kitchen Thermometer: A digital instant-read or candy thermometer is highly recommended for accurately monitoring oil temperature. This is key to perfectly cooked Cheesy Jalapeño Popper Bites.
From Prep to Perfection: Step-by-Step Frying Guide
Crafting & Chilling the Filling
Combine your shredded sharp cheddar cheese, finely diced jalapeños, and crumbled crispy bacon in a medium bowl. Mix these ingredients thoroughly to ensure every bite is packed with balanced flavor.
Form this vibrant mixture into small, uniform balls, approximately 1 inch in diameter. Consistency in size is important for even cooking. Arrange these balls on a plate or baking sheet lined with parchment paper.
Refrigerate for at least 30 minutes, or up to an hour. This crucial chilling step firms the cheese mixture, which is the ultimate secret weapon for preventing leakage and ensuring the cheese melts perfectly during frying.
Setting Up the Breading Station
Prepare three separate shallow dishes. In the first dish, place the all-purpose flour. In the second dish, pour the beaten large eggs. In the third dish, add the panko breadcrumbs, spreading them evenly.
This assembly line approach makes the breading process smooth and efficient, ensuring each cheese ball is perfectly coated.
Achieving the Perfect Triple Coat
Remove the chilled cheese balls from the refrigerator. Roll each ball first in the flour, ensuring it is completely coated, then gently shake off any excess flour.
Next, dip the floured ball into the beaten egg, allowing any excess to drip off. Finally, roll it thoroughly in the panko breadcrumbs, pressing gently to ensure an even, thick coating all around.
For extra security and an even crispier texture, you can repeat the egg and panko steps for a double coat. This creates a more robust crust that locks in the cheese.
Heating the Oil Safely & Precisely
In a large, heavy-bottomed pot or Dutch oven, pour enough vegetable oil to reach about 3 inches deep. Heat the oil over medium-high heat.
Use a kitchen thermometer to monitor the oil temperature, aiming for precisely 350°F (175°C). If you don’t have a thermometer, drop a small piece of breadcrumb into the oil; it should sizzle immediately and turn golden in about 30 seconds, indicating the correct temperature.
Frying for Optimal Melt & Crisp
Carefully lower a few breaded bites into the hot oil using a slotted spoon, making sure not to overcrowd the pot. Overcrowding will significantly lower the oil temperature, leading to greasy, less crispy results.
Fry for about 2 to 3 minutes, turning occasionally with your slotted spoon, until they are a deep golden brown and crispy on all sides. This precise frying duration and temperature ensures the cheese inside melts beautifully without the exterior burning.
Draining, Garnish & Immediate Enjoyment
Using your slotted spoon, carefully transfer the fried Cheesy Jalapeño Popper Bites to a plate lined with paper towels to drain any excess oil.
Let them cool for just a minute or two before serving, as the melted cheese will be extremely hot. Garnish with fresh chopped parsley if desired, and prepare to enjoy that irresistible, satisfying gooey cheese pull immediately!
Elevate Your Bites: Expert Tips & Tricks
Mastering the Chill: Why it Matters
Do not underestimate the power of chilling! A minimum of 30 minutes is essential, but an hour in the refrigerator or even 15-20 minutes in the freezer ensures the cheese mixture is rock-solid. This is your ultimate defense against leaky cheese and guarantees perfect shape retention.
Double Breading for Next-Level Crunch
For an extra sturdy and gloriously crispy exterior, repeat the egg and panko steps. This creates a thicker, more protective crust that stands up beautifully to the hot oil, delivering maximum crunch with every bite.
Oil Temperature: The Golden Rule
Maintaining a consistent oil temperature of 350°F (175°C) is paramount. Oil that is too cool will result in greasy bites, while oil that is too hot will burn the exterior before the cheese has a chance to melt perfectly. Use a thermometer and adjust heat as needed.
Smart Frying: Avoiding the Crowded Pot
Always fry in small batches. Giving each bite ample space prevents overcrowding, which can drastically lower the oil temperature. This ensures even cooking, optimal crispness, and prevents the bites from sticking together.
Troubleshooting Your Popper Bites
Why are my bites falling apart or leaking cheese?
This common issue usually indicates that your cheese mixture wasn’t chilled long enough, or the breading wasn’t thick and even. Ensure a minimum of 30 minutes chilling time, and consider a double breading coat for extra security, pressing the panko firmly onto the balls.
My bites aren’t crispy enough: What went wrong?
Lack of crispness often stems from oil that isn’t hot enough, causing the bites to absorb too much oil and become soggy. Overcrowding the pot can also lower the oil temperature. Maintain 350°F (175°C) and fry in small batches for optimal crispness.
How do I make them less spicy?
To significantly reduce the heat, ensure all seeds and white membranes are thoroughly removed from the jalapeños, as these parts contain most of the capsaicin. For a milder flavor, you can also use fewer jalapeños or substitute some with finely diced bell peppers. For those who love a bit of tang, consider making your own quick pickled jalapeños to add a different dimension of flavor.
Serving Suggestions & Pairing Ideas
The Best Dipping Companions
These crispy, gooey Cheesy Jalapeño Popper Bites are fantastic on their own, but pairing them with a dip elevates the experience! Classic ranch dressing offers a cool, creamy contrast that many adore, while a spicy sriracha mayo adds an extra zesty kick.
For something different, try a tangy blue cheese dip to complement the savory bacon, or even a sweet chili sauce to balance the savory and spicy notes. Offering a variety allows your guests to choose their favorite flavor adventure!
Creative Garnish Options
Beyond the optional fresh chopped parsley, consider a sprinkle of finely chopped chives for a mild oniony note that adds freshness. A dusting of smoked paprika can introduce an earthy warmth and beautiful color.
For an unexpected twist, a light drizzle of hot honey over the finished bites adds a delightful sweet-spicy complexity that truly tantalizes the palate.
Looking for More Flavor Adventures?
If you enjoyed these cheesy jalapeño popper bites, explore these other satisfying recipes.
- For a zesty and filling meal, try these buffalo chicken stuffed shells, offering a similar crowd-pleasing appeal with a kick.
- Round out your meal with this cheeseburger pasta salad, which brings a familiar flavor profile in a cool, refreshing format.
Perfect Occasions for Popper Bites
Cheesy Jalapeño Popper Bites are the ultimate crowd-pleaser for nearly any occasion! They’re absolutely perfect for game day gatherings, lively parties, or even a cozy movie night at home when you crave something truly special.
Their irresistible nature ensures they disappear quickly, so be prepared to make a double batch if you’re hosting a hungry crowd. They pair wonderfully with other finger foods; for example, you could serve them alongside amazing loaded lettuce cups with guaranteed crispy bacon for a diverse appetizer spread.
Planning Ahead: Make-Ahead & Storage Solutions
Can I prepare them in advance?
Absolutely! You can prepare and bread the Cheesy Jalapeño Popper Bites entirely, then freeze them before frying. Place the breaded bites on a parchment-lined tray and freeze until solid, typically 1-2 hours.
Once frozen solid, transfer them to an airtight freezer bag or container for up to 2-3 weeks. When ready to fry, do not thaw; simply fry them directly from frozen, adding a minute or two to the cooking time until golden and gooey.
Storing Leftover Bites
If you happen to have any leftovers – a rare occurrence with these popular bites – store them in an airtight container in the refrigerator for up to 2-3 days. While best fresh, they still make a great snack the next day.
Reheating for Maximum Crispness
For the best results and to regain that glorious crisp exterior, reheat leftover Jalapeño Popper Bites in an air fryer at 350°F (175°C) for 3-5 minutes. Alternatively, you can use an oven at 375°F (190°C) for 8-10 minutes, until they are heated through and crispy once more.
Cheesy Jalapeño Popper Bites: Your FAQs Answered
Can I bake these instead of frying?
While this recipe is meticulously optimized for frying to achieve that ultimate crispy-gooey contrast, you can certainly bake them as an alternative. Preheat your oven to 400°F (200°C).
Place the breaded bites on a parchment-lined baking sheet and bake for 15-20 minutes, flipping them halfway through, until they are golden brown. Do note that the texture will be less crispy and more tender compared to their fried counterparts.
What other cheeses can I use?
Sharp cheddar is fantastic for its flavor and melt, but feel free to experiment! A blend of cream cheese (softened) with a little cheddar can add an even creamier, richer texture to your Cheesy Jalapeño Popper Bites. You could also try Monterey Jack or pepper jack for a slightly milder spice and superb melt.
The key is to use cheeses that shred well and melt smoothly to ensure that perfect gooey center. Avoid extremely soft or watery cheeses that might leak.
How can I make them vegetarian or gluten-free?
To easily make these Jalapeño Popper Bites vegetarian, simply omit the bacon entirely. The cheese and jalapeño combination is still incredibly flavorful and satisfying on its own.
For a gluten-free version, substitute the all-purpose flour with a high-quality gluten-free all-purpose flour blend. Crucially, use certified gluten-free panko breadcrumbs, which are widely available. The rest of the preparation method remains exactly the same, ensuring delicious, dietary-friendly bites.
Your Culinary Adventure Awaits!
Now that you’re equipped with all the secrets to crafting the perfect Cheesy Jalapeño Popper Bites, it’s time to unleash your inner chef! Say goodbye to disappointing, solid centers and hello to an explosion of crispy, gooey, spicy, and savory flavor that will have everyone reaching for more before you can even say “seconds.”
Don’t just take our word for it-try this recipe tonight and experience the irresistible magic yourself. We’d absolutely love to hear about your culinary triumphs! Share your creations and tag us on social media; let’s spread the joy of truly perfect Cheesy Jalapeño Popper Bites far and wide.
Jalapeño Popper Bites
Course: AppetizerCuisine: AmericanDifficulty: easy4
servings20
minutes10
minutes750
kcal30
minutesEver bitten into a cheesy fried snack hoping for that glorious, gooey melt? This recipe reveals a simple trick to ensure your homemade cheesy bites deliver perfect, irresistible ooze every single time. Get ready for a serious flavor explosion!
Ingredients
2 cups shredded sharp cheddar cheese
2 medium jalapeños, finely diced (seeds and membranes removed for less heat)
4 slices cooked bacon, crumbled
1/2 cup all purpose flour
2 large eggs, beaten
1 1/2 cups panko breadcrumbs
4 cups vegetable oil, for frying
Fresh parsley, chopped, for garnish (optional)
Directions
- Prepare the Filling and Chill: In a medium bowl, combine the shredded cheese, finely diced jalapeños, and crumbled cooked bacon. Mix these ingredients thoroughly. Form the mixture into small, uniform balls, about 1 inch in diameter. Place these balls on a plate or baking sheet lined with parchment paper and refrigerate for at least 30 minutes, or up to an hour. This chilling step is essential for firming up the cheese mixture, which helps prevent leakage and ensures the cheese melts perfectly during frying.
- Set Up Breading Station: Prepare three shallow dishes. In the first dish, place the all purpose flour. In the second dish, pour the beaten eggs. In the third dish, add the panko breadcrumbs.
- Bread the Bites: Remove the chilled cheese balls from the refrigerator. Roll each ball first in the flour, ensuring it is completely coated. Gently shake off any excess flour. Next, dip the floured ball into the beaten egg, allowing any excess to drip off. Finally, roll it thoroughly in the panko breadcrumbs, pressing gently to ensure an even, thick coating all around. For extra security and crispiness, you can repeat the egg and panko steps for a double coat.
- Heat the Oil: In a large, heavy-bottomed pot or Dutch oven, pour enough vegetable oil to reach about 3 inches deep. Heat the oil over medium high heat until it reaches 350 degrees Fahrenheit. If you do not have a thermometer, a small piece of breadcrumb should sizzle immediately and turn golden in about 30 seconds when dropped into the oil.
- Fry to Golden Perfection: Carefully lower a few breaded bites into the hot oil, making sure not to overcrowd the pot. Fry for about 2 to 3 minutes, turning occasionally, until they are a deep golden brown and crispy on all sides. Frying at the correct temperature for this duration allows the cheese inside to melt beautifully without the outside burning.
- Drain and Garnish: Using a slotted spoon, carefully transfer the fried bites to a plate lined with paper towels to drain any excess oil. Let them cool for a minute or two before serving, as the cheese will be very hot. Garnish with fresh chopped parsley if desired. Serve immediately and enjoy that irresistible gooey cheese pull!
Notes
- Chilling step is essential for firming up the cheese mixture and preventing leakage during frying. For extra security and crispiness, repeat the egg and panko steps for a double coat.


