
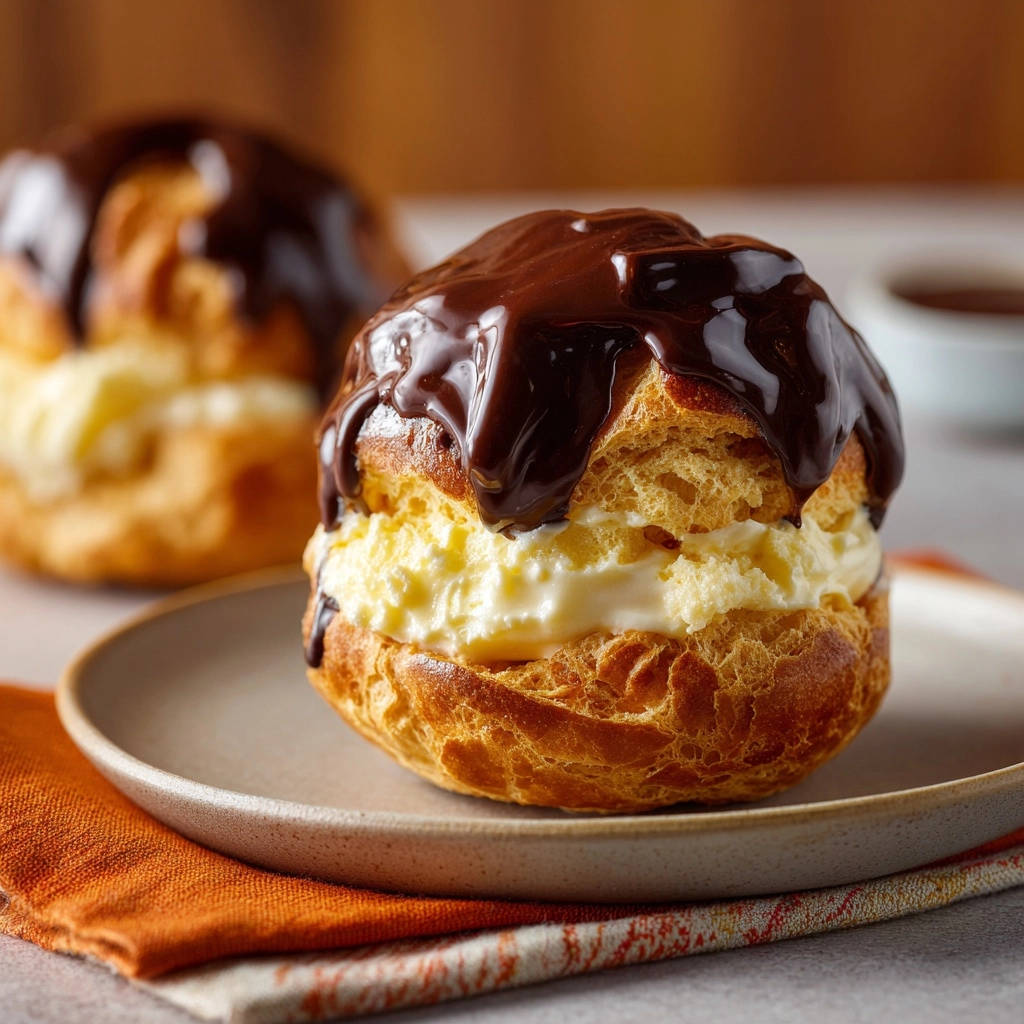
There’s a magical moment when you open the oven to find perfectly puffed, golden shells, a sight often elusive for many home bakers. I remember the frustration of deflated attempts, but through countless batches, I’ve perfected a method that guarantees light, airy, and beautifully hollow Classic Cream Puffs with Chocolate Ganache every single time.
This recipe isn’t just about ingredients; it’s about technique, specifically our “no-collapse method,” ensuring your treats are bakery-worthy without the usual heartbreak.
For more tips on achieving that perfect rise, check out this guide to classic cream puffs.
Why This Classic Cream Puffs with Chocolate Ganache Recipe is Your New Go-To
Beyond simply creating a delicious dessert, this recipe focuses on demystifying the art of choux pastry. It addresses common pitfalls, providing clear, actionable steps for a truly successful outcome.
You’ll gain the confidence to create these elegant pastries, knowing they’ll emerge from the oven perfectly structured, ready for their luscious fillings.
The Promise: Light, Airy, and Perfectly Hollow Every Time
Our method focuses on precise moisture control and temperature management, two critical factors often overlooked. This ensures your choux pastry shells achieve that coveted internal cavity and delicate crispness.
No more dense, soggy, or flat pastries-just beautifully puffed shells ready for creamy perfection.
Unveiling the “No Collapse Method” Difference
The secret lies in diligently drying out the dough on the stovetop and a strategic two-stage baking and cooling process. This careful approach builds a strong internal structure and reduces moisture, safeguarding against post-oven deflation.
It’s a reliable technique that delivers consistent, impressive results, making flawless Classic Cream Puffs with Chocolate Ganache accessible to everyone.
Gathering Your Culinary Arsenal: Key Ingredients for Success
Success begins with understanding your ingredients. Each component plays a crucial role in the texture, flavor, and stability of your Classic Cream Puffs with Chocolate Ganache.
Opt for fresh, high-quality items to ensure the best possible outcome for this delicate dessert.
For the Irresistible Choux Pastry
Unsalted Butter: Essential for richness and flavor, using unsalted butter allows you to control the overall salt content of the dough.
Water: The primary liquid that, when boiled with butter, creates the steam needed to puff the pastry.
Salt & Granulated Sugar: A pinch of each balances the flavor profile, enhancing the pastry’s overall taste without making it overtly sweet or savory.
All-Purpose Flour: Provides the structural backbone for the choux pastry. Sifting it ensures a smooth, lump-free dough.
Large Eggs: Crucial for emulsifying the dough, adding richness, and contributing significantly to the rise and texture of the puffs. Ensure they are at room temperature for better incorporation.
Crafting the Velvety Vanilla Pastry Cream
Whole Milk: The base for the cream, whole milk provides a rich, luxurious texture. Avoid lower-fat milks, which can result in a thinner cream.
Granulated Sugar: Sweetens the cream and helps achieve its smooth consistency.
Cornstarch: Our thickening agent! It provides stability and a silky texture to the pastry cream, preventing it from becoming runny.
Large Egg Yolks: Enrich the cream with a beautiful color, flavor, and additional thickening power. Tempering them correctly is essential for smoothness.
Vanilla Extract: Adds the classic, aromatic vanilla flavor. Use a good quality pure vanilla extract for the best taste.
Unsalted Butter, Softened: Stirred in at the end, butter adds a glossy finish and enhances the creaminess of the pastry cream.
The Decadent Chocolate Ganache Touch
Semi-Sweet Chocolate, Chopped: Choose a good quality baking chocolate, as it makes up the bulk of the ganache’s flavor. Chopping it finely ensures even melting.
Heavy Cream: Provides the necessary fat and liquid to create a smooth, rich, and pourable ganache. Ensure it has at least 36% milk fat.
Essential Tools for Your Classic Cream Puff Adventure
Having the right tools makes a significant difference in the ease and success of your baking process.
These items are standard kitchen equipment but are invaluable for crafting perfect cream puffs.
Medium Saucepan: Critical for cooking the choux pastry dough and the vanilla pastry cream.
Heavy-Duty Baking Sheet: Provides an even surface for baking the choux pastry. Line it with parchment paper for easy removal.
Parchment Paper: Prevents sticking and promotes even baking without spreading.
Hand Mixer or Stand Mixer: Essential for incorporating eggs into the choux pastry dough smoothly and efficiently.
Whisk: Used for blending the pastry cream ingredients and creating a smooth ganache.
Rubber Spatula or Wooden Spoon: Ideal for stirring and scraping down the sides of the pan during dough preparation.
Piping Bag with Large Round Tip (e.g., Ateco 808): Creates uniform cream puff shapes. If unavailable, two spoons can be used.
Wire Rack: Allows air to circulate around the baked puffs for complete cooling and to maintain crispness.
Plastic Wrap: Crucial for covering the pastry cream directly to prevent a skin from forming while chilling.
Your Path to Classic Cream Puff Perfection: A Detailed Guide
Follow these steps carefully to achieve magnificent Classic Cream Puffs with Chocolate Ganache that won’t disappoint.
Part 1: Mastering the Choux Pastry (The No-Collapse Way!)
- Step 1: Preheat and Prepare.
Set your oven to 400°F (200°C) and line a baking sheet with parchment paper. Proper preparation ensures you’re ready when the dough is, preventing any delays.
- Step 2: Boil the Base.
In a medium saucepan, combine the unsalted butter, water, salt, and granulated sugar. Bring this mixture to a rolling boil over medium-high heat. Achieving a strong boil ensures the butter is fully melted and the liquids are sufficiently hot.
- Step 3: Add Flour, Stir Vigorously.
Remove the saucepan from the heat and immediately add all of the all-purpose flour at once. Stir vigorously with a wooden spoon until a ball of dough forms that pulls away cleanly from the sides of the pan. Quick, decisive mixing prevents lumps and begins to develop the dough’s structure.
- Step 4: Dry Out the Dough (The Key to No Collapse).
Return the saucepan to medium-low heat and continue to cook the dough for 2-3 minutes, stirring constantly. This crucial step is essential for drying out the dough and reducing moisture content, which prevents your puffs from collapsing later.
You’ll know it’s ready when a thin film forms on the bottom of the pan, indicating proper moisture evaporation.
- Step 5: Cool Slightly.
Transfer the dough to a large mixing bowl and let it cool for 5 minutes. This cooling period is vital; it prevents the eggs from scrambling when they are added.
- Step 6: Incorporate Eggs One at a Time.
Add the eggs one at a time, beating well with a hand mixer or stand mixer after each addition until fully incorporated and the dough is smooth before adding the next egg. Proper egg integration creates the thick, glossy, and characteristic V-shaped consistency needed for the dough to puff beautifully.
- Step 7: Pipe Your Puffs.
Transfer the choux pastry to a piping bag fitted with a large round tip (or use two spoons for rustic puffs). Pipe 1 1/2 inch mounds onto the prepared baking sheet, spacing them about 2 inches apart. Consistent sizing ensures even baking and a uniform appearance.
- Step 8: Initial High-Heat Bake (No Peeking!).
Bake the choux pastry for 15 minutes at 400°F (200°C). DO NOT open the oven door during this time. This initial high heat creates the vital steam that puffs up the pastry, giving it its iconic hollow interior.
- Step 9: Lower Temperature, Longer Bake.
Reduce the oven temperature to 350°F (175°C) and continue baking for another 20-25 minutes, or until the puffs are deeply golden brown and firm to the touch. This longer baking time at a lower temperature is essential for thoroughly drying out the interior, preventing them from collapsing.
- Step 10: Gradual Cooling (The Final Collapse Prevention).
To prevent collapsing, turn off the oven and prop the door open slightly with a wooden spoon. Let the cream puffs cool inside the oven for at least 15-20 minutes. This gradual cooling prevents a sudden temperature drop that can cause them to deflate, maintaining their structure.
- Step 11: Cool Completely.
Remove from the oven and transfer to a wire rack to cool completely. Once cool, you can pierce the bottom of each puff with a small knife to release any remaining steam, further ensuring maximum crispness and preventing internal moisture from softening the shell.
Part 2: Whisking Up the Silky Vanilla Pastry Cream
- Step 1: Heat Milk and Sugar.
In a medium saucepan, whisk together 1 1/4 cups of whole milk and 1/4 cup of granulated sugar. Heat this mixture over medium heat until it just begins to simmer around the edges. Gentle, even heat prepares the liquid base for tempering.
- Step 2: Prepare Egg Yolk Mixture.
In a separate bowl, whisk together the remaining 1/4 cup of milk, cornstarch, the remaining 1/4 cup of sugar, and the large egg yolks until smooth and light yellow. This ensures a lump-free base for your pastry cream.
- Step 3: Temper the Eggs.
Slowly pour about half of the hot milk mixture into the egg yolk mixture, whisking constantly and vigorously. Tempering prevents the egg yolks from scrambling when they are combined with the hotter liquid.
- Step 4: Thicken the Cream.
Pour the tempered egg mixture back into the saucepan with the remaining hot milk. Cook over medium heat, whisking constantly, until the mixture thickens significantly and comes to a boil. Boil for 1 minute, continuing to whisk, to fully activate the cornstarch for proper thickening.
- Step 5: Add Flavor and Shine.
Remove the saucepan from the heat and stir in the vanilla extract and softened unsalted butter until the cream is perfectly smooth and glossy. These additions provide richness, depth of flavor, and a beautiful sheen.
- Step 6: Chill Thoroughly.
Transfer the pastry cream to a bowl, cover the surface directly with plastic wrap to prevent a skin from forming, and chill in the refrigerator for at least 2 hours, or until thoroughly cold and set. Proper chilling is essential for the cream’s texture and stability.
For a brighter twist on this classic, explore lemon cream puffs with perfectly hollow shells.
Part 3: Creating the Luscious Chocolate Ganache
- Step 1: Chop Chocolate.
Place the 4 ounces of chopped semi-sweet chocolate in a heatproof bowl. Smaller pieces melt more evenly and quickly, ensuring a smooth ganache.
- Step 2: Heat Cream.
Heat the 1/2 cup of heavy cream in a small saucepan over medium heat until it just begins to simmer around the edges. It’s crucial not to boil the cream, as this can scald it and negatively affect the ganache’s flavor and texture.
- Step 3: Pour and Wait.
Pour the hot cream over the chopped chocolate in the bowl. Let it sit undisturbed for 5 minutes without stirring. This allows the residual heat from the cream to gently melt the chocolate, making it easier to emulsify.
- Step 4: Whisk to Glossy Perfection.
Gently whisk the mixture from the center outwards until it is completely smooth and glossy. Let it cool slightly until it’s thick enough to spoon over the cream puffs without running off, but still easily pourable.
Bringing It All Together: The Grand Assembly
- Step 1: Slice the Puffs.
Once the cream puffs are completely cool and the vanilla pastry cream is thoroughly chilled, carefully slice each cream puff horizontally with a serrated knife. A clean cut is vital for neat assembly.
- Step 2: Fill with Pastry Cream.
Spoon or pipe a generous amount of the chilled vanilla pastry cream into the bottom half of each puff. Don’t be shy with the filling-it’s the heart of the cream puff!
- Step 3: Cap with Top.
Gently place the top half of the choux pastry over the filling. Arrange them carefully to ensure each cream puff looks appealing and intact.
- Step 4: Drizzle with Ganache.
Spoon the slightly cooled chocolate ganache over the top of each cream puff. The ganache adds a decadent finish and ties all the flavors together beautifully.
- Step 5: Serve or Chill.
Serve your Classic Cream Puffs with Chocolate Ganache immediately for the freshest experience, or chill them until ready to serve. Chilling will firm up the pastry cream further.
Chef’s Secrets to Elevate Your Cream Puff Game
These expert tips will ensure your Classic Cream Puffs with Chocolate Ganache are consistently perfect.
Don’t Rush the Drying: The 2-3 minutes of cooking the choux dough on the stovetop (Step 4) is non-negotiable for preventing soggy or collapsed puffs. This crucial step is where most issues arise, so give it your full attention.
Piping Perfection: For perfectly round and uniform puffs, pipe straight down and then release pressure as you lift the bag quickly. A large round tip (like an Ateco 808) is ideal, but using two spoons can work in a pinch for a more rustic look.
Egg Consistency is Key: Ensure each egg is fully incorporated into the choux dough before adding the next one. This creates the proper emulsification and develops the ideal elastic texture, which is vital for the puffs to rise correctly.
Cooling is Crucial: The gradual cooling process inside the oven with the door propped open (Step 10) is as important as the baking itself for firm, non-collapsing shells. Resist the urge to pull them out early, as a sudden temperature drop can cause deflation.
Preventing Pastry Cream Skin: Always press plastic wrap directly onto the surface of the pastry cream before chilling. This prevents a rubbery skin from forming and keeps your cream perfectly smooth and luscious.
Troubleshooting Your Cream Puffs: Solutions for Common Mishaps
Even experienced bakers face challenges. Here are solutions to common cream puff issues.
Why Did My Puffs Collapse?
Collapsed puffs are usually due to insufficient drying of the choux pastry on the stovetop (Part 1, Step 4) or not baking them long enough (Part 1, Step 9) to thoroughly dry out the interior. Additionally, opening the oven door too early during the initial high-heat bake (Part 1, Step 8) or skipping the gradual cooling in the oven (Part 1, Step 10) can cause deflation.
My Choux Pastry Dough Is Too Runny/Stiff!
If the dough is too runny after adding eggs, it means you’ve either used too many eggs or the initial dough wasn’t dried out enough on the stovetop. If it’s too stiff, you might need an extra tablespoon or two of a lightly beaten egg, added gradually, until it forms the characteristic ‘V’ shape when lifted with a spoon.
Ganache Isn’t Smooth or Glossy
This often happens if the cream wasn’t hot enough, or if you stirred the mixture too soon after pouring the hot cream over the chocolate. Ensure the cream is simmering hot, let it sit on the chocolate for a full 5 minutes, then whisk gently from the center outwards until smooth. If it seizes, a tablespoon of hot cream added slowly while stirring constantly can sometimes rescue it.
Beyond the Bake: Serving, Storing, and Making Ahead
Make the most of your delicious Classic Cream Puffs with Chocolate Ganache with these practical tips.
Elegant Serving Suggestions
Serve Classic Cream Puffs with Chocolate Ganache as a decadent dessert after any meal or as a sophisticated treat for afternoon tea. A light dusting of powdered sugar just before serving adds an extra touch of elegance and visual appeal.
Complementary Sweet Treats
To continue your dessert adventure after the cream puffs, consider these other delightful recipes.
- For delicate, tear-free results perfect for light fillings, explore this foolproof method for perfect crepes.
- If you enjoy a dramatic, puffed pastry experience, try the sky-high rise Raspberry Dutch Baby Pancake.
Storage Solutions for Freshness
Filled cream puffs are undoubtedly best enjoyed fresh on the day they are assembled. Store any leftovers in an airtight container in the refrigerator for up to 2-3 days. Be aware that the pastry shells may soften slightly over time due to the moisture from the filling.
Can I Make Cream Puffs in Advance?
Absolutely! The choux pastry shells can be baked and cooled completely, then stored in an airtight container at room temperature for 1-2 days, or frozen for up to a month. Thaw frozen shells at room temperature before filling and glazing. The pastry cream can also be made 1-2 days in advance and kept chilled, making assembly a breeze.
Your Most Asked Questions About Classic Cream Puffs with Chocolate Ganache
Get quick answers to common queries about this delightful dessert.
Can I use different fillings for the cream puffs?
Yes, absolutely! While vanilla pastry cream is a timeless classic, you can certainly get creative. Chantilly cream (sweetened whipped cream), lemon curd, or even a fresh fruit compote make delicious alternatives. For more inspiration on different fillings, you might explore recipes like our Strawberry Cream Puff Pastry Bites for different flavor profiles.
What’s the best way to temper eggs for pastry cream?
Tempering eggs is crucial to prevent them from scrambling when added to hot liquids. The best way is to slowly pour a small amount of hot liquid into the egg mixture while whisking vigorously. Gradually add more hot liquid until the egg mixture is warm, then slowly pour it back into the main saucepan while continuously whisking.
Can I freeze cream puff shells?
Yes, you can! Once baked and completely cooled, arrange the hollow shells in a single layer on a baking sheet and freeze until solid. Transfer them to an airtight freezer bag and store for up to 1 month. Thaw them at room temperature for about 30 minutes before filling and serving for the best texture.
Can I make the ganache ahead of time?
You can make the chocolate ganache a day in advance. Store it covered in the refrigerator. When ready to use, gently reheat it over a double boiler or in short bursts in the microwave, stirring frequently until it’s pourable and smooth again. This ensures it’s perfectly decadent for drizzling.
Ready to Impress? Share Your Classic Cream Puff Masterpiece!
Now that you’re armed with the “no collapse” method and all the expert tips, there’s nothing stopping you from creating bakery-worthy Classic Cream Puffs with Chocolate Ganache right in your own kitchen. These delicate, airy treats are guaranteed to impress anyone lucky enough to try them, showcasing your newfound baking prowess.
We’d love to see your beautiful cream puffs! Share your creations with us on social media and don’t forget to leave a comment below with your favorite part of making this recipe or any creative twists you tried. Happy baking, and enjoy every perfectly puffed bite!
Cream Puffs
Course: PastryCuisine: FrenchDifficulty: medium12
cream puffs30
minutes35
minutes450
kcal60
minutesMaking cream puffs from scratch can feel intimidating, but this simple trick ensures they puff up beautifully and hold their shape every single time. This method guarantees light, airy, and perfectly hollow cream puffs, ready for your favorite filling and chocolate ganache.
Ingredients
For the Choux Pastry:
1/2 cup (1 stick) unsalted butter
1 cup water
1/4 teaspoon salt
1 teaspoon granulated sugar
1 cup all purpose flour
4 large eggs
For the Vanilla Pastry Cream Filling:
1 1/2 cups whole milk
1/2 cup granulated sugar, divided
1/4 cup cornstarch
2 large egg yolks
1 teaspoon vanilla extract
2 tablespoons unsalted butter, softened
For the Chocolate Ganache:
4 ounces semi sweet chocolate, chopped
1/2 cup heavy cream
Directions
- Part 1: The Choux Pastry (The No Collapse Method!)
- Preheat your oven to 400°F (200°C). Line a baking sheet with parchment paper.
- In a medium saucepan, combine the butter, water, salt, and sugar. Bring to a rolling boil over medium high heat.
- Remove from heat and immediately add the flour all at once. Stir vigorously with a wooden spoon until a ball of dough forms and pulls away from the sides of the pan.
- Return the saucepan to medium low heat and continue to cook the dough for 2-3 minutes, stirring constantly. This step is crucial for drying out the dough and reducing moisture, which prevents collapsing. You’ll see a thin film forming on the bottom of the pan.
- Transfer the dough to a large mixing bowl and let it cool for 5 minutes.
- Add the eggs one at a time, beating well with a hand mixer or stand mixer after each addition until fully incorporated and the dough is smooth before adding the next egg. The final dough should be thick, glossy, and fall slowly from the spoon in a V shape.
- Transfer the choux pastry to a piping bag fitted with a large round tip (or use two spoons). Pipe 1 1/2 inch mounds onto the prepared baking sheet, spacing them about 2 inches apart.
- Bake the choux pastry for 15 minutes at 400°F (200°C). DO NOT open the oven door during this time. This initial high heat creates the steam that puffs up the pastry.
- Reduce the oven temperature to 350°F (175°C) and continue baking for another 20-25 minutes, or until the puffs are deeply golden brown and firm. The longer baking time at a lower temperature is essential for drying out the interior, preventing them from collapsing.
- To prevent collapsing, turn off the oven and prop the door open slightly with a wooden spoon. Let the cream puffs cool inside the oven for at least 15-20 minutes. This gradual cooling prevents a sudden temperature drop that can cause them to deflate.
- Remove from the oven and transfer to a wire rack to cool completely. Once cool, you can pierce the bottom of each puff with a small knife to release any remaining steam, further ensuring crispness.
- Part 2: The Vanilla Pastry Cream Filling
- In a medium saucepan, whisk together 1 1/4 cups milk and 1/4 cup granulated sugar. Heat over medium heat until it just begins to simmer.
- In a separate bowl, whisk together the remaining 1/4 cup milk, cornstarch, remaining 1/4 cup sugar, and egg yolks until smooth.
- Slowly pour about half of the hot milk mixture into the egg yolk mixture, whisking constantly to temper the eggs.
- Pour the tempered egg mixture back into the saucepan with the remaining hot milk. Cook over medium heat, whisking constantly, until the mixture thickens significantly and comes to a boil. Boil for 1 minute, continuing to whisk.
- Remove from heat and stir in the vanilla extract and softened butter until smooth.
- Transfer the pastry cream to a bowl, cover the surface directly with plastic wrap to prevent a skin from forming, and chill in the refrigerator for at least 2 hours, or until thoroughly cold and set.
- Part 3: The Chocolate Ganache
- Place the chopped chocolate in a heatproof bowl.
- Heat the heavy cream in a small saucepan over medium heat until it just begins to simmer around the edges. Do not boil.
- Pour the hot cream over the chopped chocolate. Let it sit for 5 minutes without stirring.
- Gently whisk the mixture from the center outwards until smooth and glossy. Let it cool slightly until it’s thick enough to spoon over the cream puffs but still pourable.
- Assembly:
- Once the cream puffs are completely cool and the pastry cream is chilled, slice each cream puff horizontally with a serrated knife.
- Spoon or pipe a generous amount of vanilla pastry cream into the bottom half of each puff.
- Place the top half of the choux pastry over the filling.
- Spoon the slightly cooled chocolate ganache over the top of each cream puff.
- Serve immediately or chill until ready to serve.
Notes
- The ‘No Collapse Method’ involves specific drying and gradual cooling steps to ensure perfectly puffed and crisp cream puffs.


