

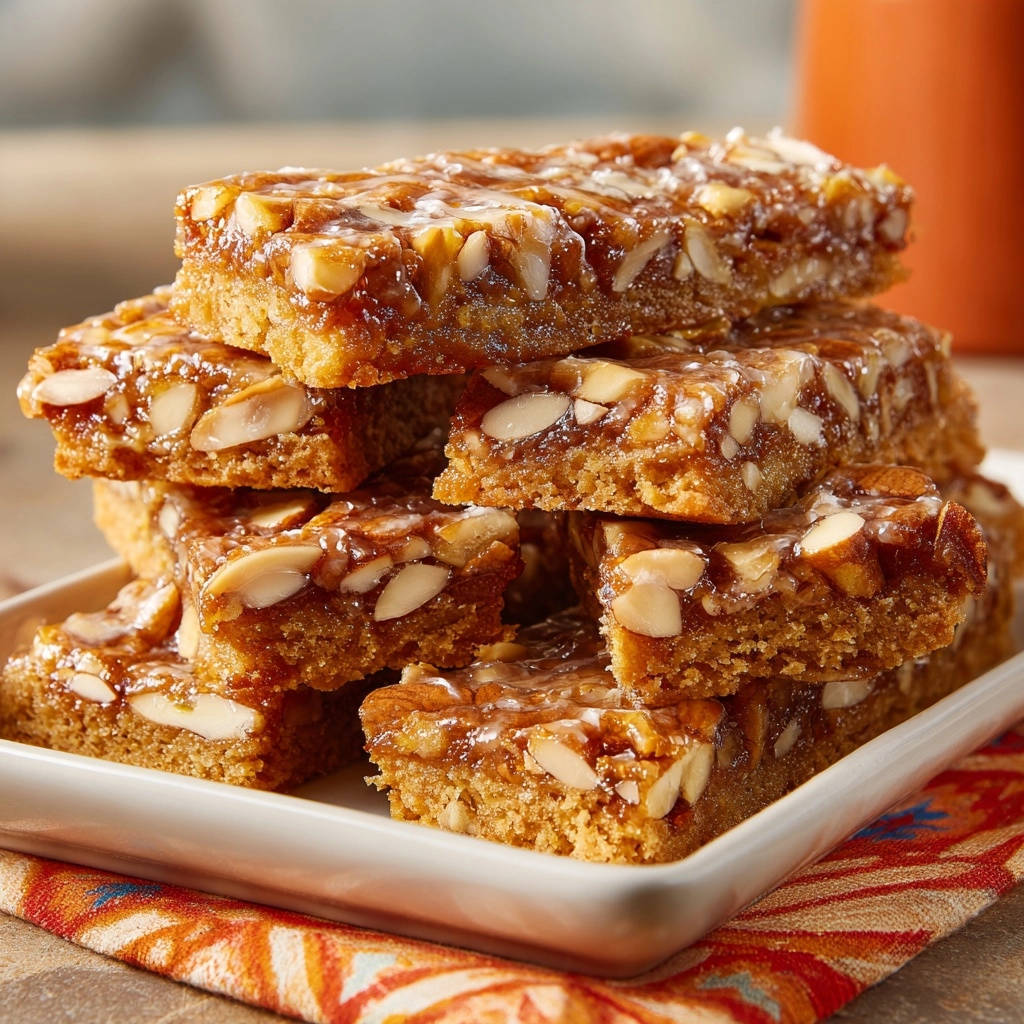
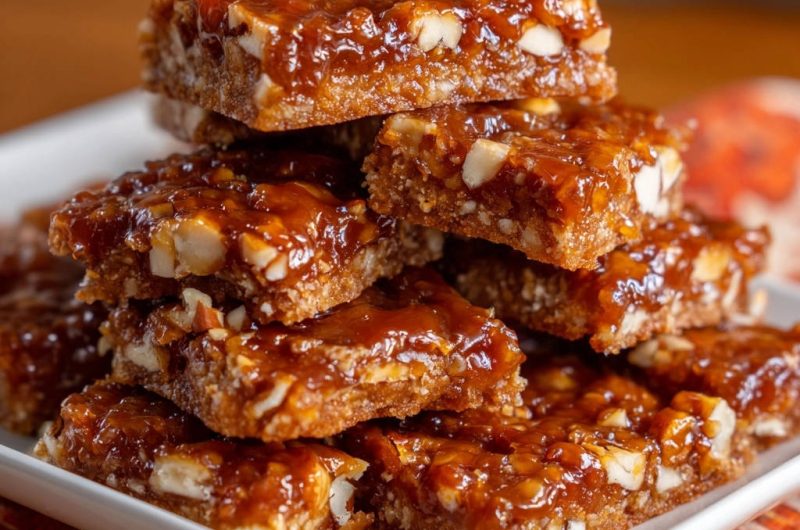
For years, I struggled to achieve that perfect caramel set-it was either rock hard, pulling out teeth, or running off the side of the pan. This recipe for Classic Nutty Caramel Bars is my solution, perfected over countless attempts.
The secret lies in our precise “Texture Lock-In” method, which guarantees a chewy, sticky caramel that holds its shape beautifully when sliced, delivering maximum indulgence every single time.
Why This Classic Nutty Caramel Bars Recipe is Guaranteed to Succeed
The greatest challenge in bar baking is controlling the caramel consistency, but our measured approach eliminates guesswork entirely.
Unlike recipes that rely only on instinct, this method uses specific structural additions and precise boiling times to create a stable, reliable topping.
You will achieve the ideal chewiness that distinguishes a truly great caramel bar, locking in the gooey texture without fear of crystallization.
The “Texture Lock-In” Method: The 60-Second Secret
The 60-second timed boil is the non-negotiable step that controls the sugar’s crystallization process.
Boiling the caramel to a specific density for exactly one minute ensures the right amount of moisture evaporates, stabilizing the mixture so it sets chewy, not brittle, after cooling.
Perfect Balance of Gooey vs. Set
We achieve the ideal texture by incorporating a small amount of flour into the cooked caramel base, acting as a crucial binder and stabilizer.
This addition prevents separation and provides the necessary structure, allowing the bars to maintain a distinct, sticky layer while still being easy to cut and handle.
Essential Make-Ahead Quality
These bars actually improve as they set fully, making them perfect for preparing a day or two in advance of an event.
Once cooled and stored in an airtight container, the caramel becomes even firmer and chewier, ensuring perfect party slices.
Building the Perfect Bar: Ingredients for Crust and Caramel
The Foundation: Key Crust Ingredients
Cold Butter is Key
The butter must be kept cold and cubed because when it is cut into the flour, it creates pockets of fat.
These pockets melt rapidly during baking, producing steam that results in a tender, flaky, shortbread-style crust rather than a tough one.
Choosing Your Brown Sugar
Packed light brown sugar is preferred over white sugar for the crust because the molasses content adds depth of flavor and crucial moisture.
Ensure it is firmly packed into the measuring cup to guarantee the correct ratio of sugar and moisture.
Crafting the Ideal Caramel Topping
Heavy Cream vs. Evaporated Milk
Heavy cream provides the richest, most decadent flavor and texture for the caramel.
Evaporated milk is a stable, shelf-friendly alternative that also yields excellent results, offering slightly less richness but consistent performance.
The Crucial Role of Flour in Stabilization
The 2 tablespoons of all-purpose flour added off the heat are the unsung heroes of this recipe, providing necessary thickening power.
This flour prevents the nuts and fat from separating from the sugar base and ensures the caramel sets uniformly without running.
Choosing the Right Nuts: Pecans or Walnuts?
Pecans offer a smoother, buttery profile that complements the caramel beautifully, while walnuts provide a sharper, slightly more tannic crunch.
For maximum flavor, lightly toasting your chosen nuts (a quick five minutes in the oven) enhances their aroma, though it is optional.
Essential Equipment for Stress-Free Bar Baking
The Right Baking Pan: A light-colored 9×13 metal pan is essential for even heat distribution, preventing the crust from burning on the bottom.
The parchment paper sling, leaving an overhang on the long sides, allows you to lift the entire chilled block out cleanly for perfect slicing.
Pastry Blender or Food Processor: These tools efficiently cut the cold butter into the flour mixture, minimizing the time the butter is handled and warms up.
Heavy-Bottomed Saucepan: Using a thick, heavy-bottomed pan for the caramel is critical to buffer direct heat.
This prevents hot spots and significantly reduces the risk of scorching or burning the sugar mixture during the crucial boiling phase.
Wire Cooling Rack: Cooling the bars on a wire rack ensures air circulation underneath the pan.
This rapid cooling facilitates the final setting of the caramel, preventing steam buildup that can make the crust soggy.
Master the Method: Step-by-Step for Classic Nutty Caramel Bars
-
Prepping the Pan and Oven:
Preheat the oven to 350°F (175°C) and line the 9×13 pan. Ensure the parchment paper overhangs the long sides-this ‘sling’ is critical for easy removal later.
-
Making the Crumb Base:
Combine the dry crust ingredients. Use a pastry blender or your fingertips to rapidly cut in the cold butter until the mixture resembles coarse, pea-sized crumbs. It is vital not to overwork the dough.
If the mixture starts to look wet or greasy, place it in the freezer for five minutes before pressing it into the pan.
-
The Initial Bake: Firming the Foundation:
Press the crumb mixture firmly and evenly into the prepared pan. Bake for 12 to 15 minutes, watching only for the edges to achieve a light golden hue, then remove and keep warm.
-
Starting the Caramel Base:
Combine the butter, brown sugar, and cream in a saucepan. Bring the mixture to a full, rolling boil over medium heat, stirring constantly until the sugar completely dissolves.
-
Executing the 60-Second Texture Lock-In:
Once the mixture reaches a full boil (one that continues vigorously even when stirred), start your timer immediately and boil for exactly 60 seconds without stirring. This controls the sugar crystallization necessary for a chewy set.
Crucial Tip: Do not guess the timing; precision is required here to avoid a caramel that pulls out your teeth or remains runny.
-
Folding in Flavor and Stabilization:
Remove the saucepan from the heat. Quickly stir in the flour, vanilla, and chopped nuts until fully incorporated. The flour must be added off the heat to prevent lumps.
-
The Final Assembly:
Carefully pour the hot caramel mixture evenly over the warm, baked crust. Spread it gently to cover the surface, avoiding disturbing the crust underneath.
-
The Second Bake: Setting the Topping:
Return the pan to the oven for an additional 15 minutes. The topping should be bubbling all over and achieve a rich, deep golden-brown color.
-
Mandatory Setting and Slicing Protocol:
Cool completely on a wire rack for at least 60 minutes. For restaurant-quality, neat cuts, transfer the cooled pan to the refrigerator for 30 minutes before slicing. Use a sharp, hot knife.
Chef’s Secrets: Achieving Ultra-Clean Cuts and Optimal Set
How to Prepare the Knife for Perfect Slices
To achieve clean, professional edges, use a long, sharp chef’s knife. Run it under very hot water and wipe the blade completely dry before each individual cut.
The residual heat slightly melts the caramel just along the cutting line, ensuring the blade slides through without tearing the topping or dragging crumbs.
The Importance of Cooling Time
Rushing the cooling process is the single fastest way to destroy the structural integrity of your caramel bars. The bars must cool and set fully.
The minimum 60-minute rack cooling, followed by the refrigerator chill, ensures the caramel is fully solid and firm, allowing for clean, crisp edges when sliced.
For a similarly satisfying texture, check out these classic lemon bars.
Ensuring the Crust Doesn’t Overbake
When pulling the crust after the first bake, look for the edges to be just lightly colored-it should not be deeply browned.
The center of the shortbread should still look slightly pale and soft; it will firm up and finish cooking during the second baking cycle with the caramel topping.
Troubleshooting Common Caramel Bar Mistakes (Too Hard? Too Runny?)
My Caramel Topping is Rock Hard or Brittle
This usually indicates that the caramel boiled for too long past the 60-second mark, meaning too much moisture was removed, leading to an over-concentrated sugar syrup.
Prevention is key: Use a precise timer. If it happens again, you can sometimes salvage a few pieces by gently reheating them, but a fully hard caramel cannot be reliably softened.
My Topping is Still Oily or Runny After Cooling
If the topping is too soft, either the mixture did not reach a full, rolling boil, or the 60-second timing was skipped, resulting in insufficient stabilization.
Always ensure you are using the precise amount of heavy cream and that the flour stabilizer was properly incorporated off the heat.
The Crust Crumbled When I Cut It
This is generally caused by slicing the bars while they are still warm, which makes the buttery crust fragile.
The other likely cause is insufficient pressing during step three-you must press the shortbread mixture very firmly into the pan to create a solid base.
Storage, Serving, and Flavor Variations
Proper Storage and Shelf Life
Store Classic Nutty Caramel Bars in a single layer in an airtight container at room temperature for up to five days.
If you need them to last longer, they can be refrigerated for up to ten days, but allow them to come to room temperature before serving for the best texture.
Serving Temperature Suggestions
These bars are undeniably best served at comfortable room temperature, which brings out the soft chewiness of the caramel layer.
For a decadent dessert, microwave a slice for 10-15 seconds; this makes the caramel gooey and soft, transforming it into a warm confection.
Nut Substitution and Flavor Customization Ideas
Feel free to substitute the pecans or walnuts with chopped macadamia nuts or almonds for a different flavor profile.
For a different take on this decadent treat, explore chocolate caramel cheesecake bars.
A sprinkle of flakey sea salt immediately after the bars come out of the oven enhances the caramel’s depth, creating a sophisticated salted caramel bar.
Ready to Impress? Share Your Classic Nutty Caramel Bars Masterpiece!
You now hold the key to truly reliable caramel bar baking-no more brittle, no more runny mess, just absolute perfection guaranteed by the “Texture Lock-In” technique.
The depth of flavor and ideal chewy consistency of these Classic Nutty Caramel Bars will make this your new signature dessert.
Dive into this recipe and enjoy the satisfaction of serving a truly exceptional sweet treat that is worth every precise minute.
More Sweet Ideas
If you enjoyed these nutty caramel bars, you might like these other sweet treats.
- For a similar sticky caramel sweetness with nuts, try these Gooey Pecan Sticky Buns.
- If you’re in the mood for baked goods with fruit and chocolate, these Assorted Fruit & Chocolate Scones offer a different texture.
Happy baking!
Nutty Caramel Bars
Course: DessertCuisine: AmericanDifficulty: medium16
servings20
minutes30
minutes350
kcal120
minutesStop settling for runny or rock-hard caramel bars! This perfected recipe uses a crucial 60-second boil time to achieve a sticky, gooey caramel topping that sets perfectly every time. Layered over a buttery shortbread crust and packed with chopped nuts, these bars are the ultimate dessert.
Ingredients
For the Crust:
1 1/2 cups all-purpose flour
1/2 cup packed light brown sugar
1/4 teaspoon salt
1 cup (2 sticks) unsalted butter, cold and cubed
For the Caramel Topping:
1/2 cup (1 stick) unsalted butter
1 cup packed light brown sugar
1/4 cup heavy cream or evaporated milk
2 tablespoons all-purpose flour
1 teaspoon vanilla extract
2 cups chopped nuts (pecans or walnuts)
Directions
- Prepare the Crust: Preheat oven to 350 degrees F. Line a 9×13 inch baking pan with parchment paper, leaving an overhang on the sides for easy removal later.
- In a large bowl, whisk together the flour, brown sugar, and salt. Cut in the cold, cubed butter using a pastry blender or your fingers until the mixture resembles coarse crumbs.
- Press the crumb mixture firmly and evenly into the bottom of the prepared pan. Bake the crust for 12 to 15 minutes, until the edges are lightly golden. Remove from the oven and set aside.
- Prepare the Topping (The Texture Lock-In): While the crust is baking, combine the butter, brown sugar, and heavy cream in a medium saucepan. Bring the mixture to a full, rolling boil over medium heat, stirring constantly so the sugar dissolves completely.
- The Consistency Fix: Once the mixture reaches a full boil (a boil that does not stop when you stir it), continue boiling without stirring for exactly 60 seconds. This is the crucial step that ensures the caramel sets perfectly without becoming brittle or runny.
- Remove the saucepan from the heat immediately. Stir in the flour, vanilla extract, and the chopped nuts until they are evenly coated.
- Pour the caramel topping evenly over the warm, baked crust. Spread gently to cover the whole surface.
- Return the pan to the 350 degrees F oven and bake for an additional 15 minutes, or until the topping is bubbly and a deep golden brown color.
- Mandatory Setting: Once baked, remove the bars from the oven. Allow them to cool completely on a wire rack for at least 1 hour before attempting to cut them. For the cleanest cuts, transfer the pan to the refrigerator for 30 minutes after the initial cooling period. Use the parchment paper overhang to lift the entire block out of the pan before slicing into neat bars.
Notes
- Allow bars to cool completely (at least 1 hour) before cutting. The 60-second boiling step for the topping is mandatory for perfect setting.


