
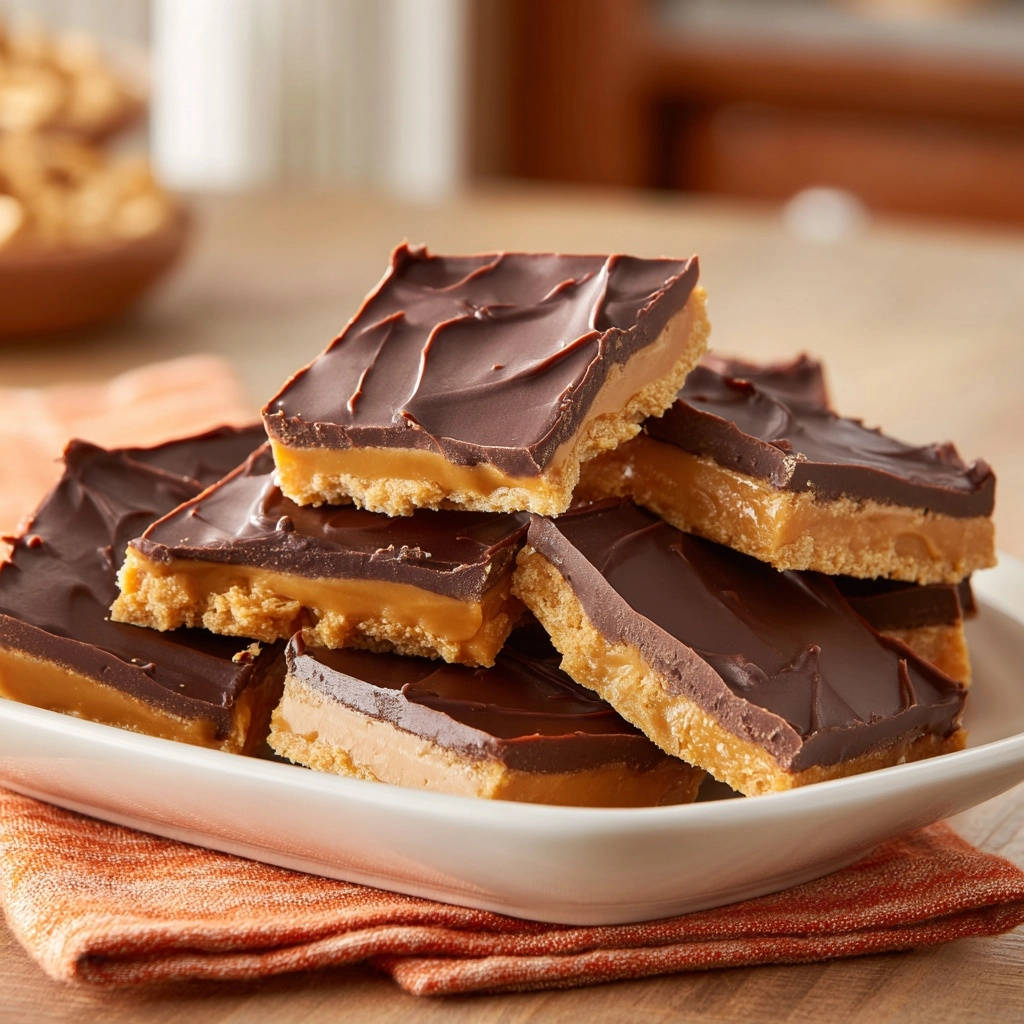
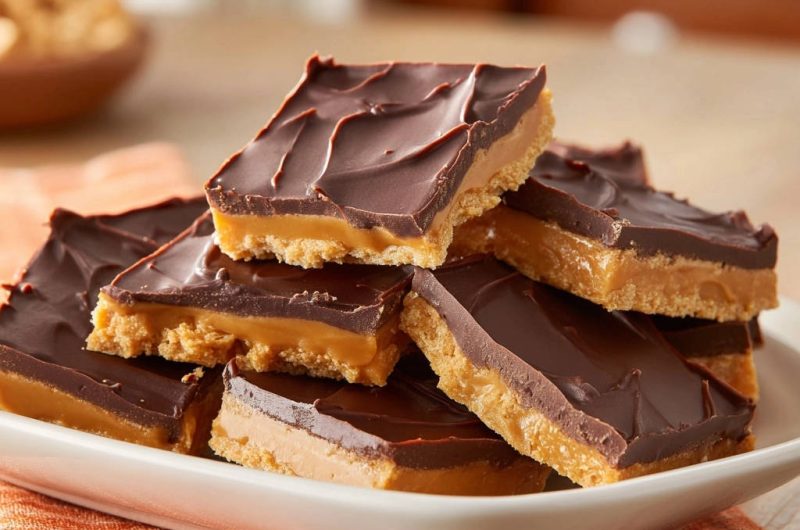
There’s a special joy in sinking your teeth into a homemade peanut butter chocolate bar, but I know the frustration of crumbly, messy slices all too well. After countless attempts, I’ve perfected a method for these Classic Peanut Butter Chocolate Bars that guarantees pristine, picture-perfect edges every single time, making those bakery-worthy squares finally achievable.
This recipe delivers on flavor and, more importantly, on flawless presentation, transforming a classic treat into an impressive dessert without the usual fuss or breakage.
Why These Classic Peanut Butter Chocolate Bars Will Be Your New Favorite
Effortless Perfection: Learn the simple secrets to create bakery-worthy Classic Peanut Butter Chocolate Bars without the fuss of complicated techniques.
For more ideas on creating delightful layered desserts, check out these chocolate caramel cheesecake bars.
The “No Crumble” Promise: Discover the unique technique that guarantees perfectly clean, picture-ready slices every single time, eliminating the dreaded crumbly mess.
Irresistible Flavor Profile: Enjoy a harmonious blend of a buttery graham cracker crust, a rich, creamy peanut butter filling, and a smooth, decadent chocolate topping.
Crowd-Pleasing Classic: Ideal for potlucks, parties, or a simple weeknight indulgence, these bars are always a resounding hit with both kids and adults.
The Essential Ingredients for Unforgettable Classic Peanut Butter Chocolate Bars
Building the Buttery Graham Cracker Crust
Graham Cracker Crumbs: These form the delicious, slightly spiced and crunchy foundation of our bar. For convenience, use store-bought crumbs, or make your own from whole graham crackers.
For an extra layer of crunch, check out the techniques for chocolate caramel peanut crunch bars.
Granulated Sugar: A small amount of sugar enhances the sweetness of the crust, perfectly balancing the other rich layers.
Unsalted Butter (Melted): This is crucial for binding the graham cracker crumbs together, ensuring a firm and sturdy crust. Using unsalted butter allows you to control the overall saltiness of the final product.
Crafting the Dreamy Peanut Butter Layer
Creamy Peanut Butter: The undeniable star of these Classic Peanut Butter Chocolate Bars! Opt for a classic, processed creamy variety (like Jif or Skippy) for the best texture and consistency in this recipe. Natural peanut butter can be too oily and often separates, altering the desired texture.
Unsalted Butter (Softened): This contributes significantly to the layer’s rich, smooth, and spreadable consistency. Ensure it’s properly softened at room temperature for easy and lump-free mixing.
Powdered Sugar: Essential for achieving a smooth, melt-in-your-mouth texture without any grittiness. It also provides the perfect level of sweetness, complementing the peanut butter.
Vanilla Extract: A teaspoon of vanilla enhances the overall flavor profile, adding a warm, inviting aromatic depth that elevates the peanut butter.
Milk: Just a small amount helps to achieve that perfectly soft, yet stable and easily spreadable consistency for the peanut butter layer, ensuring it’s not too stiff.
Melting the Silky Chocolate Topping
Semi-Sweet Chocolate Chips: These provide the classic chocolate flavor we all adore and melt beautifully for a smooth topping. Investing in quality chocolate chips will truly make a difference in the final taste and texture of your Classic Peanut Butter Chocolate Bars.
Coconut Oil or Shortening: This is a key ingredient for a perfectly smooth, shiny, and most importantly, easy-to-cut chocolate topping. It helps the chocolate set without becoming brittle and prone to cracking, while also adding a subtle richness without a strong coconut flavor.
Gear Up: Essential Tools for Classic Peanut Butter Chocolate Bars Success
8×8 Inch Baking Pan: This size is ideal for creating thick, satisfying bars with generous layers. Using this specific dimension ensures your bars have the right height.
Parchment Paper: A non-negotiable for effortless lifting of the entire slab of bars and for exceptionally easy clean-up. Don’t skip this!
Electric Mixer: An electric mixer makes light work of combining the peanut butter layer ingredients, ensuring a smooth, fluffy, and lump-free mixture, which is crucial for texture.
Microwave-Safe Bowls & Spatulas: These are perfect for melting chocolate efficiently and for mixing various ingredients throughout the process.
Wire Rack: Essential for cooling the crust evenly and completely, preventing sogginess and ensuring a crisp base.
Sharp Knife: This is an absolutely crucial tool for achieving the ultimate clean and precise slices, especially with the hot knife technique we’ll discuss.
Step-by-Step Guide: Crafting Your Classic Peanut Butter Chocolate Bars
- Prepare Your Pan and Preheat Oven:
Preheat your oven to 350°F (175°C) to ensure it’s ready for the crust.
Line an 8×8 inch baking pan with parchment paper, making sure to leave an overhang on two sides. This thoughtful overhang will serve as convenient handles, allowing you to easily lift the entire batch of bars out of the pan once they’re chilled and ready to slice.
- Assemble and Bake the Graham Cracker Crust:
In a medium bowl, combine the graham cracker crumbs, granulated sugar, and the melted unsalted butter. Mix these ingredients thoroughly until all the crumbs are evenly moistened and cohesive.
Press this mixture very firmly and evenly into the bottom of your prepared pan. Use the back of a spoon or your clean fingers to compact it well, which is key for a stable crust.
Bake for 10-12 minutes, or until the edges appear lightly golden. Remove the pan from the oven and immediately transfer it to a wire rack to cool completely. A fully cooled crust is absolutely essential before proceeding to the next layer, preventing any premature melting or melding of layers.
- Create the Creamy Peanut Butter Layer:
In a large bowl, using an electric mixer, beat together the softened creamy peanut butter and the softened unsalted butter until the mixture is beautifully light, fluffy, and consistently smooth.
Gradually add the powdered sugar, beginning on a low speed to avoid a “sugar cloud,” then increase to medium until it’s fully incorporated and the mixture is wonderfully creamy.
Finally, stir in the vanilla extract and milk until the mixture is smooth and easily spreadable. Be careful not to overmix once everything is combined, as this can change the texture.
- Assemble the Layers and Initial Chill:
Carefully spread the prepared peanut butter mixture evenly over the completely cooled graham cracker crust. Strive for an even thickness across the entire surface of the crust.
Place the pan in the refrigerator for at least 30 minutes. This initial chill is crucial as it allows the peanut butter layer to firm up, creating a stable and distinct base for the chocolate and preventing the layers from mixing.
- Prepare the Glossy Chocolate Topping:
In a microwave-safe bowl, combine the semi-sweet chocolate chips and the coconut oil (or shortening).
Microwave the mixture in short 30-second intervals, stirring thoroughly after each, until the chocolate is fully melted and becomes beautifully smooth and glossy. As an alternative, you can melt the mixture gently over a double boiler.
Ensure there are absolutely no lumps and the mixture is perfectly silky before you proceed to the next step.
- Add the Chocolate Topping:
Pour the melted chocolate evenly over the chilled peanut butter layer. Gently tilt the pan from side to side to help the chocolate spread uniformly to all edges, creating a flat and consistent top layer.
Resist the urge to smooth it with a spatula, as this can disturb the firm peanut butter layer below and cause marbling where it’s not intended.
The Game-Changer: Unlocking Perfectly Sliced Classic Peanut Butter Chocolate Bars
The Power of Prolonged Chilling for Flawless Cuts
This is where the magic truly begins to create those impeccable Classic Peanut Butter Chocolate Bars! Return the assembled pan of bars to the refrigerator and chill them for at least 2 hours.
For the absolute best results and the cleanest, most professional-looking cuts, an overnight chill is highly recommended. Thorough chilling is the single most critical step here; the longer the bars chill, the firmer all the layers become, which completely prevents the dreaded crumbling and cracking when you attempt to slice them. Patience here is truly key to achieving absolute perfection!
The Hot Knife Technique for Pristine Edges
Once your bars are completely firm from chilling, use the parchment paper overhang to gently lift the entire slab out of the baking pan and place it carefully on a clean cutting board.
To achieve those professional-looking, non-cracked slices, heat a sharp, long knife under hot running water for about 30 seconds. Immediately wipe the blade completely dry with a clean towel. Make one decisive, smooth cut through the bars.
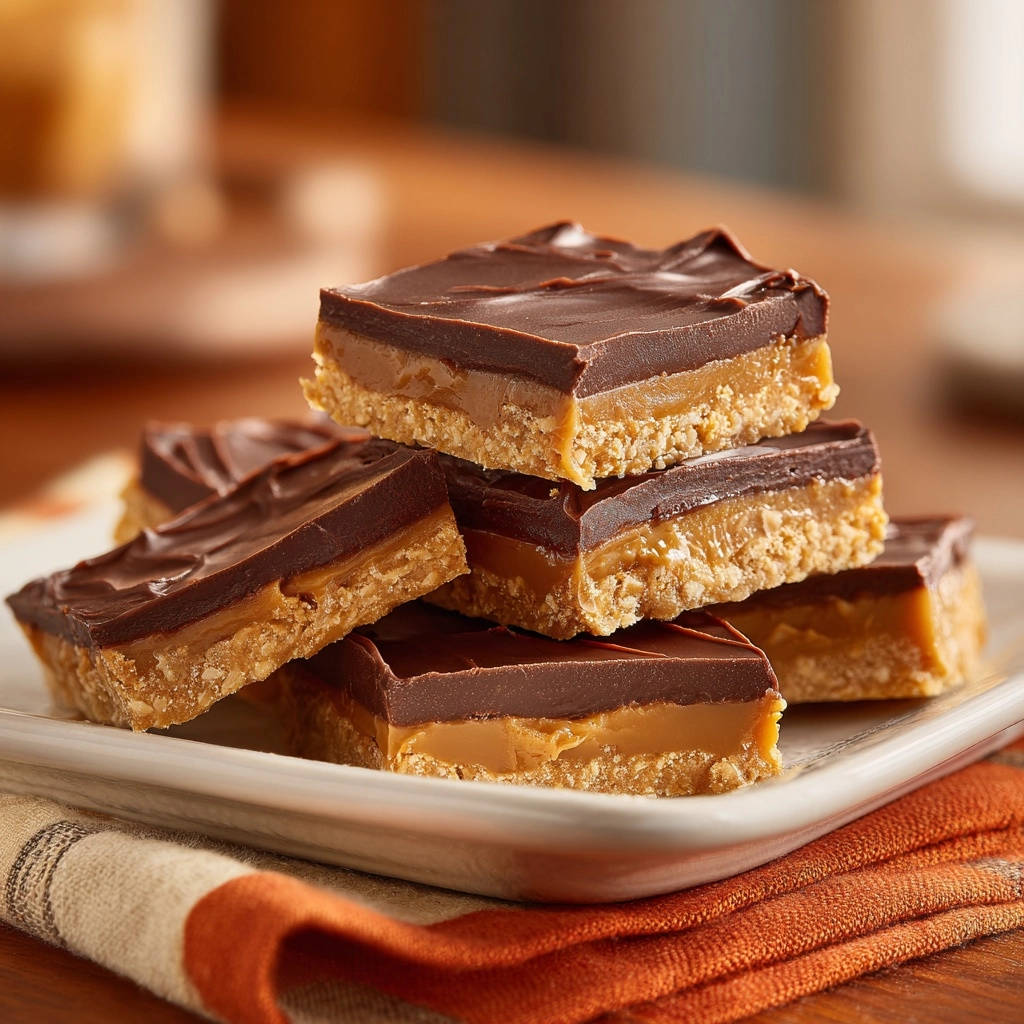
Crucially, reheat and wipe the knife clean after each individual cut. This simple yet highly effective trick prevents melted chocolate from sticking to the blade and ensures every single slice is smooth, neat, and truly Instagram-ready. Cut into your desired 16 even squares.
Expert Tips: Elevate Your Classic Peanut Butter Chocolate Bars Experience
Don’t Substitute Natural Peanut Butter: For this recipe’s specific texture and firm set, it’s vital to stick to conventional creamy peanut butter. Natural varieties, with their separated oils and often runnier consistency, can lead to a greasier or less firm peanut butter layer that won’t hold its shape as well.
Ensure Ingredients are at Room Temperature (Except Butter for Crust): For the peanut butter layer, softened butter and room temperature peanut butter are crucial for a smooth, homogenous mixture. Cold ingredients can lead to lumps and an uneven texture in your bars.
Press the Crust Firmly: A well-compacted crust is paramount to prevent crumbling later on. Don’t be shy about pressing down hard with the back of a spoon or a flat-bottomed glass to ensure a sturdy foundation.
Be Patient with Cooling and Chilling: Rushing the cooling process for the crust or, more critically, the chilling process for the layers will compromise the final texture and your ability to achieve clean slices. Good things truly come to those who wait with these Classic Peanut Butter Chocolate Bars!
Flavor Variations to Explore: Consider adding a pinch of flaky sea salt to the chocolate topping just after pouring it to enhance the delightful sweet and salty contrast. For a visual twist, swirl in some melted white chocolate before chilling for a marbled effect.
Troubleshooting Common Classic Peanut Butter Chocolate Bars Mishaps
Why is My Crust Crumbly?
A crumbly crust usually indicates that there wasn’t quite enough melted butter to properly bind the graham cracker crumbs, or it wasn’t pressed firmly enough into the pan. Double-check your butter measurement for accuracy and apply plenty of pressure when compacting the crust.
Peanut Butter Layer Too Soft or Oily?
This common issue can occur if you used natural peanut butter, which typically has more oil separation than conventional types, or if your butter wasn’t properly softened. Ensure you’re using a standard creamy peanut butter and that your butter is just soft, not melted, for the best texture. If you’re looking for other dessert bar ideas, you might enjoy these Orange Dream Bars, which also require precise setting.
Chocolate Topping Cracks When Slicing?
A cracked chocolate topping is a clear sign that the bars weren’t chilled sufficiently, or the vital hot knife technique wasn’t used correctly. Always aim for at least 2 hours (preferably overnight) of chilling and be sure to heat and wipe your knife between every single cut.
Layers Are Not Sticking Together?
If your layers separate, it’s often due to insufficient chilling between layers. Ensure the graham cracker crust is completely cool before you add the peanut butter, and confirm that the peanut butter layer is firm before pouring on the warm chocolate topping.
Presentation & Preservation: Enjoying Your Classic Peanut Butter Chocolate Bars
Creative Serving Suggestions
These Classic Peanut Butter Chocolate Bars are absolutely perfect on their own, but you can effortlessly elevate them further! Serve them alongside a generous scoop of vanilla bean ice cream for an indulgent, contrasting dessert, or add a delicate sprinkle of flaky sea salt for an extra gourmet touch that highlights their flavors.
Round Out Your Treat Tray
After enjoying these chocolate and peanut butter bars, consider these other sweet creations.
- For a smaller, bite-sized sweet, try these Mini Peanut Butter Bites, which share the classic peanut butter flavor.
- If you’re in the mood for more chocolate baked goods, these Chocolate Swirl Muffins offer a different chocolate experience.
They also make truly excellent additions to any dessert platter for parties or holiday gatherings, and can be individually wrapped as thoughtful, homemade gifts that everyone will appreciate.
Storing Your Delicious Bars for Freshness
To maintain their delightfully soft, chewy texture, store your Classic Peanut Butter Chocolate Bars in an airtight container at room temperature for up to 3 days. This keeps them perfectly ready for snacking.
For a firmer bar, or if you simply prefer them cold, they can be stored in the refrigerator for up to a week. Always ensure the container is tightly sealed to prevent them from drying out or absorbing other food odors from your fridge, preserving their fresh taste.
Planning Ahead: Make-Ahead Tips for Classic Peanut Butter Chocolate Bars
Freezing for Future Cravings
These Classic Peanut Butter Chocolate Bars freeze beautifully, making them perfect for future cravings or meal prep! Once fully chilled and sliced, arrange them in a single layer on a parchment-lined baking sheet and freeze for about an hour until they are firm.
Then, transfer them to a freezer-safe airtight container, separating each layer with parchment paper to prevent sticking. They can be kept frozen for up to 2-3 months. To enjoy, thaw at room temperature for about 30 minutes, or enjoy them slightly chilled directly from the freezer for a unique, firmer texture.
Your Top Questions About Classic Peanut Butter Chocolate Bars, Answered!
Can I use natural peanut butter for this recipe?
While you might be tempted to use natural peanut butter, we highly recommend sticking to conventional creamy peanut butter (like Jif or Skippy) for these bars. Natural varieties tend to be oilier and can result in a greasier, less firm peanut butter layer that may not set as well as intended, affecting the overall texture of your Classic Peanut Butter Chocolate Bars.
What can I substitute for coconut oil in the chocolate topping?
Shortening is an excellent substitute for coconut oil in the chocolate topping. It performs the same function of creating a smooth, beautifully set chocolate layer that is easy to cut without cracking. While butter can also be used, it might slightly alter the texture and shine of the topping.
Are these Classic Peanut Butter Chocolate Bars gluten-free?
No, as written, this recipe uses traditional graham cracker crumbs which contain gluten. However, you can very easily make them gluten-free by simply substituting gluten-free graham cracker crumbs for the regular ones. Most of the other ingredients are typically gluten-free, but it’s always wise to check individual labels to be certain.
How can I make these bars dairy-free?
To successfully make these Classic Peanut Butter Chocolate Bars dairy-free, you would need to use a high-quality plant-based butter substitute for both the crust and the peanut butter layer. Additionally, use a dairy-free milk alternative and ensure you select dairy-free chocolate chips. Remember to also verify that your chosen graham cracker crumbs are dairy-free.
My chocolate topping seized! What went wrong?
Chocolate can seize, or become thick and grainy, if it’s exposed to even a tiny amount of water (from steam, or a wet utensil) while melting, or if it overheats too quickly. To prevent this, ensure your bowl and all stirring utensils are completely dry, and melt the chocolate gently in short intervals, stirring frequently to distribute the heat evenly.
Ready to Share Your Classic Peanut Butter Chocolate Bars Masterpiece?
You’ve now truly mastered the art of creating irresistible Classic Peanut Butter Chocolate Bars, complete with the secret to those coveted, perfectly clean slices! The blend of crunchy crust, creamy peanut butter, and decadent chocolate is a combination that is simply unbeatable and universally loved.
We enthusiastically encourage you to whip up a batch (or perhaps even two!) and share the joy with your friends and family. Don’t forget to capture a photo of your perfectly sliced creations and tag us on social media! We’d absolutely love to see your delicious results and hear about your favorite moments enjoying these timeless treats.
For more delightful dessert ideas and expert baking tips, explore our collection of easy dessert bar recipes designed to bring joy and deliciousness to your kitchen.
Peanut Butter Chocolate Bars
Course: DessertCuisine: AmericanDifficulty: easy16
bars25
minutes12
minutes380
kcal120
minutesDiscover the simple secret to perfectly sliced peanut butter and chocolate bars. This recipe ensures every piece is beautiful, firm, and as delicious as it looks, without the usual crumbling or cracking mess.
Ingredients
For the Crust:
1 1/2 cups graham cracker crumbs
1/4 cup granulated sugar
1/2 cup unsalted butter melted
For the Peanut Butter Layer:
1 cup creamy peanut butter
1/2 cup unsalted butter softened
2 cups powdered sugar
1 teaspoon vanilla extract
2 tablespoons milk
For the Chocolate Topping:
1 1/2 cups semi-sweet chocolate chips
2 tablespoons coconut oil or shortening
Directions
- Prepare the crust: Preheat your oven to 350 degrees Fahrenheit. Line an 8×8 inch baking pan with parchment paper, leaving an overhang on two sides to easily lift the bars out later.
- Make the crust: In a medium bowl, combine the graham cracker crumbs, granulated sugar, and melted butter. Mix until well combined and moist. Press the mixture evenly and firmly into the bottom of the prepared pan. Bake for 10-12 minutes, or until lightly golden. Remove from oven and let cool completely on a wire rack.
- Prepare the peanut butter layer: In a large bowl, using an electric mixer, beat together the softened peanut butter and softened butter until smooth and creamy. Gradually add the powdered sugar, mixing until fully incorporated. Stir in the vanilla extract and milk until the mixture is smooth and spreadable.
- Assemble the layers: Evenly spread the peanut butter mixture over the cooled graham cracker crust. Place the pan in the refrigerator for at least 30 minutes to allow the peanut butter layer to firm up. This initial chill helps create a stable foundation.
- Prepare the chocolate topping: In a microwave-safe bowl, combine the chocolate chips and coconut oil. Microwave in 30-second intervals, stirring well after each, until the chocolate is fully melted and smooth. Alternatively, melt over a double boiler.
- Add the chocolate topping: Pour the melted chocolate evenly over the chilled peanut butter layer. Gently tilt the pan to ensure the chocolate spreads to all edges.
- The Secret to Perfect Slices: This is where the magic happens! Return the pan to the refrigerator and chill for at least 2 hours, or even better, overnight. Thorough chilling is the most critical step for clean cuts. The longer it chills, the firmer the layers become, preventing crumbling and cracking.
- Slice with Precision: Once completely firm, lift the bars out of the pan using the parchment paper overhang. Place them on a cutting board. To achieve those perfect, non-cracked slices, heat a sharp, long knife under hot running water for about 30 seconds. Wipe the blade completely dry. Make one decisive cut through the bars. Reheat and wipe the knife clean after each cut. This prevents sticking and ensures smooth, neat edges. Cut into 16 squares.
- Store: Keep the bars in an airtight container at room temperature for up to 3 days, or in the refrigerator for up to a week.
Notes
- Thorough chilling is the most critical step for clean cuts and preventing crumbling.


