
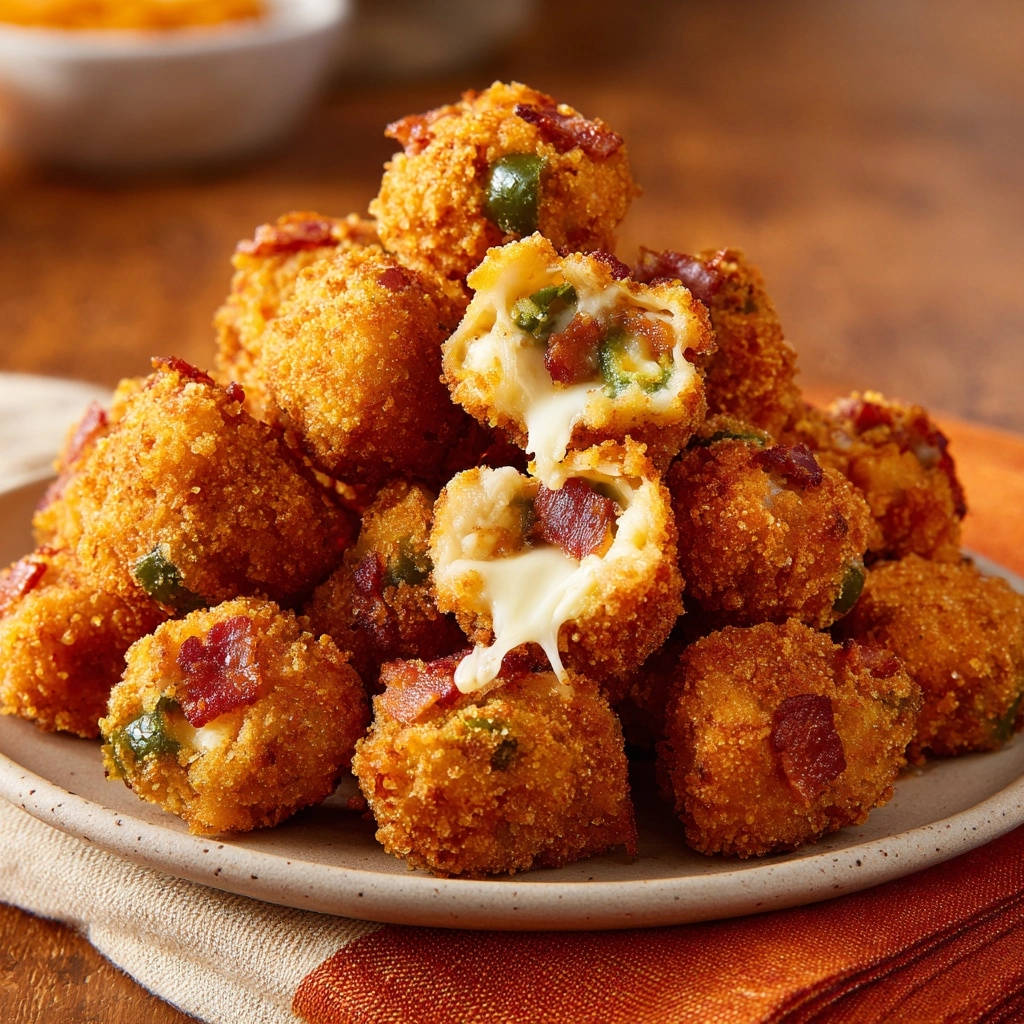
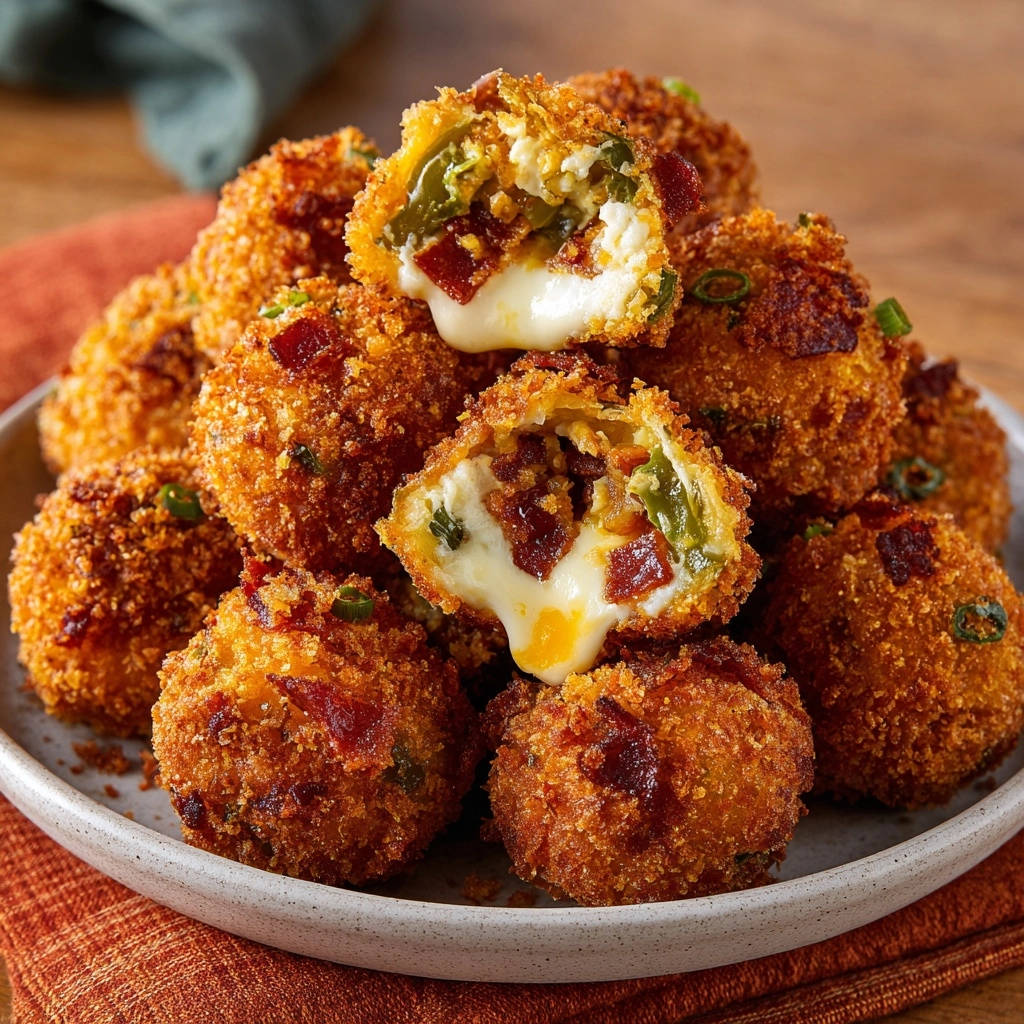
I know the disappointment: biting into what should be a perfect jalapeño popper, only to find the glorious, gooey cheese has vanished, leaving an empty shell. It used to happen to me often, but through countless test batches, I cracked the code to truly leak-proof Crispy Bacon Jalapeño Popper Bites. This recipe guarantees that every bit of creamy, spicy goodness stays exactly where it belongs, tucked safely inside a golden, crispy coating, ready to delight your taste buds.
Prep Time: 25 minutes | Cook Time: 10 minutes | Total Time: 35 minutes (plus 1 hour chilling/freezing) | Servings: 4-6
The Secret Behind Perfect Crispy Bacon Jalapeño Popper Bites (No Ooze!)
Beyond the Basics: What Makes Our Recipe Unique
This recipe isn’t just another jalapeño popper; it’s engineered for success, specifically designed to eliminate the common problem of cheese leakage. We employ a strategic combination of thorough breading and a critical freezing step that locks the creamy filling inside. This ensures a flawless, leak-proof result every single time you make these savory bites.
The secret lies in solidifying the cheese mixture before frying, allowing the breading to crisp up to perfection without the interior melting out prematurely. This crucial technique sets our Crispy Bacon Jalapeño Popper Bites apart from all others, delivering a superior appetizer experience.
A Flavor Explosion: Why These Bites Disappear First
Prepare for an irresistible sensory experience with these delightful poppers. Each bite offers an exquisite balance of rich, tangy cream cheese, gooey Monterey Jack, and the subtle kick of fresh jalapeño.
The smoky crunch of crispy bacon complements the creamy core beautifully, all encased in a satisfyingly golden Panko crust. It’s this symphony of creamy, spicy, and smoky textures that makes these party favorites disappear remarkably fast.
Your Go-To Appetizer for Any Occasion
Whether you’re hosting a game day gathering, a casual party, or simply craving a delicious snack, these popper bites are your ultimate solution. Their impressive flavor profile and reliable leak-proof nature make them an instant crowd-pleaser.
For a similar experience, try these cheesy jalapeño popper bites.
They are versatile, easy to prepare in advance, and always leave guests asking for the recipe. Get ready to elevate your appetizer game with these truly special treats.
Round Out Your Meal
Here are some other dishes that go well with flavorful appetizers.
- For a hearty main course, consider this savory beef and cream cheese puff pastry pie, featuring similar rich flavors.
- If you enjoy jalapeño, you might like this cheesy jalapeño chicken rice casserole, offering a comforting and cheesy experience.
Gather Your Goodies: Building Blocks for Delicious Popper Bites
Creamy Core Components: Cheese, Jalapeño, and Bacon Harmony
Softened cream cheese forms the rich, tangy base of our filling, ensuring a smooth and luxurious texture. It binds all the flavors together beautifully, creating the signature creamy interior.
Shredded Monterey Jack cheese melts wonderfully, contributing a delicious gooeyness that defines a great popper. You can also use cheddar for a sharper flavor profile if preferred.
Finely minced jalapeños provide that essential spicy kick, which can be customized by removing or keeping the seeds. Their fresh, vibrant flavor brightens the rich cheese mixture.
Crispy, crumbled bacon introduces a crucial smoky, salty dimension that pairs perfectly with the heat of the jalapeños and the creaminess of the cheese. It adds an irresistible depth of flavor to every bite.
The Crispy Exterior: Our Leak-Proof Breading System
All-purpose flour creates the initial dry layer, crucial for helping the egg wash adhere effectively. This first coating ensures a uniform and secure breading for our popper bites.
Lightly beaten eggs act as the binder, allowing the Panko breadcrumbs to stick firmly to the flour-coated cheese balls. A complete egg coating is vital for a robust breading.
Panko breadcrumbs are the star of the exterior, delivering an exceptionally light and crispy texture that traditional breadcrumbs can’t match. Their flaky structure creates the perfect golden, crunchy shell, sealing in the delicious filling.
Pantry Staples & Frying Essentials
Garlic powder adds an aromatic warmth to the filling, enhancing the savory profile of the cheeses and bacon. It’s a subtle but important flavor enhancer.
Salt and black pepper are essential for seasoning the mixture to perfection, balancing the flavors and bringing out the best in each ingredient. Always season to your taste.
Vegetable oil is the preferred choice for frying due to its high smoke point and neutral flavor, ensuring your popper bites achieve a beautiful golden crisp without imparting unwanted tastes.
Equip Your Kitchen: Essential Tools for Popper Bite Success
Must-Have Gadgets for Frying Perfection
A large, heavy-bottomed pot or Dutch oven is essential for safely and evenly heating the oil. Its sturdy construction helps maintain a consistent temperature, which is crucial for perfect frying.
A reliable cooking thermometer is your best friend for deep frying. It allows you to accurately monitor and maintain the oil’s temperature, preventing greasy bites or burnt exteriors.
Handy Helper Tools for Prep and Breading
Mixing Bowls: You’ll need a medium bowl for the filling and three shallow dishes for the breading station.
Small Spoon or Scoop: This helps in forming uniform 1-inch cheese balls, ensuring even cooking and consistent results.
Baking Sheet and Parchment Paper: Used for chilling the formed cheese balls and later for freezing the breaded bites without sticking.
Slotted Spoon: Essential for safely lowering and removing the popper bites from hot oil, allowing excess oil to drain.
Crafting Your Crispy Bacon Jalapeño Popper Bites: A Step-by-Step Guide
- Prepare the Filling:
In a medium bowl, combine the softened cream cheese, shredded Monterey Jack cheese, finely minced jalapeños, finely crumbled bacon, garlic powder, salt, and pepper.
Mix everything thoroughly until it’s evenly combined. This ensures every bite of your Crispy Bacon Jalapeño Popper Bites is bursting with flavor.
- Form the Bites:
Using a small spoon or scoop, form the cheese mixture into approximately 1-inch balls. This size is important for even cooking and proper sealing during frying.
Place these formed balls onto a baking sheet lined with parchment paper, preparing them for the next crucial steps.
- Set Up Breading Station:
To ensure maximum leak prevention, prepare your breading station meticulously. Arrange three shallow dishes side-by-side.
Fill the first dish with all-purpose flour, the second with lightly beaten eggs, and the third with Panko breadcrumbs.
- Flour Coating:
Working with one cheese ball at a time, roll it thoroughly in the flour, making sure it’s completely coated. Gently shake off any excess flour.
This initial flour layer is critical as it creates a dry surface for the egg to adhere to, forming a strong bond for the subsequent breading.
- Egg Dip:
Next, dip the floured ball into the beaten egg, ensuring it’s completely submerged and coated on all sides. Allow any excess egg to drip off.
A full and even egg coating is essential for the Panko to stick properly, forming a robust exterior.
- Panko Breading:
Immediately transfer the egg-coated ball to the Panko breadcrumbs. Gently press the breadcrumbs onto the ball from all angles, ensuring it’s fully and generously coated.
This thick Panko layer is your primary defense against leaks, creating the signature crispy exterior.
- Repeat Breading:
Continue this breading process for all the remaining cheese balls, ensuring each one has a complete and generous coating. Consistency here is key for uniformly delicious results.
- The Crucial Freeze:
For guaranteed leak-proof results, this step is non-negotiable. Place the entire baking sheet with the breaded cheese balls into the freezer for at least 1 hour, or until they are very firm.
This crucial freezing period ensures the cheese remains solid while the breading fries to a perfect golden crisp, preventing premature melting and oozing.
- Heat the Oil:
In a large, heavy-bottomed pot or Dutch oven, heat 4 cups of vegetable oil over medium-high heat. Use a thermometer to monitor the temperature until it reaches 350°F (175°C).
Maintaining the correct oil temperature is paramount to preventing greasy bites and ensuring the breading cooks perfectly before the cheese gets too hot.
- Fry the Bites:
Carefully lower a few frozen popper bites into the hot oil, ensuring you do not overcrowd the pot. Frying in batches is vital to maintain oil temperature.
Fry for 2-3 minutes, turning them occasionally with a slotted spoon, until they are beautifully golden brown and crispy. The frozen core helps keep the cheese from bursting through too quickly.
- Drain Excess Oil:
Using your slotted spoon, remove the cooked Crispy Bacon Jalapeño Popper Bites from the oil. Transfer them to a plate lined with paper towels to drain any excess oil.
This step ensures your bites are perfectly crisp and not greasy.
- Serve Immediately:
Serve your delicious popper bites immediately while they are hot and the cheese inside is wonderfully gooey. Enjoy the ultimate appetizer perfection!
Elevate Your Game: Expert Tips for Unforgettable Popper Bites
The Power of Freezing: Your Ultimate Leak Prevention Strategy
Freezing your breaded popper bites for at least one hour is the single most critical step to prevent cheese leakage. This crucial chill solidifies the cheesy filling completely.
When the frozen core hits the hot oil, the breading has ample time to cook and crisp up, forming a protective barrier before the cheese inside even begins to melt. Never skip this step for truly leak-proof results.
Temperature Control: The Golden Rule for Non-Greasy Crispy Bites
Maintaining the oil temperature consistently at 350°F (175°C) is paramount for perfectly fried, non-greasy popper bites. Use a reliable cooking thermometer and adjust heat as needed.
If the oil is too cold, your bites will absorb too much oil, becoming greasy and heavy. If it’s too hot, the exterior will burn before the interior is cooked, resulting in an unpleasant texture.
Flavor Customization: Playing with Heat and Ingredients
To adjust the spice level, simply remove all the seeds and white membranes from the jalapeños for milder poppers, or leave some in for more heat. You can even use a different pepper like serrano for an extra kick.
Experiment with alternative cheeses such as sharp cheddar or pepper jack for varied flavor profiles. A pinch of chives or green onions can add a fresh, oniony note to the creamy filling.
For a subtle sweet-and-spicy dynamic, consider adding a tiny pinch of brown sugar or a dash of honey to the cheese mixture. This adds an unexpected layer of delicious complexity.
Breading Best Practices: Achieving Maximum Crunch
Ensure each cheese ball is thoroughly coated in flour before the egg, creating a dry surface for the egg to cling to. This initial layer is foundational for a strong breading system.
When applying the Panko, gently press the breadcrumbs firmly onto the ball from all angles. This ensures a thick, even coating with no bare spots, maximizing crispiness and preventing leaks.
Double-breading is another advanced technique: after the first full breading, you can dip the ball back into the egg and then Panko again for an even thicker, crunchier crust. This adds an extra layer of protection and texture to your Crispy Bacon Jalapeño Popper Bites.
Solving Common Popper Problems: Quick Fixes for Any Snag
“My Poppers Oozed! What Went Wrong?”
The most common culprit for oozing is insufficient freezing time. Ensure your popper bites are solid-frozen for at least one hour before frying.
Another reason could be an incomplete breading, leaving gaps for the cheese to escape. Make sure each ball is fully coated in flour, egg, and Panko with no exposed areas.
Also, check your oil temperature. If the oil is too cold, the breading won’t seal fast enough, allowing the cheese to melt and seep out.
“Why Are My Bites Greasy?”
Greasy poppers usually result from oil that isn’t hot enough. When the oil temperature drops too low (below 350°F), the breading absorbs more oil instead of crisping.
Overcrowding the pot can also cause the oil temperature to drop rapidly. Fry in small batches to maintain a consistent high heat.
“They’re Not Crispy Enough!”
Lack of crispiness can stem from oil that is too cold, as mentioned, leading to a soggy exterior rather than a crunchy one. Always verify your oil temperature with a thermometer.
Ensure you are using Panko breadcrumbs, as their flaky texture provides superior crispiness compared to standard breadcrumbs. Frying for the full 2-3 minutes, until deeply golden, is also key.
Enjoying and Preserving Your Delicious Crispy Bacon Jalapeño Popper Bites
The Perfect Accompaniments: What to Serve Them With
These popper bites are fantastic on their own, but a delicious dipping sauce takes them to the next level. Classic ranch dressing or a zesty sriracha mayo are always popular choices.
For a sweet and spicy contrast, try a sweet chili sauce. Pairing them with other appetizers like mini spring rolls or vegetable sticks creates a wonderful party platter.
Make-Ahead Magic: Preparing for Parties in Advance
One of the best features of this recipe is its make-ahead potential. You can prepare and fully bread the popper bites several days in advance.
Simply freeze them on a baking sheet until solid, then transfer them to an airtight freezer bag or container. They can be stored for up to 2-3 weeks, ready to be fried directly from frozen whenever you need a quick appetizer.
Storing and Reheating for Best Results
Leftover Crispy Bacon Jalapeño Popper Bites can be stored in an airtight container in the refrigerator for up to 3 days. While best fresh, they still taste great reheated.
To maintain crispiness, reheat them in an air fryer at 350°F (175°C) for 5-7 minutes, or in an oven at 375°F (190°C) for 10-15 minutes, until heated through and re-crisped.
Your Top Questions Answered: Crispy Bacon Jalapeño Popper Bites Edition
Can I Bake These Instead of Frying?
While frying yields the ultimate crispy exterior, you can bake these popper bites with some adjustments. Bake them on a parchment-lined baking sheet at 400°F (200°C) for 15-20 minutes, flipping halfway, until golden brown.
For more wonderfully baked goodness, check out these crispy cheesy meat bites.
Note that the texture will be less intensely crispy than fried versions, and baking may slightly increase the chance of minimal cheese seepage. For best results, brush them lightly with oil before baking.
How Can I Adjust the Spice Level?
To reduce heat, remove all seeds and white membranes (pith) from the jalapeños, as these contain most of the capsaicin. For a milder flavor, you can even use bell pepper instead of one jalapeño.
If you crave more heat, leave some seeds in, or add a tiny pinch of cayenne pepper to the cheese mixture. Always taste a tiny bit of the raw jalapeño to gauge its potency.
What Are Some Good Dipping Sauces?
Beyond ranch and sriracha mayo, consider a creamy avocado ranch for a fresh twist. A zesty cilantro-lime crema or a sweet and tangy raspberry chipotle sauce also pair wonderfully.
For something truly unique, try a homemade honey-mustard dip or a cool sour cream-based dip with chives.
Is There a Gluten-Free Option?
Absolutely! To make these gluten-free, substitute all-purpose flour with a gluten-free all-purpose flour blend. For the Panko breadcrumbs, use gluten-free Panko breadcrumbs, which are widely available.
The rest of the ingredients in this Crispy Bacon Jalapeño Popper Bites recipe are naturally gluten-free, making it an easy adaptation for dietary needs.
Your Next Party Awaits: Share Your Leak-Proof Popper Success!
There you have it – the ultimate guide to creating truly leak-proof Crispy Bacon Jalapeño Popper Bites that will impress everyone. No more sad, oozing cheese; just perfectly crispy, creamy, spicy goodness in every single bite.
Embrace these expert tips and watch these irresistible treats become your go-to appetizer for any occasion. Don’t hesitate to share your delicious creations and newfound popper mastery with friends and family!

Jalapeño Popper Bites
Course: AppetizerCuisine: AmericanDifficulty: easy4
servings25
minutes10
minutes550
kcal2100
minutesDiscover the secret to making perfect, leak-proof jalapeño poppers with gooey cheese and crispy bacon, encased in a golden shell. This recipe guarantees appetizer perfection with a simple freezing trick that keeps all the delicious filling inside.
Ingredients
4 ounces cream cheese, softened
1/2 cup shredded Monterey Jack cheese (or cheddar)
2 medium jalapeños, finely minced (seeds removed for less heat, or left in for more)
4 strips cooked bacon, finely crumbled
1/4 teaspoon garlic powder
Salt and black pepper to taste
1/2 cup all-purpose flour
2 large eggs, lightly beaten
1 1/2 cups Panko breadcrumbs
4 cups vegetable oil, for frying
Directions
- In a medium bowl, combine the softened cream cheese, shredded Monterey Jack cheese, minced jalapeños, crumbled bacon, garlic powder, salt, and pepper. Mix well until everything is evenly combined.
- Using a small spoon or scoop, form the cheese mixture into approximately 1-inch balls. Place them on a baking sheet lined with parchment paper. This size is important for even cooking and proper sealing.
- To prevent leaks, prepare your breading station carefully. Set up three shallow dishes: one with flour, one with the beaten eggs, and one with Panko breadcrumbs.
- Working with one cheese ball at a time, first roll it thoroughly in the flour, shaking off any excess. This initial flour coating helps the egg adhere.
- Next, dip the floured ball into the beaten egg, ensuring it’s completely coated. Let any excess egg drip off.
- Immediately transfer the egg-coated ball to the Panko breadcrumbs. Gently press the breadcrumbs onto the ball, making sure it’s fully and generously coated on all sides. This thick breading is your first line of defense against leaks.
- Repeat steps 4-6 for all the cheese balls.
- For guaranteed leak-proof results, freeze the breaded balls. Place the entire baking sheet with the breaded cheese balls into the freezer for at least 1 hour, or until they are firm. This crucial step ensures the cheese remains solid while the breading fries to a perfect golden crisp, preventing premature melting and oozing.
- In a large, heavy-bottomed pot or Dutch oven, heat the vegetable oil over medium-high heat until it reaches 350 degrees Fahrenheit (175 degrees Celsius). Use a thermometer to monitor the temperature; maintaining the right heat is key to preventing greasy bites and ensuring the breading cooks properly before the cheese gets too hot.
- Carefully lower a few frozen popper bites into the hot oil, ensuring you do not overcrowd the pot. Fry for 2-3 minutes, turning occasionally, until they are golden brown and crispy. The frozen core helps prevent the cheese from bursting through too quickly.
- Using a slotted spoon, remove the cooked popper bites from the oil and place them on a plate lined with paper towels to drain any excess oil.
- Serve immediately while hot and the cheese is beautifully gooey inside.
Notes
- Freezing the breaded poppers for at least 1 hour is crucial for preventing leaks during frying.


