
I spent years fighting the disappointment of a perfectly golden, flaky pie crust hiding a filling that always tasted like savory dust. The secret to transforming any chicken pot pie into a guaranteed crowd-pleaser lies in a simple, overlooked technique that locks in moisture.
This definitive recipe for Deep Dish Shredded Chicken Pie utilizes a unique gravy cooling process that completely stabilizes the sauce, ensuring every bite is incredibly rich, creamy, and satisfying without ever being dry.
Why Our Deep Dish Shredded Chicken Pie Stays Impossibly Moist
The “Never Dry” Guarantee: Our Anti-Chalky Filling Secret
The number one killer of homemade savory pies is a dry, chalky filling that results when the shredded meat absorbs the thin liquid of the gravy base during baking.
We solve this by cooking the gravy base first and cooling it completely until it is stiff and thick. This crucial step prevents the chicken fibers from absorbing the moisture and drying out under the oven’s heat.
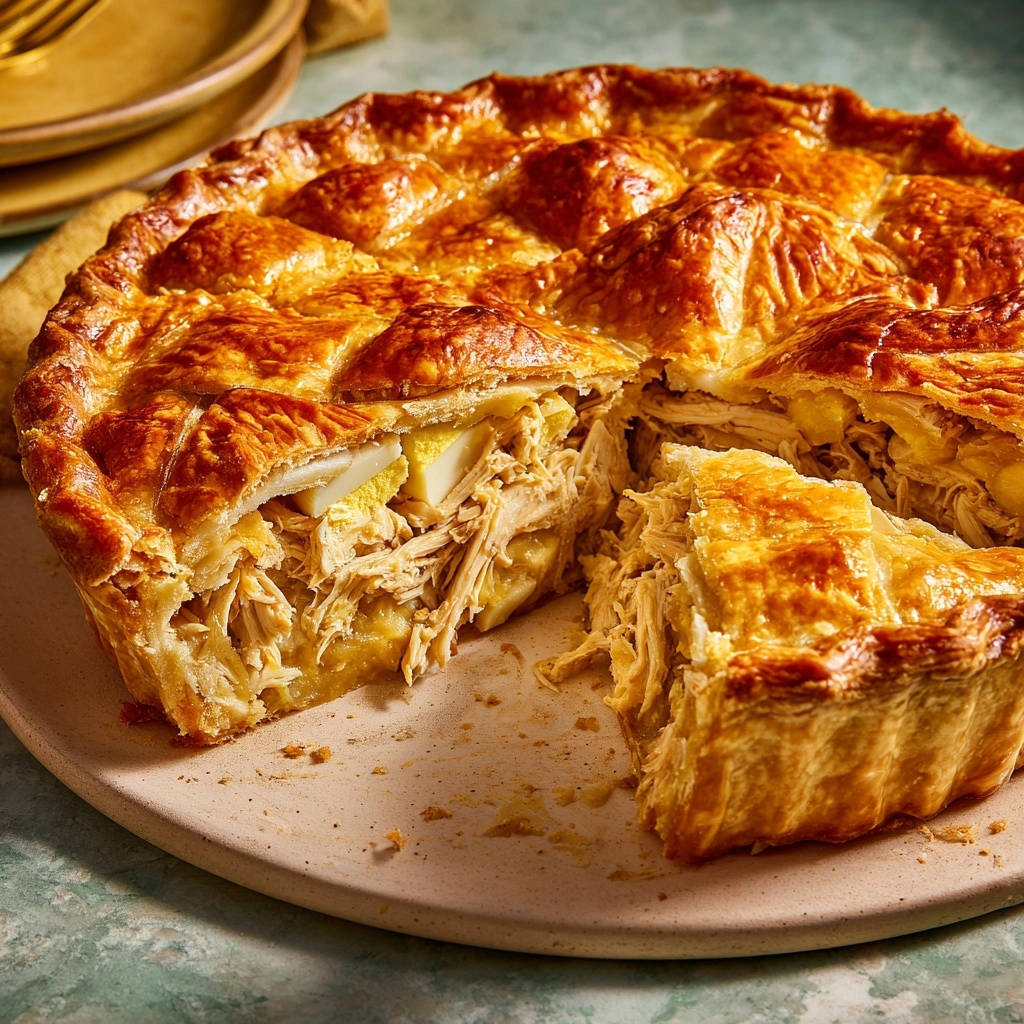
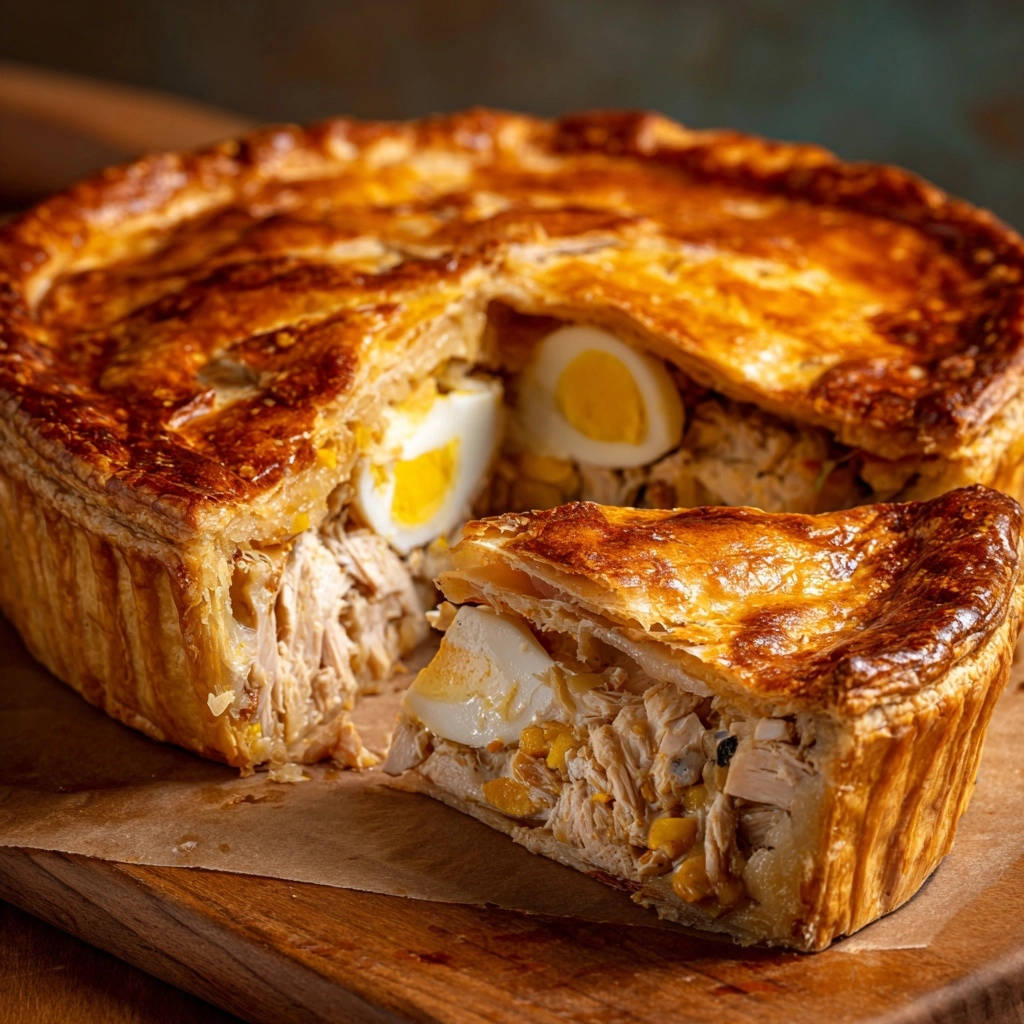
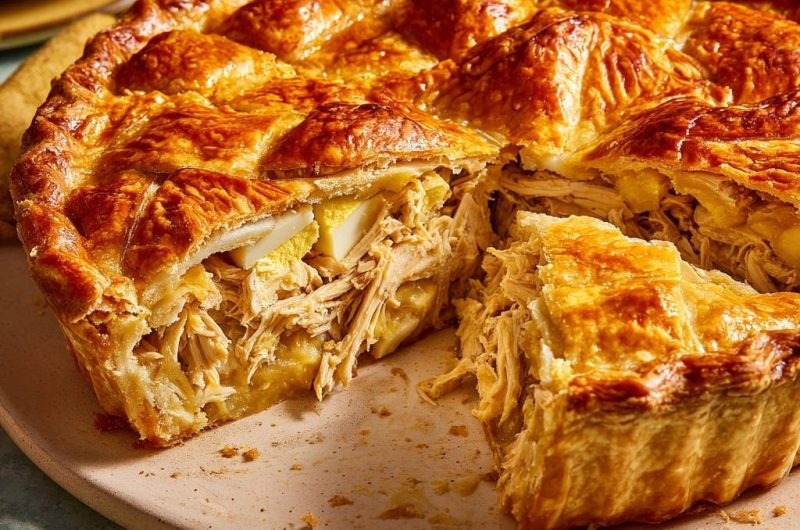
The Unexpected Inclusion: Hard-Boiled Eggs
Quartered hard-boiled eggs add incredible textural contrast and richness that complements the savory chicken beautifully, ensuring the filling is satisfyingly substantial.
This inclusion is a nod to traditional, hearty English savory pies, adding a luxurious creaminess when married with the thick, velvety sauce.
Perfect for Busy Weeknights: Using Prepared Pastry
Using high-quality refrigerated pie crust or puff pastry drastically cuts down on prep time without sacrificing a flaky, deep golden finish.
This convenience allows us to prioritize the filling-the complex, flavorful heart of the dish-making this impressive savory pie manageable even on a busy weeknight.
The Essential Ingredients: Building Flavor and Depth
Achieving the Velvety Gravy Base (Roux Mastery)
A roux, a cooked mixture of fat (butter) and flour, provides the foundational thickening agent for the entire sauce structure.
The two-minute continuous cook time for the roux is essential; it eliminates the raw, pasty flour taste, resulting in a cleaner, nutty base flavor.
Whisking the chicken stock in gradually ensures the starch granules hydrate evenly, which is critical for creating a perfectly smooth, lump-free base for the Deep Dish Shredded Chicken Pie.
Meat Prep: Shredded Chicken vs. Other Cuts
Shredded meat, rather than diced chunks, is the superior choice because the small fibers maximize the surface area needed to absorb and hold onto the thick, cooled gravy base.
The easiest method for creating fine shreds from cooked chicken breast is using a stand mixer with the paddle attachment on low speed for 30 seconds.
If utilizing store-bought rotisserie chicken for ease, reduce the amount of added salt in the gravy base by half, as commercially prepared poultry is often highly seasoned.
If you also enjoy a beautiful crust, consider golden lattice chicken pot pie for your next bake.
The Pastry Decision: Puff Pastry vs. Traditional Pie Crust
Traditional pie crust offers a flakier, denser bite that fully encapsulates the hearty filling, while puff pastry provides an airier, lighter texture and magnificent height for the top layer.
Always handle refrigerated pastry as little as possible and ensure it stays very cold; this prevents gluten development and minimizes the risk of tearing during the transfer to the deep-dish plate.
To ensure a watertight seal for a deep-dish plate, trim the top pastry sheet so it slightly overlaps the bottom overhang, then aggressively crimp or press the two layers together.
Essential Tools for Deep Dish Pie Success (Quick Read)
Deep-Dish Pie Plate: This recipe demands a 9-inch deep dish plate to accommodate the generous volume of rich filling and the inclusion of the whole quartered hard-boiled eggs.
Wire Whisk: A good wire whisk is non-negotiable for quickly incorporating the flour into the fat for the roux and gradually whisking in the cold stock without forming lumps.
Large Saucepan: Use a saucepan or Dutch oven large enough to comfortably manage the two cups of stock and half cup of heavy cream without boiling over during the active thickening phase.
A Step-by-Step Guide to Deep Dish Shredded Chicken Pie Mastery
-
Preparing the Aromatic Base:
Start by melting the butter and softening the diced onions thoroughly over medium heat until they are translucent, which typically takes about five minutes.
Add the minced garlic only for the final minute of sautéing and stir constantly. This short cooking time prevents the delicate garlic from burning, which would introduce a sharp bitterness.
-
Creating the Roux and Sauce:
Whisk the flour continuously into the butter and onion mixture for two full minutes to create a smooth roux and ensure you cook out the starchy, raw flour taste.
Gradually incorporate the chicken stock while whisking vigorously. Continue simmering and stirring until the sauce is reduced and thick enough to visibly coat the back of a metal spoon.
-
The Crucial Gravy Cooling Phase (Locking in Moisture):
This is the most important step! Transfer the hot, thick gravy immediately to a separate, shallow bowl to speed up the cooling process.
Explain the physics: Cooling the gravy until it is firm and nearly solid prevents the thin liquid components from being absorbed by the chicken fibers during baking, guaranteeing long-lasting moisture.
Allow the gravy to cool completely to room temperature, using the refrigerator (1-2 hours) or the freezer (30 minutes, stirring occasionally) to achieve the necessary stiff consistency.
-
Assembling and Seasoning the Filling:
Gently fold the shredded cooked chicken into the completely cooled gravy base; the resulting mixture should be very stiff and easily hold its shape when scooped.
Taste test the filling and adjust the final seasoning (salt and pepper) at this stage. Since flavors are slightly muted when cold, be confident in seasoning slightly stronger than usual for perfect results after baking.
-
Prepping and Layering the Pie:
Preheat the oven to 400°F and carefully place the bottom crust, ensuring an adequate overhang around the edge for sealing the top layer.
Layer the filling methodically: spoon in half of the chicken mixture, arrange the quartered hard-boiled eggs evenly over that layer, and then top with the remaining chicken filling.
Press the filling lightly to remove air pockets and ensure a stable structure that will prevent the pie from sinking after baking.
-
Sealing and Ventilation:
Place the second pastry sheet (the lid) over the filling and ensure a tight crimp is made where it meets the bottom crust overhang to prevent any leakage.
Cut four small steam vents into the top crust-these necessary cuts allow steam to escape and are critical in preventing a soggy top crust or a structural blowout during baking.
-
The Two-Stage Bake:
Bake initially at 400°F for 15 minutes to rapidly set the crust and begin the intense browning process, developing a strong structure.
Reduce the temperature to 375°F for the remaining 40 minutes, which allows the filling to heat through evenly without scorching the flaky crust.
-
The Critical Resting Period:
Allowing the pie to rest on a wire rack for at least 20 minutes after baking is non-negotiable for a structurally sound slice.
This resting period allows the molten, hot filling to fully solidify and set, which prevents the pie from crumbling or running out when you cut the first slice.
Chef’s Secrets: Handling Pastry and Preventing a Soggy Bottom
The Art of the Perfect Egg Wash
The ideal egg wash is made by whisking one large egg with one tablespoon of cold water, which slightly thins the proteins for easier, more even coverage.
Brushing the wash liberally over the top surface maximizes that deep, glossy golden color and helps to secure and stabilize the crimped edges during the bake.
Temperature Control: Handling Frozen Pastry
Refrigerated pastry should be handled immediately after being removed from the fridge while it is still very cold to reduce sticking and tearing.
If using puff pastry, ensure it is completely thawed but still highly chilled before attempting to unfold, as cold pastry is less likely to crack along the fold lines.
Preemptively Preventing a Soggy Bottom Crust
Lightly “docking” the bottom crust-pricking it all over with a fork-allows trapped steam to escape, which prevents the base from becoming saturated and soggy.
The benefit of using a dark metal pie plate over clear glass is superior heat conduction, which significantly aids in achieving a crisp, golden bottom crust every time.
Troubleshooting & Prep Ahead: Solving Common Pie Challenges
My Gravy Filling is Too Runny After Cooling
If the gravy didn’t thicken enough during simmering, return it to the saucepan and quickly stir in a cornstarch slurry (1 tsp cornstarch mixed with 1 Tbs cold water) and bring back to a simmer until thickened.
Ensure you allowed adequate cooling time; if the filling is still lukewarm when assembled, it will run during baking, so confirmed thickness is crucial here.
What if the Top Crust Browns Too Quickly?
If the crust achieves a beautiful dark golden color well before the pie is fully cooked, loosely tent the entire pie with aluminum foil during the remaining bake time to shield the crust from direct heat.
Make-Ahead and Freezing Instructions
The Deep Dish Shredded Chicken Pie can be assembled completely (steps 1-8), then tightly wrapped in two layers of plastic wrap and foil and frozen for up to three months.
Bake the frozen pie straight from the freezer without thawing, adding 20-30 minutes to the total bake time until the internal temperature reaches 165°F.
Alternatively, the filling can be made entirely ahead of time and stored refrigerated for up to 3 days, making the final layering and baking extremely fast when ready to serve.
Customizing Your Deep Dish Shredded Chicken Pie: Variations and Pairings
Vegetable Additions and Substitutions
Excellent optional add-ins include sautéed mushrooms, frozen peas, finely diced carrots, or celery, all of which enhance the savory depth of the pie.
Crucially, ensure any added vegetables are fully cooked and soft before mixing into the cooled gravy, as they will not soften significantly inside the pie during the oven bake.
Making it Gluten-Free or Dairy-Free
For a gluten-free savory pie: Substitute the all-purpose flour for the roux with a high-quality 1:1 gluten-free baking blend, ensuring the mixture contains xanthan gum for proper thickening.
For a dairy-free filling: Use full-fat coconut milk or a rich oat cream substitute instead of heavy cream for the sauce base, and use a high-quality dairy-free butter substitute for the roux.
For a similarly satisfying pasta dish, try creamy chicken and carrot penne.
Serving Suggestions: What to Pair with This Hearty Pie
Pair this rich and hearty Deep Dish Shredded Chicken Pie with a light, acidic side, such as a crisp green salad tossed in a sharp lemon vinaigrette to cut through the richness.
A simple side of roasted asparagus or steamed green beans provides a necessary textural contrast and beautiful freshness to complement the creamy filling.
What to Try Next
Round out your meal with these complementary dishes.
- For a fresh take on chicken, try this Grilled Chicken Pasta Salad, a bright counterpoint to the rich pie.
- Pair your chicken pie with the comforting texture of Golden Skillet Cornbread for a complete meal.
Quick Answers to Your Deep Dish Shredded Chicken Pie Questions
How Do I Know When the Gravy is Thick Enough?
During the cooking phase, the sauce is thick enough when it can fully coat the back of a wooden spoon or metal spatula, and a line drawn through the coating holds its shape for several seconds.
Once cooled, the filling should have the consistency of a very stiff, thick pudding or spreadable dip, completely holding its shape when transferred to the crust.
Why Are Hard-Boiled Eggs Used in a Chicken Pie?
Hard-boiled eggs are a traditional, historical inclusion in many classic British and colonial savory pies, providing rich flavor and a substantial, distinct textural contrast.
They blend seamlessly with the shredded chicken and help to ensure the filling remains robust and hearty enough for the deep-dish format.
Can I Use Chicken Broth Instead of Stock?
While possible, chicken stock is highly recommended because it provides a deeper, more layered flavor profile and better body due to its natural collagen and gelatin content.
If using standard chicken broth, use a low-sodium variety and consider simmering it down slightly to concentrate the inherent flavor before incorporating it into the roux.
Ready to Bake? Share Your Deep Dish Masterpiece!
Mastering the technique of pre-cooling the gravy base is the single factor that elevates this Deep Dish Shredded Chicken Pie from good to truly great, guaranteeing ultimate moisture and richness.
Trust this process, focus on excellent seasoning, and remember that critical resting period. We are confident this recipe will become your definitive guide for creating superior savory pies.
Try this superior savory pie recipe tonight and share your deep-dish masterpiece with us-you won’t believe how easy it is to achieve perfection!
Shredded Chicken Pie
Course: Main CourseCuisine: AmericanDifficulty: medium8
servings30
hours55
minutes480
kcal60
minutesTired of dry chicken pie? This recipe guarantees an impossibly moist filling by using a simple gravy cooling technique before assembly. Filled with rich shredded chicken and hard-boiled eggs, this hearty pie is perfect for dinner.
Ingredients
1 tablespoon unsalted butter
1 small yellow onion, finely diced
2 cloves garlic, minced
1/4 cup all-purpose flour
2 cups chicken stock
1/2 cup heavy cream
1 teaspoon salt, divided
1/2 teaspoon black pepper
1 teaspoon onion powder
1 pound cooked chicken breast or thighs, shredded
4 large hard-boiled eggs, quartered
1 package refrigerated pie crust or puff pastry (2 sheets)
1 large egg, beaten (for egg wash)
1 tablespoon water
Directions
- Prepare the Gravy Base (The Anti-Dryness Step): In a large saucepan, melt the butter over medium heat. Add the diced onion and cook until softened, about 5 minutes. Add the minced garlic and cook for 1 minute until fragrant.
- Create the Thickening Agent: Sprinkle the flour over the butter and onion mixture. Whisk continuously for 2 minutes to create a smooth roux.
- Build the Sauce: Gradually whisk in the chicken stock until the mixture is smooth and thickened. Bring it to a simmer, stirring constantly, until the sauce coats the back of a spoon thickly. Reduce the heat and stir in the heavy cream, 1/2 teaspoon salt, pepper, and onion powder.
- Lock in Moisture: Transfer this thick gravy base to a bowl and allow it to cool completely to room temperature (about 1 to 2 hours in the refrigerator, or 30 minutes in the freezer, stirring occasionally). This crucial step prevents the shredded chicken from absorbing thin liquid and drying out during baking.
- Assemble the Filling: Once the gravy is fully cooled and very thick, gently fold in the shredded cooked chicken until every piece is coated. Adjust seasoning if needed. The mixture should hold its shape.
- Prep the Crust: Preheat oven to 400 degrees F. Place one sheet of pastry into a 9-inch deep-dish pie plate, allowing the edges to overhang. Dock the bottom crust lightly with a fork.
- Layer the Pie: Spoon half of the chicken filling into the prepared crust. Arrange the quartered hard-boiled eggs evenly over the filling. Top with the remaining chicken mixture, ensuring it is pressed lightly and evenly distributed.
- Seal and Finish: Place the second pastry sheet (or puff pastry) over the top of the pie. Crimp and seal the edges tightly around the bottom crust overhang. Cut four small steam vents into the top crust. Combine the beaten egg and water to make an egg wash and brush liberally over the top crust for that deep golden color.
- Bake: Bake at 400 degrees F for 15 minutes. Reduce the oven temperature to 375 degrees F and continue baking for 40 minutes, or until the crust is deeply golden brown and the filling is bubbly hot.
- Rest: Let the pie cool on a wire rack for at least 20 minutes before slicing and serving. This allows the filling to set completely and prevents crumbling.
Notes
- Cooling the gravy base completely is the crucial step to ensure the filling remains moist.


