
Imagine biting into a waffle that doesn’t just yield to your teeth but shatters with a satisfying, glass-like crunch. Most homemade waffles suffer from the dreaded “steam soak,” where the interior moisture migrates to the surface, turning a golden crust into a limp, soggy mess within minutes. This is especially frustrating when you want to load those deep pockets with heavy fruit preserves or syrups.
The “Anti-Soggy Bottom” philosophy changes the game by focusing on structural engineering rather than just flavor. By adjusting the chemistry of the batter and utilizing a specific double-heat technique, you can create a waffle that acts as a sturdy, crispy vessel for your favorite toppings. This guide explores how to achieve that elusive texture that stands up to the weight of thick jam without losing its integrity.
The secret lies in a precise cornstarch-to-flour ratio and a final dehydration step in the oven. While most recipes rely on flour alone, adding cornstarch limits gluten development, ensuring the exterior stays crisp while the inside remains airy. You’ll never have to rush through breakfast again just to beat the sogginess.
The Science of the Anti-Soggy Waffle
When waffle batter hits a hot iron, the water inside rapidly turns into steam. In a standard recipe, that steam often gets trapped within the dense flour structure. As the waffle cools, the trapped vapor settles back into the crust, making it soft and chewy rather than crispy.
To support heavy jam, you need a waffle with high structural integrity. This means creating a crust that is essentially a reinforced shell. By managing how moisture escapes during the cooking process, we can ensure the “moisture migration” happens outward and away from the waffle, rather than staying locked inside the crumb.
Why Cornstarch Creates a Glass-Like Shell
Cornstarch is a pure starch with no protein, which means it cannot form gluten. When you mix it with all-purpose flour, you are effectively lowering the overall protein content of your dry mix. This results in a batter that produces a more delicate, brittle crunch rather than a bread-like chew.

During cooking, the cornstarch granules undergo gelatinization and then quickly dehydrate on the surface. This creates a thin, rigid layer that mimics the texture of fried foods. Because this layer is so low in moisture, it resists absorbing the liquid from the jam you’ll add later.
The Role of Aeration in Steam Escape
Folding in stiffly beaten egg whites isn’t just about making the waffles tall and fluffy. Those millions of tiny air bubbles act as internal “exhaust vents.” As the heat from the iron penetrates the batter, the steam travels through these pre-formed channels and escapes out the sides of the iron.
Without these air pockets, the steam is forced to push through the batter itself, which creates a dense, gummy interior. By whipping the whites until they hold a firm shape, you are building a scaffolding that keeps the waffle light and allows the exterior to dry out completely.
Essential Components for Cinnamon Sugar Jam-Filled Waffles
Quality ingredients are the foundation of this technical bake. Using whole milk is vital because the fat content helps tenderize the crumb while the sugars in the milk contribute to a deep, mahogany browning. If you use skim milk, you’ll lose that rich flavor and the crust won’t be as sturdy.
The temperature of your melted butter also matters. If the butter is too hot when it hits the eggs, it can scramble them; if it’s too cold, it will clump up when it touches the cold milk. Aim for a lukewarm temperature that blends seamlessly into the liquid base for a smooth, emulsified batter.
Selecting the Right Fruit Preserves
Not all fruit toppings are created equal. For this recipe, a high-pectin jam or preserve is much better than a thin jelly or a watery syrup. Pectin acts as a natural thickener that keeps the fruit in place within the waffle wells, preventing it from running off the sides.
For even more fruit-filled baking ideas, try these peach crumble muffins.
Strawberry and raspberry jams are classic choices because their natural acidity provides a sharp contrast to the sweet cinnamon sugar. The brightness of the fruit cuts through the richness of the butter, creating a balanced bite that isn’t cloyingly sweet.
For a savory contrast to sweet toppings, consider these spinach pepper mini quiches with their wonderfully crisp crusts.
The Cinnamon Sugar Ratio for Maximum Adhesion
The “golden ratio” for the coating is one tablespoon of ground cinnamon for every half-cup of granulated sugar. This provides enough spice to be prominent without the bitterness that comes from over-using cinnamon. Use standard granulated sugar rather than powdered sugar to maintain that gritty, churro-like texture.
For a similar sweet dusting, check out these fluffy powdered sugar donuts.
Step-by-Step: Engineering the Perfect Crunch
Success with this recipe requires moving with intention. You want to maintain the aeration you’ve built into the batter while ensuring the iron is hot enough to sear the exterior instantly. This immediate heat is what locks in the shape before the batter has a chance to deflate.
Phase 1: Preparing the Dry and Wet Bases
Start by sifting your flour, cornstarch, and baking powder together. Sifting is a step you shouldn’t skip here; it ensures the cornstarch is perfectly distributed so you don’t end up with patchy spots in the crust. Create a well in the center of your dry ingredients to receive the liquids.
When you combine the two, whisk only until the large lumps of flour disappear. Overmixing at this stage is the fastest way to ruin the texture. If you see a few tiny streaks of flour, that’s perfectly fine. You want to keep the gluten relaxed so the waffle stays tender.
Phase 2: Achieving Stiff Peaks and Folding
Beat your egg whites in a clean, grease-free bowl. You’ll know you’ve reached “stiff peaks” when you lift the whisk and the foam stands straight up without drooping at the tip. This is the “engine” of your waffle’s lift.
Use a large rubber spatula to fold the whites into the batter using a “J-fold” motion. Cut down through the center, scrape across the bottom, and lift over the top. Rotate the bowl as you go. Stop the moment the white streaks disappear to preserve as much air as possible.
Phase 3: The High-Heat Iron Technique
Your waffle iron must be screaming hot. If your iron has a light that indicates it’s ready, wait an extra minute after it turns on to ensure the plates are fully saturated with heat. Pour the batter in and resist the urge to peek.
Watch the steam coming out of the sides of the iron. This is your most reliable timer. When the visible steam almost completely stops, it means the internal moisture has evaporated sufficiently. This usually takes about 4 to 5 minutes depending on your specific appliance.
The Double-Heat Method: Dehydrating the Crust
This is the secret step that separates average waffles from professional-grade ones. Even after the iron is done, there is still residual moisture inside the waffle. By moving the waffle to a low-temperature oven, you pull that remaining vapor out without overcooking the interior.
Set your oven to 250°F before you even start the batter. This gentle heat acts like a dehydrator. It firms up the cornstarch shell, making it incredibly rigid and ready to handle the butter brush and sugar dredge without collapsing.
Why a Wire Rack is Non-Negotiable
Never place your hot waffles on a flat plate or a solid baking sheet. This creates a “steam trap” where the heat from the bottom of the waffle hits the cold surface, turns back into water, and immediately softens the crust. You’ve worked too hard for that crunch to let it vanish now!
A wire rack allows for 360-degree airflow. The air can circulate under the waffle, ensuring the bottom stays just as crisp as the top. This is the only way to maintain that “shatter-crisp” texture while you finish cooking the rest of the batch.
The Finishing Touch: Coating and Filling
Timing is everything during the assembly phase. You have a small window of opportunity where the waffle is warm enough to melt the butter slightly but dry enough to hold its shape. Have your melted butter and cinnamon sugar station ready to go right next to the oven.
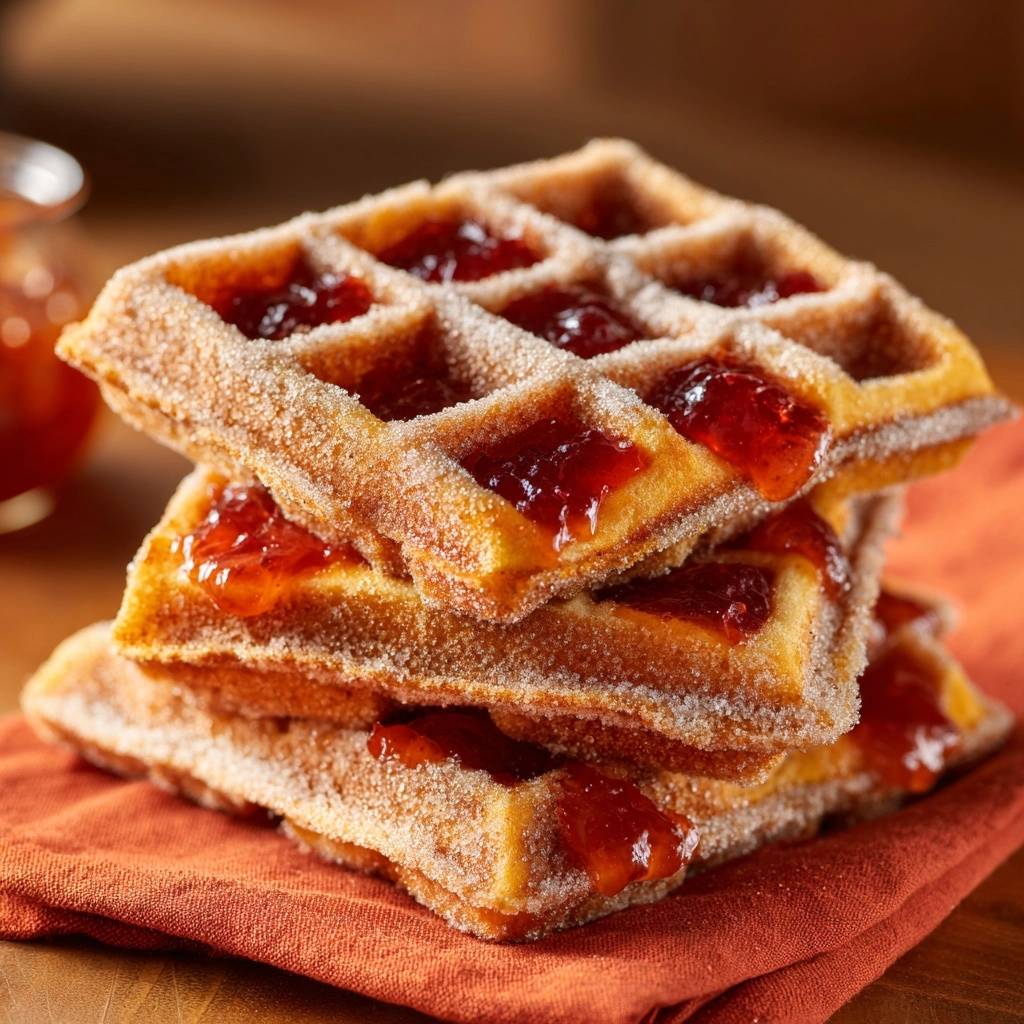
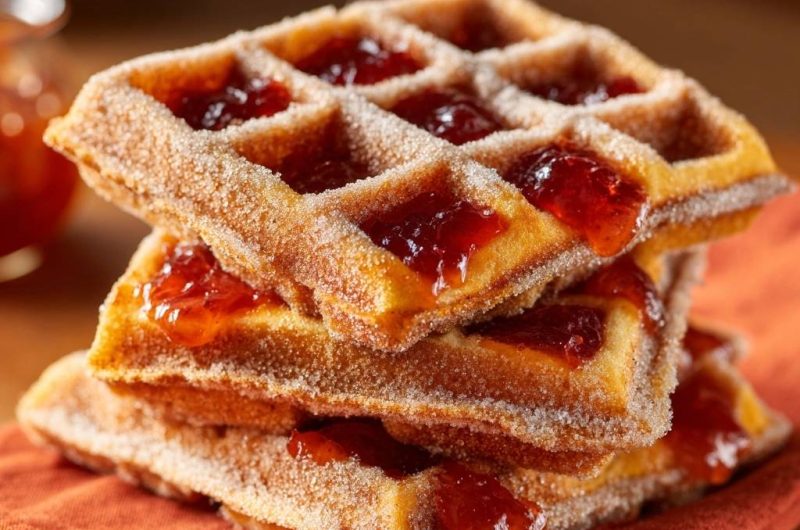
Brush the waffle generously with melted butter. You want to hit the ridges and the deep pockets. Immediately drop it into the sugar mixture. The butter acts as the “glue” that binds the cinnamon sugar to the crust, creating a sweet, spiced veneer that crackles when you bite into it.
Technique for Even Cinnamon Sugar Distribution
Instead of just sprinkling the sugar on top, actually dredge the waffle. Place it face down in the sugar and press very gently. This ensures the sugar gets into the corners of every single square. Flip it over and repeat. Shake off any excess so the flavor remains balanced.
Troubleshooting Common Waffle Failures
If your waffles are sticking to the iron, it’s usually a sign that the iron wasn’t hot enough or there wasn’t enough fat in the batter. Ensure your butter is fully incorporated and give the iron a light brush of oil before the first batch if it isn’t a high-quality non-stick surface.
If the cinnamon sugar coating is falling off, you might be waiting too long to dredge. The waffle needs to be warm, and the butter must be wet. If the butter soaks in or dries before you hit the sugar, the crystals won’t have anything to cling to. Work with one waffle at a time for the best results.
Equipment: Why Your Waffle Iron Matters
A Belgian-style waffle iron with deep pockets is the best choice for this recipe. Those deep wells are designed to hold a significant amount of jam. A standard, shallow iron won’t give you the same “filled” experience, as the jam will simply sit on top rather than being cradled by the waffle.
The depth of the pocket also allows for more surface area. More surface area means more of that crispy, cornstarch-reinforced crust. If you only have a thin waffle maker, you may want to reduce the amount of jam so it doesn’t overwhelm the delicate structure.
Make-Ahead Strategies and Texture Retention
You can actually make these in advance, which is great for busy mornings. Cook the waffles in the iron but skip the oven and the sugar coating. Let them cool completely on a wire rack, then freeze them in a single layer before transferring to a freezer bag.
To reheat, pop them into a toaster or a 350°F oven until they are hot and crispy again. Once they are revived, proceed with the butter brushing and cinnamon sugar dredging. Never use a microwave to reheat these; the microwave vibrates water molecules, which will instantly turn your crispy masterpiece into a rubbery mess.
Flavor Variations and Seasonal Swaps
While strawberry and raspberry are the gold standard, don’t be afraid to experiment. A tart orange marmalade is incredible against the cinnamon sugar, especially in the winter. In the fall, you might try a thick apple butter or a plum preserve for a deeper, woodsy flavor profile.
You can also tweak the coating. Adding a pinch of ground cardamom or nutmeg to the sugar adds a sophisticated, floral note. If you want a bit of heat, a tiny pinch of cayenne pepper in the cinnamon sugar can make the fruit flavors pop in a really interesting way.
Sweet Treats to Complement Your Waffles
After enjoying your Cinnamon Sugar Jam-Filled Waffles, explore more sweet baked goods.
- For a different cookie experience, try these Chocolate Dipped Pastry Cream Cookies, which offer a creamy center and a crisp chocolate coating.
- If you love cinnamon sugar flavors, you might also enjoy these Homemade Cinnamon Sugar Donuts for their fluffy texture and sweet coating.
Expert Tips for High-Volume Cooking
If you’re cooking for a crowd, the oven is your best friend. You can keep a whole stack of waffles on the wire rack in the 250°F oven for up to 30 minutes without them losing their quality. In fact, they often get even crispier the longer they sit in that dry heat.
Set up an assembly line: one person handles the waffle iron, one person does the butter brushing, and another does the sugar dredging. This keeps the process moving quickly so everyone can eat at the same time. Add the jam at the very last second before serving to ensure the crust stays at peak crunch levels.
Frequently Asked Questions
Can I use gluten-free flour for these waffles?
Yes, you can substitute the all-purpose flour with a high-quality 1-to-1 gluten-free flour blend. However, make sure your blend contains xanthan gum, which provides the necessary elasticity that the egg whites need to cling to. The cornstarch is already gluten-free and will actually help the gluten-free flour achieve a better crunch than it would on its own.
Why are my egg whites not reaching stiff peaks?
The most common culprit is fat contamination. Even a tiny speck of egg yolk or a trace of oil on your whisk or bowl will prevent the proteins in the whites from bonding. Always use a stainless steel or glass bowl (plastic can hold onto hidden oils) and ensure your equipment is bone-dry and perfectly clean before you start whisking.
Can I use oil instead of butter in the batter?
You can use a neutral oil like vegetable or canola oil, which actually makes the waffle slightly crispier because oil remains liquid at room temperature. However, you will lose the rich, toasted flavor that butter provides. For this specific recipe, butter is recommended because it complements the cinnamon sugar coating so much better than oil does.
How do I store leftover cinnamon sugar?
If you have leftover sugar that hasn’t been contaminated by butter brushes, store it in a small airtight jar in your pantry. It will stay fresh indefinitely. You can use it on toast, in coffee, or for your next batch of waffles. If the sugar has clumps of butter in it, it’s best to discard it to prevent it from going rancid.
What is the best way to clean the iron after a sugar spill?
If jam or sugar leaks onto the iron, don’t try to scrub it while it’s cold. While the iron is still slightly warm (but unplugged), place a very damp paper towel between the plates and close it. The residual heat will create steam that loosens the burnt sugar, allowing you to wipe it away easily after a few minutes without scratching the non-stick surface.
Waffles
Course: BreakfastCuisine: AmericanDifficulty: easy4
servings10
minutes15
minutes415
kcal25
MinutesThese waffles are engineered to stay crispy. By incorporating cornstarch and folding in stiff egg whites, the batter creates a light, glass-like shell. A final toast in the oven ensures the crust remains crunchy after being brushed with butter, coated in cinnamon sugar, and filled with fruit jam.
Ingredients
1 3/4 cups all-purpose flour
1/4 cup cornstarch
2 tablespoons granulated sugar
1 tablespoon baking powder
1/2 teaspoon salt
2 large eggs, separated
1 1/2 cups whole milk
1/2 cup unsalted butter, melted and cooled
1 teaspoon vanilla extract
1/2 cup strawberry or raspberry jam
1/2 cup granulated sugar mixed with 1 tablespoon ground cinnamon (for coating)
4 tablespoons melted butter (for brushing)
Directions
- Preheat your waffle iron to its highest setting. High heat is essential for immediate moisture evaporation, which prevents a soggy texture. Preheat your oven to 250°F (120°C) with a wire rack set over a baking sheet inside.
- In a large bowl, whisk together the flour, cornstarch, baking powder, sugar, and salt. The cornstarch is the secret weapon; it prevents excessive gluten development and creates a crispier, glass-like shell.
- In a medium bowl, whisk the egg yolks, milk, 1/2 cup melted butter, and vanilla. In a separate clean bowl, beat the egg whites until stiff peaks form.
- Pour the wet ingredients into the dry and whisk until just combined. Gently fold in the stiff egg whites; this creates internal air pockets that allow steam to escape more efficiently.
- Pour the batter into the hot iron and cook until the steam stops escaping from the sides and the waffle is deep golden brown.
- For the ultimate crunch, place the cooked waffles directly on the wire rack in the preheated oven for 2-3 minutes. This “double-toast” method dehydrates the outer crust, ensuring it stays crisp even after coating.
- Remove from the oven. Working quickly, brush both sides of the warm waffles generously with the additional melted butter and immediately dredge them in the cinnamon sugar mixture until the edges and ridges are fully encrusted.
- Fill the deep waffle pockets with generous dollops of jam. Because of the cornstarch-reinforced crust and the oven-drying step, the jam will sit perfectly in the wells without soaking through.
Notes
- The cornstarch prevents excessive gluten development for a crispier shell. Using a wire rack in the oven for the second toast is crucial to dehydrate the outer crust and prevent moisture buildup.


