
Most home cooks have experienced the disappointment of a flatbread that looks beautiful but feels like a wet sponge. You pile on the toppings, only to find the center is a greasy, doughy mess that sags the moment you pick it up. This happens because the dough absorbs the fats from the butter and cheese before it has a chance to set its structure.
The secret to a professional-grade Garlic Butter Feta Flatbread lies in a two-part strategy: the dough composition and the “dry-sear” cooking method. By using Greek yogurt in the mix, we create a more resilient crumb that stands up to heat. Then, we hit a scorching dry skillet to lock in the base before any fat ever touches the surface.
I’ve found that the real trick is the immediate temperature shock. When that cold dough hits a hot cast iron surface without oil, it creates an instant “crust barrier.” This barrier acts like a shield, ensuring your garlic butter stays on top of the bread rather than soaking into the middle and ruining the texture.
The Chemistry of Airy Flatbread Dough
Creating a flatbread that is both chewy and airy requires a bit of kitchen science. We start with water heated to exactly 110°F. This temperature is the “Goldilocks zone” for yeast; it is warm enough to wake the organisms up instantly but not hot enough to kill them. If your water is too cool, the fermentation will lag, resulting in a heavy, leaden bread.
The real “Greek Yogurt Secret” is about more than just flavor. The natural acidity in the yogurt works to gently weaken the gluten strands. While that might sound counterintuitive, it actually allows the dough to stretch further without snapping back. This elasticity is what permits those massive air bubbles, or alveoli, to form and expand rapidly when they hit the heat of the pan.
Furthermore, the yogurt adds a subtle tang that cuts through the richness of the feta. It provides a moisture boost that keeps the interior soft while the outside develops a charred, smoky crust. Without this acidic component, the bread can often taste flat or overly floury.
Selecting Flour for Structural Integrity
For this specific recipe, All-Purpose flour is actually superior to high-protein bread flour. You want a moderate protein content that provides enough strength to hold the heavy feta but remains tender enough to tear easily. Bread flour can often result in a “cracker” texture that is too stiff for a foldable flatbread.
Yeast Activation and Fermentation Milestones
When you mix your yeast with sugar and water, look for a thick, creamy foam to develop within five minutes. This “bloom” is your insurance policy that the yeast is alive. A one-hour rise is the sweet spot; it gives the yeast enough time to produce carbon dioxide for lift without over-fermenting, which can make the dough smell like vinegar and lose its structural strength.
Essential Components for the Garlic Butter Feta Flatbread
Quality ingredients are the difference between a basic side dish and a restaurant-quality meal. When choosing butter, look for European-style options with a higher butterfat content. These have less water than standard sticks, meaning you get a more intense flavor and a silkier mouthfeel that doesn’t make the bread soggy.
The feta choice is equally vital. If possible, buy a block of feta packed in brine rather than the pre-crumbled tubs. Brined feta, especially those made from sheep’s milk, has a lower melting point and a much creamier texture. It softens beautifully under the lid, whereas cow’s milk crumbles can sometimes stay grainy and dry even when heated.
Fresh Garlic vs. Jarred Alternatives
Never reach for the jar of pre-minced garlic for this recipe. Those jars contain citric acid and preservatives that dull the garlic’s natural sulfurous compounds. Freshly minced cloves provide a sharp, spicy “bite” that is absolutely necessary to balance the creamy fat of the butter and the saltiness of the cheese.
The Role of Fresh Parsley and Flaky Salt
Fresh parsley isn’t just a garnish; it provides a necessary herbaceous brightness that “wakes up” the palate. Similarly, flaky sea salt adds a final textural element. Those large, crunchy crystals provide little bursts of saltiness that contrast with the soft dough, making every bite more dynamic.
Phase One: Kneading and Proofing for Texture
Kneading is where you build the “bones” of your bread. As you work the dough for those 5 to 7 minutes, you’ll feel it transform from a shaggy, sticky mass into a silky, elastic ball. You can check your progress with the “Windowpane Test”: pull a small piece of dough and stretch it thin; if it translucent without tearing, the gluten is ready.
For more ideas on building dough structure, check out these cheesy garlic herb rolls.
If your kitchen is chilly, your dough might struggle to rise. A pro tip is to place the bowl in the oven with only the oven light turned on. The heat from that single bulb creates a perfect, draft-free proofing chamber that stays around 75-80°F, ensuring a consistent and reliable double-in-size rise every time.
Phase Two: Infusing the Garlic Butter Base
The goal of the garlic butter is infusion, not browning. Use the “low and slow” method, heating the butter just until the garlic begins to dance and release its aroma. If the garlic turns brown, it becomes bitter and acrid, which will overwhelm the delicate flavor of the feta.
Once the garlic is fragrant, remove it from the heat immediately. The carryover heat in the butter will continue to mellow the garlic’s pungency without crossing the line into burnt territory. This creates a sweet, mellow garlic fat that coats the bread perfectly.
The Dry-Sear Technique: Solving the Soggy Bottom
The most common mistake in making flatbread is adding oil to the pan. When you add oil, the raw dough acts like a sponge, soaking up the fat before the starch can gelatinize. By using a bone-dry cast iron skillet, you utilize pure conductive heat to sear the exterior of the dough instantly.
This dry heat creates a crisp, charred “skin” that is structurally sound. Think of it as building the foundation of a skyscraper before you put the furniture in. Once that bottom crust is set, it becomes impervious to the garlic butter you’ll brush on later, ensuring the bread stays light and airy rather than heavy and greasy.
Managing Skillet Temperature Without a Thermometer
To know if your pan is ready, use the “water droplet test.” Flick a few drops of water onto the cast iron; if they bead up and dance across the surface before evaporating, you’ve hit the sweet spot. Medium-high heat is better than high heat, as it allows the interior to cook through before the outside burns.
Step-by-Step: Assembly and the Steam-Melt Method
After the first side is charred and you’ve flipped the bread, the clock starts ticking. Brush the garlic butter onto the hot, charred surface and sprinkle the feta. Now, the most important step: put a lid on it. This isn’t just to keep the heat in; it creates a pressurized steam environment.
The moisture trapped under the lid mimics the intense environment of a commercial stone oven. This steam softens the feta until it is nearly molten and ensures the center of the dough is fully puffed and cooked. Without the lid, your cheese will stay cold while the bottom of your bread burns.
Visual Cues for Perfect Charring
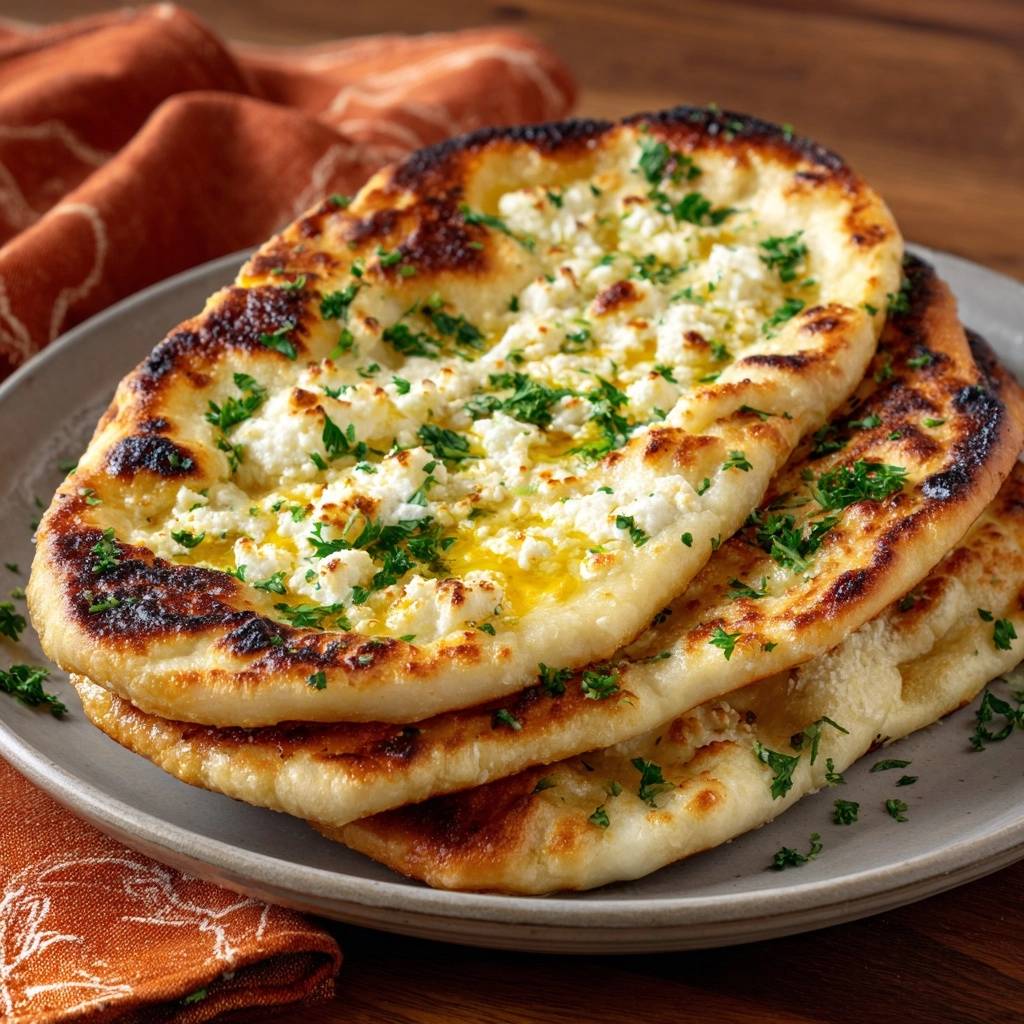
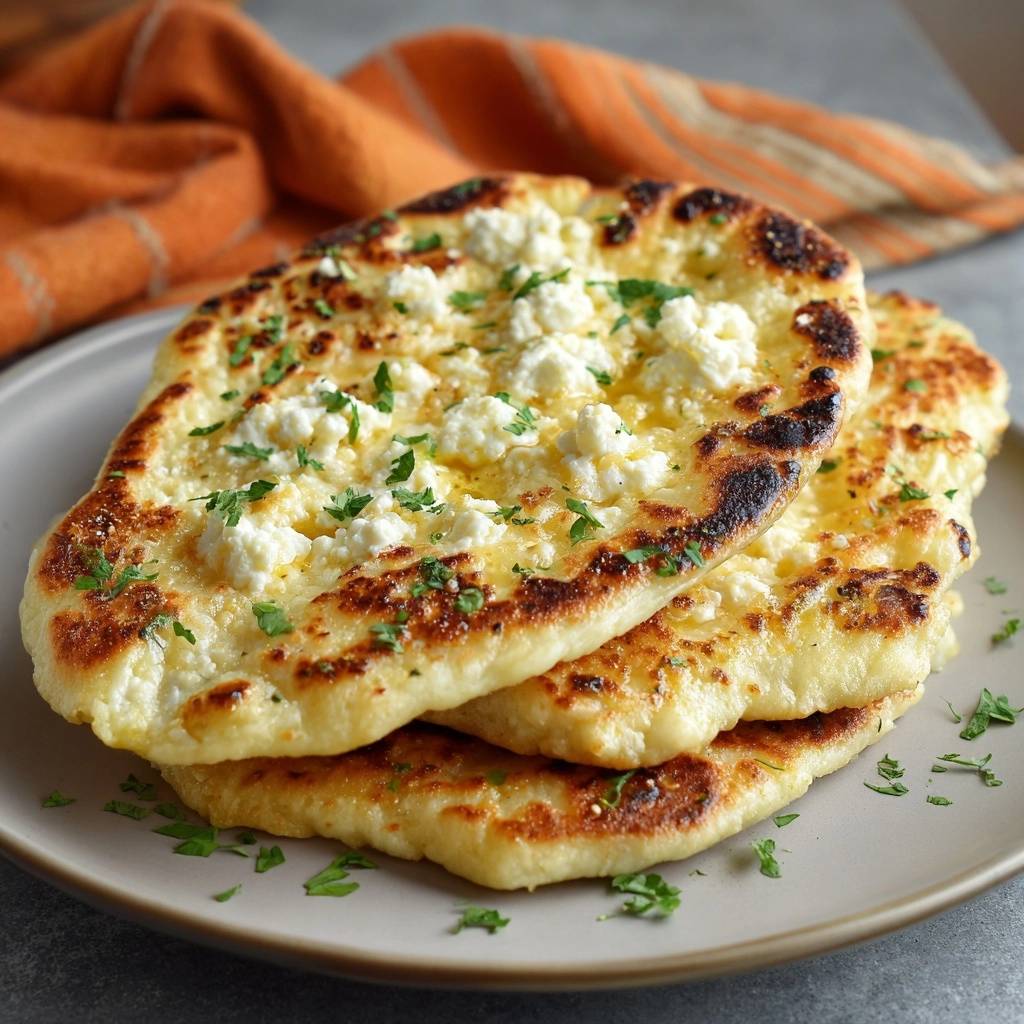
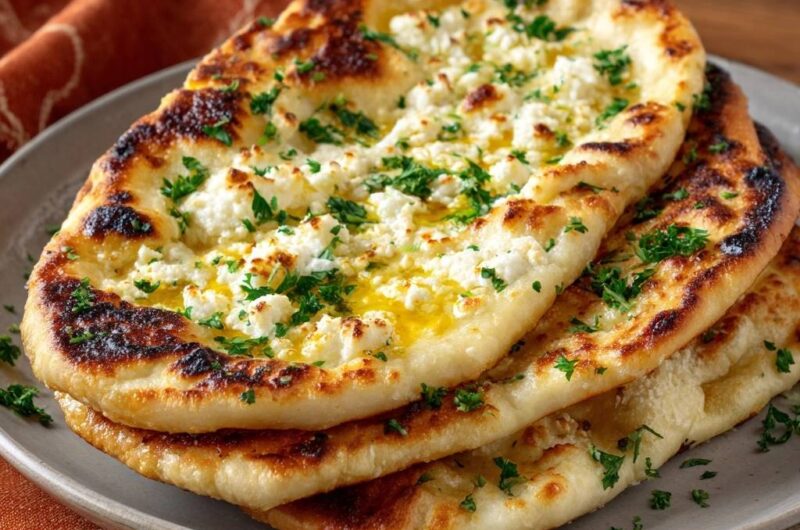
You are looking for “leopard spotting”—deep, dark brown or black spots surrounded by golden rings. This isn’t burnt; it’s flavor. These spots provide a smoky, charred taste that balances the sweetness of the dough. Check the bottom frequently during the final minute to ensure it reaches a deep golden brown.
Troubleshooting Common Flatbread Failures
If your dough won’t stretch and keeps snapping back, the gluten is too tight. Simply cover it with a towel and let it rest for 10 minutes; this allows the protein bonds to relax. If the bread feels dense, your yeast might have been expired, or you may have over-kneaded the dough into a tough state.
If the feta isn’t softening, your lid likely isn’t tight enough to trap the steam. Ensure you are using a lid that fits the skillet perfectly. Finally, if you see excessive smoke, it’s usually leftover residue from a previous meal on your cast iron. Wipe the pan out thoroughly with a dry paper towel between each flatbread.
Flavor Variations and Ingredient Swaps
This recipe is a fantastic canvas for experimentation. You can add a tablespoon of Za’atar to the garlic butter for a Middle Eastern flair, or swap the parsley for cilantro and add a pinch of red chili flakes if you want some heat. The feta provides the salt, so any addition should focus on brightness or spice.
For those avoiding dairy, you can successfully use a high-quality plant-based butter and an almond-based feta alternative. Because the “dry-sear” method relies on the dough’s structure rather than the fat’s properties, the technique remains exactly the same and yields excellent results.
Optimal Pairings for Garlic Butter Feta Flatbread
Since this bread is rich and salty, it pairs best with high-acid sides. A simple arugula salad dressed with heavy lemon juice and black pepper is the perfect companion. The bitterness of the greens and the acid of the lemon cut right through the garlic butter, refreshing your palate between bites.
It also serves as an incredible vessel for dipping into a tomato-based shakshuka or a spicy lentil soup. The sturdy crust we built with the dry-sear technique means you can scoop up heavy sauces without the bread falling apart in your hands.
Round Out Your Meal
To complement your garlic butter feta flatbread, consider these satisfying main courses.
- For a hearty, warming experience, explore this creamy chicken and cheesy dumplings recipe, which shares a comforting feel.
- If you enjoy slow-cooked flavors, this braised lemon herb chicken and potatoes offers a similar dedication to developing deep tastes.
Storage and Reheating for Maximum Crispness
If you have leftovers, avoid the microwave at all costs. Microwaves vibrate water molecules, which will turn your beautiful crust into a rubbery, chewy mess. Instead, store the flatbread in an airtight container in the fridge for up to three days.
To reheat, place the bread back into a dry skillet over medium heat for about two minutes per side. This will re-crisp the bottom and soften the cheese again. Alternatively, a toaster oven at 350°F for five minutes will revive that “just-cooked” texture perfectly.
How do I store leftover Garlic Butter Feta Flatbread?
Store any leftovers in an airtight container or a zip-top bag in the refrigerator for up to 3 days. To maintain the best texture, place a piece of parchment paper between the flatbreads to prevent them from sticking together. Do not freeze these, as the feta can become grainy and the bread may lose its airy structure upon thawing.
Why is my flatbread tough instead of soft and bubbly?
Toughness usually comes from two things: over-kneading or too much flour. If you work the dough too long, the gluten becomes too strong, resulting in a bready, tough texture. Also, ensure you aren’t adding too much extra flour during the rolling process. The dough should be slightly tacky; if it’s too dry, it won’t puff up in the pan.
Can I use a regular non-stick pan instead of cast iron?
You can, but you won’t get the same level of char or “leopard spotting.” Cast iron retains heat much better than non-stick materials, which is crucial for that instant sear. If you must use non-stick, make sure it is a heavy-bottomed pan and get it as hot as safely possible before adding the dough.
What can I use if I don’t have Greek yogurt?
The best substitute is full-fat sour cream, as it has a similar acidity and fat content. If you don’t have that, you can use whole milk mixed with a teaspoon of lemon juice, though the dough will be slightly less “pillowy” than the yogurt version. Avoid using non-fat yogurt, as the fat is necessary for the tender crumb.
Why didn’t my feta melt completely?
Feta is a high-moisture, high-acid cheese, which means it softens and gets “gooey” rather than turning into a liquid puddle like mozzarella. If it stayed hard, you likely didn’t use a lid during the final cooking stage. The steam trapped by the lid is what provides the gentle heat needed to break down the feta’s structure.
For a similar gooey cheese experience, explore cheesy garlic pizza bombs.
Garlic Butter Feta Flatbread
Course: Appetizer and Side DishCuisine: Mediterranean InspiredDifficulty: medium4
servings1
hour10
minutes340
kcal60
MinutesA high-heat cast iron flatbread recipe featuring a strategic layering method and a dry-sear technique to ensure a crisp, charred crust topped with melted feta and fragrant garlic butter.
Ingredients
2 cups all-purpose flour
3/4 cup warm water (110°F)
1 teaspoon instant yeast
1 teaspoon sugar
1/2 teaspoon salt
2 tablespoons Greek yogurt (for the airy, bubbly texture shown)
1 tablespoon olive oil
1/2 cup high-quality feta cheese, crumbled
4 tablespoons unsalted butter
3 cloves garlic, finely minced
1/4 cup fresh parsley, finely chopped
Flaky sea salt (for finishing)
Directions
- In a large bowl, combine warm water, sugar, and yeast. Let sit for 5 minutes until foamy. Stir in the olive oil, Greek yogurt, salt, and flour. Knead for 5-7 minutes until the dough is smooth and elastic. Cover and let rise in a warm spot for 1 hour or until doubled in size.
- While the dough rises, melt the butter in a small saucepan over low heat. Add the minced garlic and cook for 1 minute just until fragrant (do not brown). Set aside.
- Divide the risen dough into 4 equal portions. On a lightly floured surface, roll each out into an oval shape about 1/4 inch thick.
- To solve the soggy bottom issue, preheat a heavy cast iron skillet over medium-high heat until it is very hot. Do not add oil to the pan.
- Place one dough oval into the dry, hot skillet. This dry-sear method locks in the structure of the dough immediately, preventing the fats from soaking in and making it heavy. Cook for 90 seconds to 2 minutes until large bubbles form on the surface and the bottom has deep charred spots.
- Flip the bread. Immediately brush the charred side generously with the garlic butter. Sprinkle a quarter of the feta cheese over the top.
- Cover the skillet with a tight-fitting lid for the final 60 seconds. This creates a pressurized steam environment that softens the feta and ensures the dough is fully cooked through while the bottom achieves a crisp, golden finish.
- Remove from the heat. Garnish immediately with a heavy dusting of fresh parsley and a pinch of flaky sea salt. Repeat with the remaining dough portions. The result is a sturdy, charred crust that holds up perfectly to the rich, melted toppings.
Notes
- The dry-sear method in a hot skillet is essential to prevent the dough from becoming greasy. Using Greek yogurt in the dough helps achieve a bubbly and airy interior texture.


