
Few things feel as disappointing as pulling a beautiful cake out of the oven only to watch the center slowly cave in. You’ve spent time zesting, whisking, and waiting, yet the result is a dense, sunken middle that looks nothing like the bakery photos. This Orange Pistachio Olive Oil Cake is designed specifically to end that frustration. By focusing on a precise aeration technique, we build a structural foundation that holds its shape from the oven rack to the cooling wire.
The flavor profile brings a sophisticated Mediterranean vibe to your kitchen. You’ll notice the bright, floral notes of fresh orange zest playing against the peppery, fruity depth of high-quality olive oil. It’s a moist, tender crumb that feels lighter than a traditional butter cake but carries a much richer aroma. The secret to this success lies in the “ribbon stage,” a method of beating eggs and sugar until they’re thick enough to support the weight of the flour and oil.
If you’re enjoying the citrus notes here, you might also like this chocolate orange cake.
I’ve found that the most common reason cakes fail is a weak emulsion. If you rush the process of adding your fats, the batter can’t hold the air you’ve worked so hard to incorporate. In this guide, I’ll show you how a slow, steady drizzle of oil creates a bond so strong that your cake will stay lofty and proud every single time. Let’s get into the science of why this works and how you can master it today.
The Science of Preventing Cake Collapse
Cake structure is essentially a delicate balance of chemistry and physics. When you combine baking soda and baking powder with the natural acidity of fresh orange juice, a chemical reaction occurs. This reaction produces carbon dioxide bubbles that expand in the heat of the oven, pushing the batter upward. However, if the protein structure of the cake isn’t strong enough to trap those bubbles, they’ll pop and the cake will deflate.
Most cakes sink because of temperature shocks or over-mixing. If you open the oven door too early, the rush of cool air causes the internal gases to contract before the flour’s proteins have set. Similarly, over-mixing develops too much gluten, which makes the cake puff up rapidly and then crash because it’s too heavy. This recipe uses a specific emulsion method to coat the flour particles, ensuring the cake stays tender while maintaining a sturdy “skeleton.”
By emulsifying the olive oil into the egg mixture, we create a uniform distribution of fat. This prevents the oil from weighing down the air pockets. Instead of a greasy, heavy base, you get a crumb that is both resilient and incredibly soft. Understanding this interaction between the leaveners and the fats is the first step toward becoming a more confident baker.
Why Olive Oil Creates a Superior Crumb
While butter is a classic choice, olive oil offers a distinct advantage in terms of texture. Since oil is a liquid at room temperature, it stays liquid within the cake crumb. This means your cake will feel significantly moister on the tongue than a butter-based cake, which can feel firm or dry once it cools down.
Furthermore, olive oil is excellent at inhibiting gluten formation. It coats the proteins in the flour more effectively than solid butter does. This “shortening” effect ensures that the cake remains tender and delicate. You aren’t just getting a different flavor; you’re getting a superior mouthfeel that lasts for days.
The Role of Aeration and Ribboning
The “Ribbon Stage” is the most critical part of this entire process. When you beat the eggs and sugar for a full five minutes, you’re forcing air into the mixture and dissolving the sugar crystals. You’ll know you’ve reached it when the batter turns a pale, creamy yellow and becomes thick and voluminous.
To test it, lift your whisk or beater out of the bowl. The batter should fall back into the bowl in a thick, ribbon-like trail that sits on the surface for a few seconds before disappearing. This trapped air provides the initial lift and structural integrity needed to prevent the cake from sinking as it bakes.
Essential Components for Orange Pistachio Cake
Quality is everything when the ingredient list is this simple. For the olive oil, I recommend using a high-quality Extra Virgin Olive Oil. A “robust” or “peppery” oil will stand up well to the citrus, while a “mild” or “buttery” oil will let the pistachio flavor shine. Avoid “light” olive oils, as they are often highly processed and lack the characteristic fruity notes that make this cake special.
Temperature management is your best friend in the kitchen. Ensure your eggs and milk are at room temperature before you start. Cold ingredients can cause the olive oil to clump or the emulsion to break, leading to an uneven bake. If you’re in a rush, place your eggs in a bowl of warm water for five minutes to take the chill off.
Selecting the Right Citrus and Nuts
The orange zest is where the true aromatic power lives. The oils in the skin provide a deep, floral scent that juice alone cannot replicate. Always zest your orange before juicing it, and be careful to stop before you hit the bitter white pith. For the juice, fresh is non-negotiable; the enzymes in fresh juice react better with the leavening agents than the pasteurized bottled versions.
When it comes to pistachios, look for raw, unsalted kernels. They have a vibrant green color that looks stunning against the golden cake. When chopping them, aim for a mix of fine dust and larger chunks. The dust will flavor the cream, while the larger pieces provide a satisfying crunch that contrasts with the soft cake.
Step-by-Step: Emulsifying the Perfect Batter
Creating this batter is a three-phase journey. You’ll start with high-energy aeration, move into a disciplined emulsion, and finish with a gentle hand-fold. Each phase changes the texture of the batter significantly. You’ll see it transform from a simple egg mixture into a thick, glossy, and fragrant batter that looks almost like a pourable custard.
Pay close attention to the visual cues at each stage. The way the light reflects off the batter and the way it clings to your spatula will tell you exactly how the structure is developing. If the batter looks broken or curdled at any point, it usually means an ingredient was added too quickly. Patience is the key to a bakery-standard result.
Phase 1: Achieving the Ribbon Stage
Start by beating your eggs and sugar on high speed. For the first two minutes, it will just look like frothy eggs. By minute three, it will start to thicken and turn pale. By minute five, it should be nearly triple in volume. Don’t stop early; this is the only time you’ll be adding significant air to the cake’s structure.
Phase 2: The Slow Oil Drizzle
Turn your mixer down to its lowest setting. You want to pour the olive oil in a stream as thin as a piece of string. This is exactly like making a mayonnaise. If you dump the oil in all at once, it will collapse the air bubbles and separate from the eggs. A slow drizzle allows the fats to bond with the water in the egg whites, creating a creamy, stable base.
Phase 3: The Gentle Fold
Once your wet ingredients are combined, put away the electric mixer. Use a large silicone spatula to fold in the flour. Use a “J-fold” motion: cut through the center, scoop along the bottom, and turn the batter over. This preserves the aeration you worked so hard for. Stop the moment you see the last streak of white flour disappear.
Optimizing Your Baking Environment
The vessel you choose matters just as much as the ingredients. I love using a scalloped ceramic dish for this cake. Ceramic holds heat very steadily, which helps the cake bake evenly from the edges to the center. Unlike thin metal tins, ceramic prevents the edges from overcooking before the middle is set, which is another common cause of sinking.
I highly recommend using an oven thermometer. Most home ovens are off by 10 to 25 degrees. If your oven is too cool, the cake won’t rise fast enough to set the structure. If it’s too hot, it will rise too quickly and then collapse. Ensuring a true 350°F environment is the best insurance policy for your baking.
The “No-Peek” Rule for Structural Success
Resist the urge to check on your cake! Every time you open the oven door, the internal temperature drops significantly. In the first 25 minutes, the cake’s “walls” are still liquid. A sudden drop in temperature can cause those walls to fail. Wait until at least the 30-minute mark before you even think about opening that door to test for doneness.
Troubleshooting Common Olive Oil Cake Issues
If you find your cake is oily on the bottom, it’s a sign the emulsion broke. Next time, drizzle the oil even slower. If you see large, irregular holes in the crumb, you likely skipped the “counter tap.” Tapping the pan on the counter before baking forces those large, unstable bubbles to the surface so they don’t create weak spots in the cake.
A bitter aftertaste usually points to the olive oil. Olive oil can go rancid quickly if stored in light or heat. Always taste your oil before you start baking. If it tastes metallic or like old crayons, it’s time for a new bottle. Fresh olive oil should taste clean, fruity, and perhaps a little peppery at the back of the throat.
Finishing Touches: Cream and Garnish
The topping should be as light as the cake. When whipping your heavy cream, make sure your bowl and beaters are ice-cold. This helps the fat globules in the cream stay firm, resulting in a more stable foam. Whip it just until stiff peaks form; if you go too far, it will turn grainy and lose its silky texture.
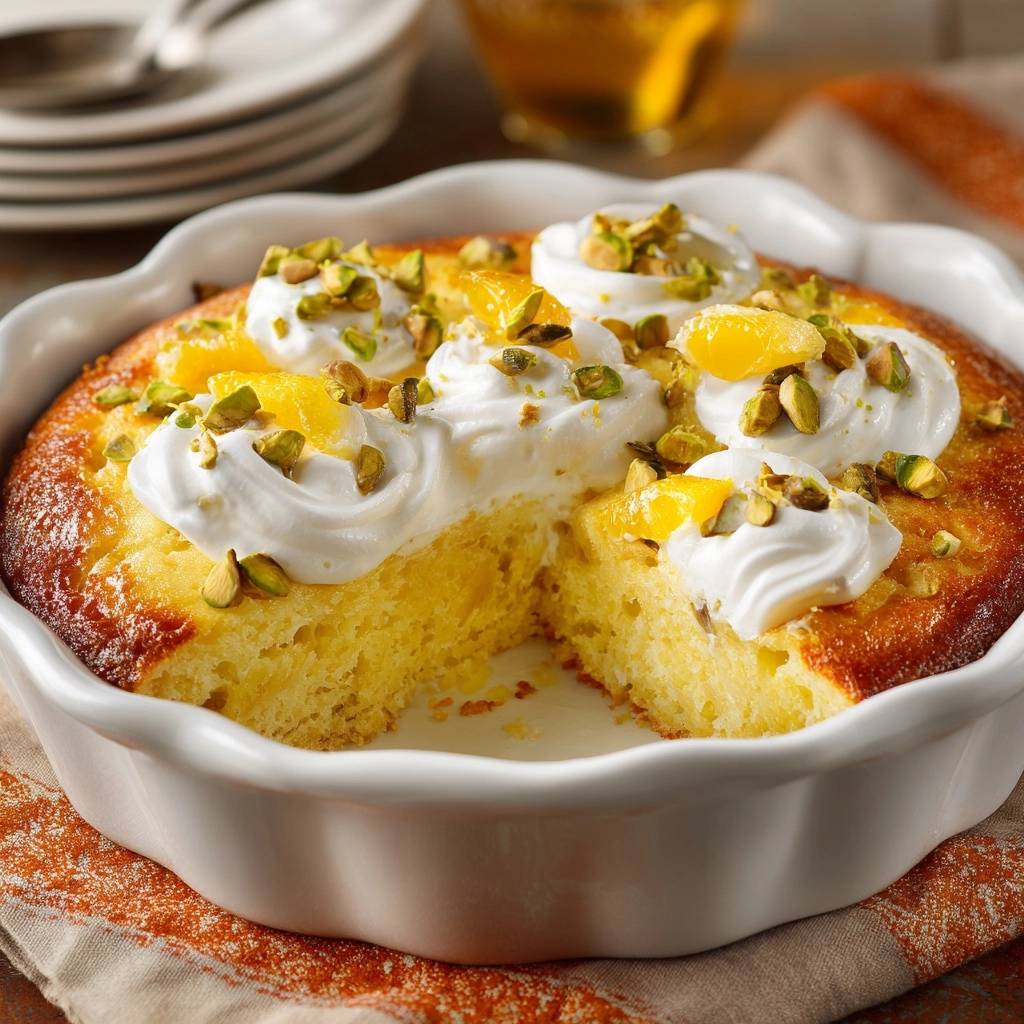
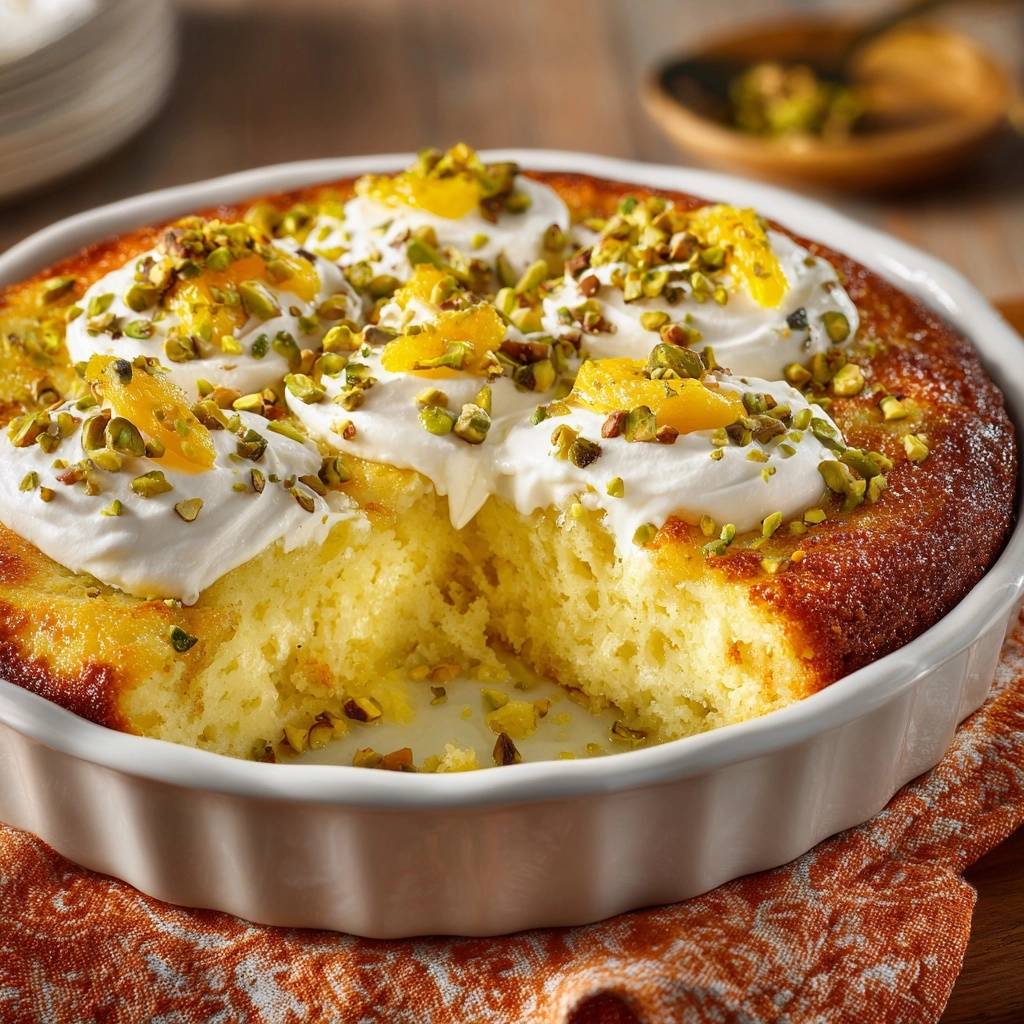
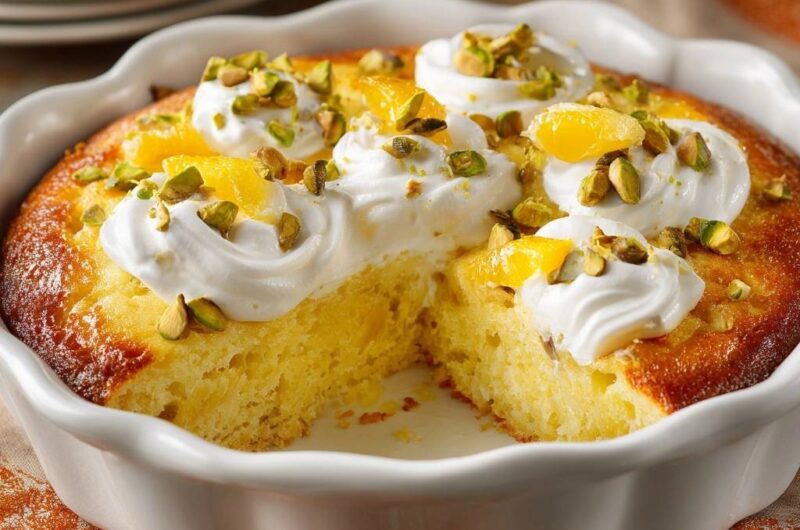
For a professional look, “supreme” your orange segments. This means cutting away the peel and then slicing between the membranes to get clean, skinless wedges. It takes an extra few minutes, but the lack of chewy pith makes the eating experience much more elegant. Arrange them over the cream dollops and finish with a heavy rain of chopped pistachios.
Storage and Make-Ahead Instructions
One of the best things about olive oil cakes is that they actually taste better the next day. The moisture from the oil and the citrus juice migrates through the crumb, deepening the flavor. You can bake the cake base a day in advance and store it at room temperature, tightly wrapped in plastic. It stays incredibly fresh.
However, once you add the whipped cream and fresh orange segments, the clock starts ticking. The moisture from the cream will eventually soften the top of the cake. If you have leftovers, store them in the refrigerator in an airtight container for up to three days. I don’t recommend freezing this cake once it’s decorated, as the cream and fresh fruit won’t survive the thaw well.
Frequently Asked Questions
Can I substitute the whole milk with a dairy-free alternative?
Yes, you can use dairy-free milk, but try to choose one with a higher fat content like oat milk or full-fat coconut milk. The fat in whole milk contributes to the tender crumb and the stability of the emulsion. Avoid very thin alternatives like rice milk, as they may result in a slightly less rich texture.
What is the best substitute for pistachios if there is an allergy?
If you need to avoid nuts entirely, toasted pepitas (pumpkin seeds) are a fantastic alternative. They provide a similar green color and a lovely crunch. If nuts aren’t an issue but you just don’t have pistachios, toasted pine nuts or slivered almonds also pair beautifully with the orange and olive oil flavors.
Why did my cake stick to the ceramic dish despite greasing it?
Ceramic can be more porous than metal. To ensure a clean release, I recommend greasing the dish with olive oil and then lightly dusting it with flour, tapping out the excess. Also, make sure the cake is completely cool before you try to slice or serve it, as the structure is quite delicate while warm.
Can I use bottled orange juice instead of fresh?
While you can use it in a pinch, bottled juice lacks the bright acidity and aromatic oils found in fresh oranges. Bottled juice is often sweeter and more muted. Since this recipe relies on the juice to react with the baking soda for lift, the freshness really does make a difference in the final height of the cake.
How do I know if my olive oil has gone rancid?
Rancid olive oil loses its pleasant fruity aroma and starts to smell like putty, cardboard, or even vinegar. If you pour a little into a spoon and taste it, it will feel greasy and leave a stale, unpleasant coating on your tongue. Always store your oil in a cool, dark cupboard to keep it fresh for as long as possible.
Orange Pistachio Cake
Course: DessertCuisine: MediterraneanDifficulty: medium8
servings15
minutes40
minutes345
kcal55
MinutesA bright and citrusy olive oil cake featuring fresh orange zest, juice, and crunchy pistachios. This recipe focuses on specific emulsion and aeration techniques to ensure the cake maintains its height and structure after baking.
Ingredients
1 and 1/2 cups all-purpose flour
1 cup granulated sugar
1/2 teaspoon baking soda
1/2 teaspoon baking powder
1/2 teaspoon salt
3 large eggs, room temperature
3/4 cup extra virgin olive oil
2/3 cup whole milk
1/4 cup fresh orange juice
2 tablespoons orange zest
1 teaspoon vanilla extract
1 cup heavy whipping cream, chilled (for topping)
2 tablespoons powdered sugar (for cream)
1/2 cup shelled pistachios, roughly chopped
1 fresh orange, segmented, for garnish
Directions
- Preheat your oven to 350°F (175°C). Generously grease a 9-inch fluted or scalloped ceramic baking dish with olive oil or butter.
- In a medium bowl, whisk together the flour, baking soda, baking powder, and salt. Set aside.
- In a large bowl, using a hand mixer or stand mixer, beat the eggs and granulated sugar on high speed for a full 3-5 minutes. The mixture should be pale, thick, and reach the “ribbon stage” (where the batter trails off the whisk and holds its shape for a few seconds). This is the secret to a stable rise.
- With the mixer on low, slowly drizzle in the olive oil in a thin, steady stream to create a stable emulsion.
- Whisk in the milk, orange juice, orange zest, and vanilla extract until just combined.
- Gradually fold the dry ingredients into the wet ingredients using a spatula. Do not overmix; fold only until no flour streaks remain. Overmixing develops excess gluten which can cause the cake to puff too quickly and then collapse.
- Pour the batter into the prepared scalloped dish. Tap the dish firmly on the counter three times to release large air bubbles that cause structural weakness.
- Bake for 35 to 40 minutes. To prevent sinking, do not open the oven door before the 30-minute mark. The cake is done when the top is golden brown and a toothpick inserted into the center comes out clean.
- Let the cake cool completely in the dish. This allows the internal crumb structure to set firmly.
- In a chilled bowl, whip the heavy cream and powdered sugar until stiff peaks form. Using a piping bag with a large round tip or a spoon, create decorative dollops of cream across the surface of the cake.
- Generously top with chopped pistachios and fresh orange segments before serving directly from the dish.
Notes
- To prevent the cake from sinking, ensure eggs reach the ribbon stage and do not open the oven door before 30 minutes of baking have passed. Cooling completely in the dish is essential for the crumb structure to set.


