
I used to dread making layered no-bake bars, often ending up with a mushy bottom crust that betrayed all my efforts. That longing for perfectly firm, distinct layers felt like an unreachable dream, until I finally cracked the code. This recipe for No-Bake Peanut Butter Caramel Bars is designed precisely to eliminate that common frustration, ensuring every layer holds its own beautifully.
You’ll discover a secret to keeping those layers wonderfully firm and distinct, transforming what was once a tricky dessert into a triumph. Get ready for a decadent, easy-to-make treat that consistently delivers stunning presentation and incredible taste.
Why These No-Bake Peanut Butter Caramel Bars Will Be Your New Favorite
These aren’t just any no-bake bars; they’re a revelation for anyone who loves rich flavors without the fuss. My perfected method ensures every single layer stands out, delivering a stunning presentation and an incredible taste experience.
You’ll enjoy a delightful interplay of textures and a sublime sweet-and-salty balance that’s utterly addictive, all achieved without ever needing to turn on your oven. It’s the ultimate combination of convenience and indulgence.
The “No Soggy Crust” Secret Unveiled
The biggest complaint about many layered no-bake desserts is a disappointing soggy bottom crust. This recipe for No-Bake Peanut Butter Caramel Bars directly addresses that challenge with strategic chilling and thoughtful layering techniques.
We build an exceptionally firm initial crust, then strategically introduce a second crumb layer mid-dessert. These crucial steps, combined with precise chilling intervals, effectively lock in moisture and prevent any mushiness, ensuring a sturdy foundation for your indulgent treat.
Effortless Indulgence: The Beauty of a No-Bake Dessert
The allure of a no-bake recipe is undeniable, offering pure indulgence without the oven’s heat or the complexity of traditional baking. It’s the perfect solution for warm weather, busy schedules, or simply when you crave a decadent dessert with minimal effort.
Beginners will find this recipe incredibly approachable, while seasoned dessert makers will appreciate the reliable results and the consistent rave reviews these bars receive. It’s a win-win for everyone.
A Symphony of Flavors: Peanut Butter, Caramel, and Cream Cheese Harmony
Imagine the creamy tang of cream cheese blending with rich, savory peanut butter, all swirled with sweet, luscious caramel. These No-Bake Peanut Butter Caramel Bars deliver a harmonious flavor profile that delights with every single bite.
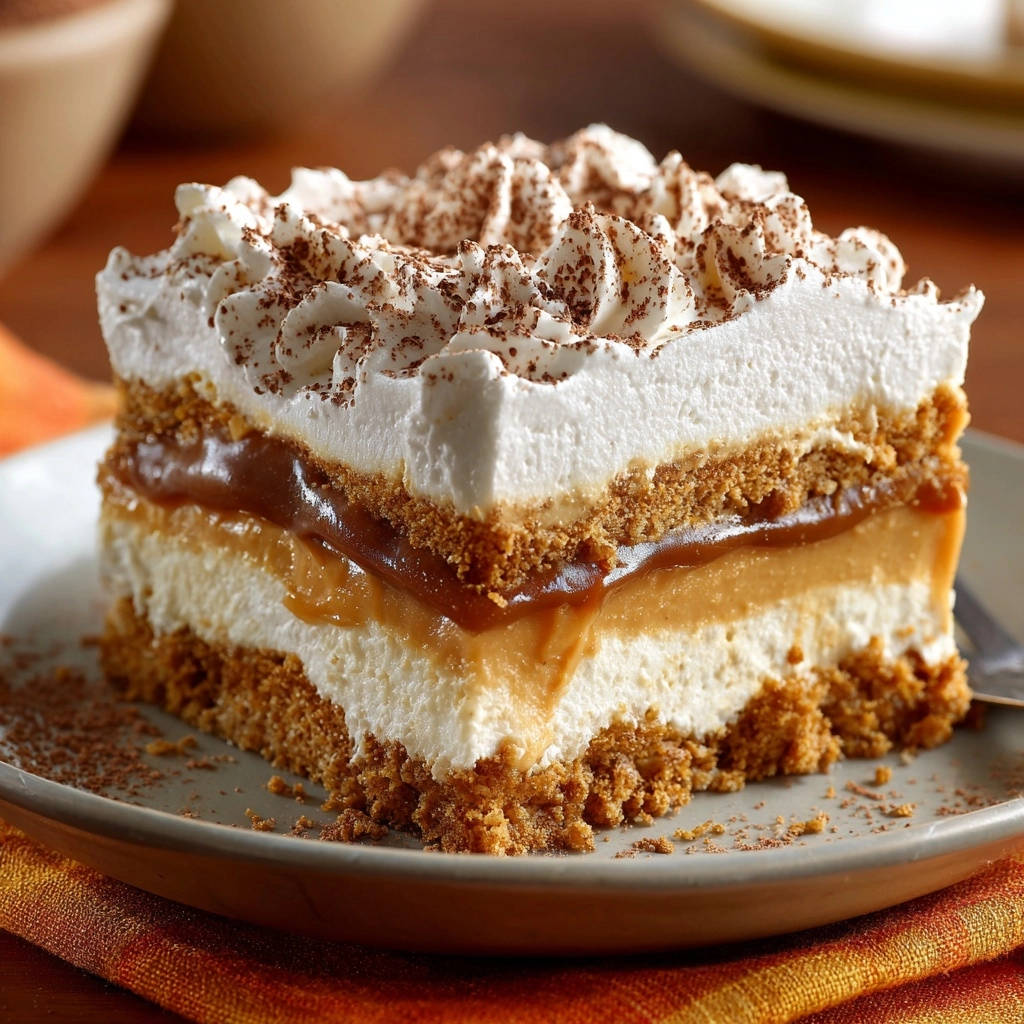
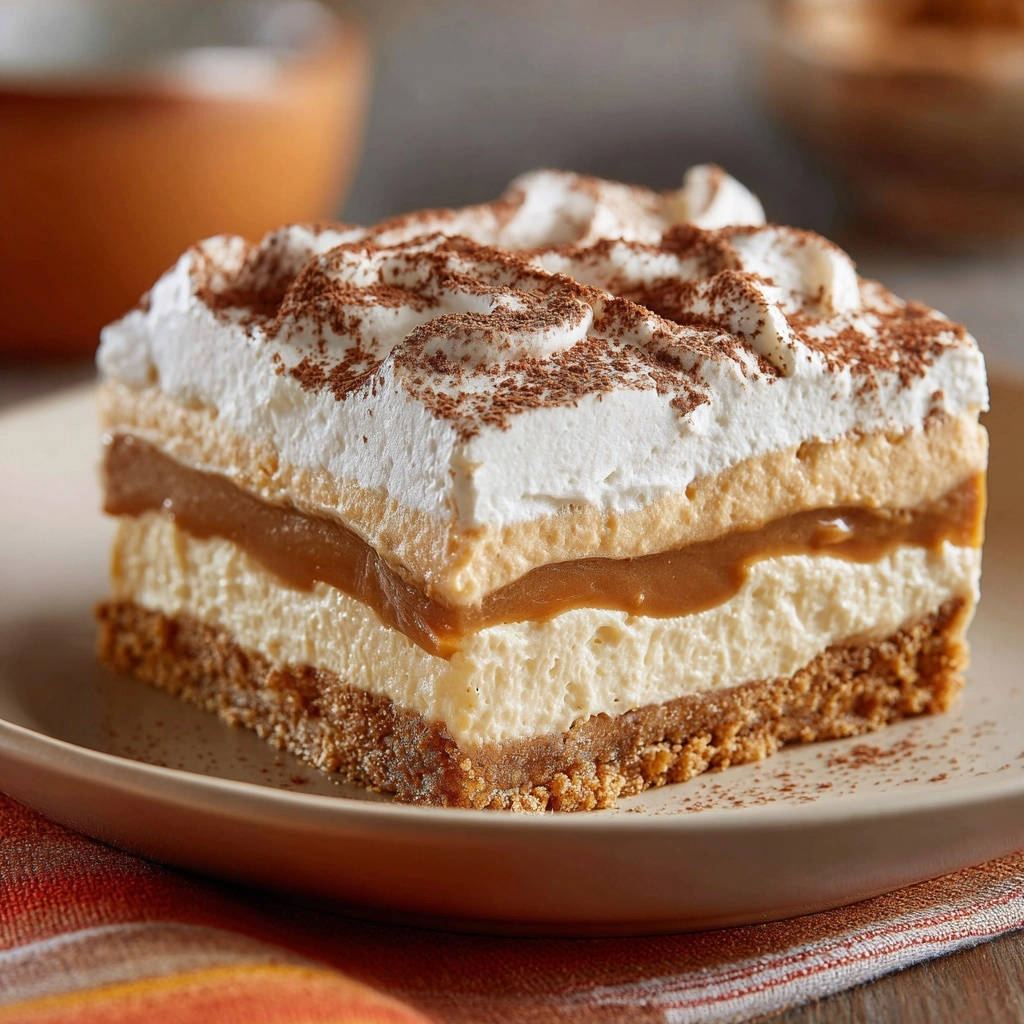
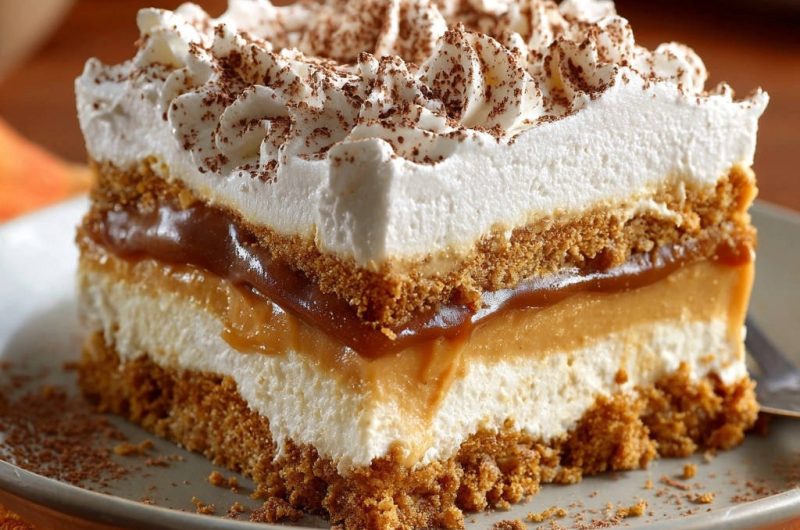
The textures are equally captivating: a tender graham cracker base, silken cream cheese, smooth peanut butter, gooey caramel, and a light, airy whipped topping. It’s a multi-sensory experience that is both comforting and exciting.
Gather Your Essentials: Tools for Flawless No-Bake Bars
Having the right tools on hand makes crafting these layered delights a breeze. A little preparation ensures smooth execution from start to finish, setting you up for success.
What You’ll Need Before You Start
8×8 inch baking pan: This size is ideal for creating bars with distinct, generous layers. A smaller pan might make layers too thick, while a larger one could make them too thin or spread too much.
Electric mixer: Essential for achieving perfectly smooth, lump-free cream cheese and peanut butter layers, as well as whipping heavy cream to soft peaks quickly and efficiently.
Medium and large mixing bowls: You’ll need separate bowls for combining crust ingredients, preparing the cream cheese mixture, and mixing the peanut butter layer. This streamlines the process.
Measuring cups and spoons: Accuracy is key for consistent results in no-bake desserts, ensuring the right balance of sweetness and texture in every batch.
Rubber spatula: Perfect for gently folding in whipped cream, spreading layers evenly into the pan, and scraping down the sides of bowls to ensure no delicious bit is left behind.
Flat-bottomed glass or measuring cup: Crucial for firmly compacting the graham cracker crusts. This density is a vital step in preventing sogginess and creating a sturdy base.
The Heart of the Treat: Ingredients for Irresistible Layers
Each ingredient plays a crucial role in building the robust structure and sensational flavors of these No-Bake Peanut Butter Caramel Bars. Using quality ingredients truly makes a significant difference here.
For the Resilient Graham Cracker Crusts
Graham cracker crumbs: These form the foundational structure of our bars. Finely crushed crumbs are best for a cohesive, firm crust. You can either buy them pre-crushed or easily crush whole graham crackers yourself.
Unsalted butter, melted: Melted butter binds the crumbs together, giving the crust its tender yet sturdy texture. Using unsalted butter allows you to precisely control the overall saltiness of your finished dessert.
The Creamy Trio: Cream Cheese, Peanut Butter & Caramel
Cream cheese, softened: Starting with truly softened cream cheese is non-negotiable for achieving a smooth, lump-free cream cheese layer. It whips up easily and incorporates powdered sugar seamlessly for a silky texture.
Powdered sugar: This fine sugar dissolves effortlessly into the creamy mixtures, ensuring a silky-smooth texture in both the cream cheese and peanut butter layers, without any unwanted grittiness.
Heavy cream, cold: Using very cold heavy cream is essential because it whips up quickly and incorporates more air, creating light and airy cream cheese and peanut butter fillings. Do not substitute with milk.
Vanilla extract: A touch of good quality pure vanilla extract enhances all the sweet flavors, adding a comforting warmth to the cream cheese layer for a more complex taste.
Creamy peanut butter: For consistent texture and reliable setting, opt for creamy, shelf-stable peanut butter. Natural peanut butter can be used, but may require slight adjustments due to its often thinner, oil-separated consistency.
Caramel sauce: Whether store-bought or homemade, ensure your caramel sauce is smooth and easily pourable. If it’s too thick, a gentle warming will make it easy to spread evenly over the peanut butter layer. For an extra special touch, you might even consider making your own homemade orange caramel candy to drizzle over, adding a delightful citrus note.
The Whipped Topping Finale
Frozen whipped topping, thawed (or homemade whipped cream): This light and airy topping provides a beautiful contrast to the denser layers below. Ensure it’s fully thawed or freshly whipped for the best spreadability and an appealing appearance.
Cocoa powder: A final dusting of cocoa powder adds a touch of visual elegance and a subtle hint of bitterness. This beautifully balances the sweetness of the bars and makes them look professionally finished.
Layer by Layer: Crafting Your No-Bake Peanut Butter Caramel Bars
- Step 1: Build the Anti-Sog Bottom Crust.
In a medium bowl, thoroughly combine 2 cups of graham cracker crumbs with 1/2 cup of melted unsalted butter. Mix vigorously until every single crumb is evenly moistened by the butter; this uniform coating is key for a cohesive and strong crust.
Press half of this mixture very firmly into the bottom of an 8×8 inch baking pan. Use the flat bottom of a glass or a measuring cup to compact it as tightly as possible; this density is absolutely crucial for creating a sturdy, less permeable barrier against the moist layers that follow. Place the pan in the freezer for 15 minutes, or in the refrigerator for 30 minutes, to allow the butter to set and firm up.
- Step 2: Prepare and Set the Velvety Cream Cheese Layer.
In a large bowl, beat the 1 (8-ounce) package of softened cream cheese, 1/2 cup powdered sugar, and 1 teaspoon vanilla extract with an electric mixer until the mixture is completely smooth and creamy. Make sure there are absolutely no lumps remaining.
In a separate, very cold bowl, whip 1/2 cup of cold heavy cream until it forms soft, pillowy peaks. Gently fold this whipped cream into the cream cheese mixture using a rubber spatula, taking care not to deflate the air you’ve incorporated. Spread this light, airy mixture evenly over your now-chilled graham cracker crust. Return the pan to the refrigerator for another 30 minutes; this allows the cream cheese layer to fully firm up before the next moist addition.
- Step 3: Create the Smooth Peanut Butter Dream Layer.
In a clean bowl, combine 1 cup of creamy peanut butter, 1/2 cup powdered sugar, and 1/4 cup cold heavy cream. Beat these ingredients until the mixture is smooth, uniformly creamy, and well combined. The cold cream helps create a stable, spreadable texture that won’t run.
Carefully spread this decadent peanut butter mixture over the now-set cream cheese layer. Work gently to avoid disturbing the layer beneath. Chill the pan again for 20 minutes. Each distinct chilling step is absolutely critical here, as it effectively locks in each layer, preventing moisture from migrating and keeping everything beautifully defined and firm.
- Step 4: Add the Irresistible Caramel and Middle Crust.
Gently pour and evenly spread 1 cup of caramel sauce over the set peanut butter layer. If your caramel is too stiff to spread easily, warm it slightly in the microwave or a double boiler until it achieves a pourable consistency, then cool it slightly before spreading to avoid melting the layers. This ensures an even, luscious coating.
Now, take the remaining half of your graham cracker crumb mixture. Sprinkle it evenly over the caramel layer. Gently press it down just enough to adhere to the caramel without overly compacting it. This middle crust layer serves as a second defense against sogginess and adds a pleasant textural contrast to the creamy fillings. Return the pan to the refrigerator for another 15 minutes to allow this layer to set.
- Step 5: The Grand Finale – Topping and the Ultimate Chill.
Spread the 1 (8-ounce) container of thawed whipped topping (or 2 cups of freshly homemade whipped cream) evenly over the final graham cracker layer. For a more decorative finish, you can pipe the whipped cream using a pastry bag and a star tip, creating a beautiful presentation.
For another creamy delight, explore these blackberry cheesecake bars.
Generously dust the top with 1 tablespoon of cocoa powder, using a fine-mesh sieve for an even, elegant coating. This adds a beautiful visual and a subtle chocolate note. Cover the pan loosely with plastic wrap and refrigerate for at least 4 hours, or ideally overnight. This extended chilling time is absolutely vital for all the layers to fully meld, firm up, and for the crusts to tenderize without becoming soggy, ensuring perfectly clean, easy-to-slice No-Bake Peanut Butter Caramel Bars.
- Step 6: Slice and Serve with Confidence.
When you’re ready to serve these magnificent bars, use a sharp knife warmed under hot water. Wipe the knife completely dry between each cut to ensure impeccably clean, crisp slices that showcase every layer. This small step makes a huge difference in presentation and enjoyment.
Elevate Your Bars: Expert Tips & Tricks for Perfection
Achieving perfection with these No-Bake Peanut Butter Caramel Bars is easier than you think with a few insider tips. These insights will ensure every batch you make is a consistent triumph.
Mastering the Chill: The Key to Structure and Flavor
Each chilling interval isn’t just a suggestion; it’s a critical step that actively prevents layers from mixing or bleeding into one another. It allows the fat in the butter and cream cheese to solidify, creating a firm matrix that holds everything together beautifully.
The final, extended chill (4 hours to overnight) is paramount. This crucial period allows flavors to deeply meld and ensures the graham cracker crumbs absorb just enough moisture to be tender, never soggy. This patient wait results in bars that slice cleanly and taste incredibly cohesive.
Achieving Picture-Perfect, Clean Slices
A warm, dry knife is truly your best friend for neat slices. Run your sharp knife under hot water for a few seconds, wipe it completely dry with a towel, and then make a single, decisive cut. Repeat this process for each slice, wiping and re-warming the knife as needed to maintain perfect edges.
For extra precision, you can lightly score the top of the chilled bars with your knife before making your final cuts. This helps guide your blade and maintain perfectly straight lines, enhancing the visual appeal of your dessert.
Temperature Control for Creamy Layers
Starting with truly softened cream cheese is essential for a silky-smooth, lump-free filling. If it’s too cold, it will be lumpy; if too warm, it can become runny and won’t set properly. Similarly, ensure your heavy cream is very cold for optimal whipping volume and stability.
When it comes to the caramel, a slightly warmed, pourable consistency is ideal for even spreading. Avoid overheating, as it can make it too thin and messy. For other creamy delights, similar temperature control is essential, like in our silky smooth homemade hummus, where ingredient temperature directly impacts final texture.
Customizing Your Topping Presentation
While a simple dusting of cocoa is elegant and always impressive, feel free to get creative with your presentation! Pipe the whipped topping using various decorative tips for a more fancy and festive look.
Consider adding mini chocolate chips, a drizzle of extra caramel or chocolate fudge, or finely chopped roasted peanuts for added texture and visual appeal. These small touches can really elevate the dessert.
Creative Twists: Personalize Your No-Bake Caramel Bars
These No-Bake Peanut Butter Caramel Bars are a fantastic canvas for culinary creativity. Don’t hesitate to experiment with different flavors and textures to make them uniquely yours and suit any occasion.
Alternative Crust Ideas
Instead of graham crackers, try crushed Oreos for a rich, chocolatey twist, or use shortbread cookies for a buttery, delicate base. Digestive biscuits also work wonderfully for a milder, slightly less sweet foundation.
You could also incorporate toasted coconut flakes or finely chopped nuts into the crust mixture. These additions provide both added flavor depth and an interesting textural crunch.
Flavor Adventures for Your Fillings
Swap out the peanut butter for almond butter or cashew butter to explore a different nutty profile. For coffee lovers, a touch of espresso powder added to the peanut butter layer creates a delightful mocha-peanut butter fusion.
Instead of traditional caramel, try a luxurious salted caramel sauce for an elevated sweet-and-salty experience, or even a classic butterscotch sauce for a different comforting flavor dimension.
Decadent Topping Upgrades
For an irresistible finish, sprinkle with flaky sea salt over the caramel layer before the whipped topping for a gourmet touch that enhances the sweetness. Chopped Reese’s peanut butter cups or chocolate-covered pretzels make excellent crunchy additions.
A beautiful swirl of melted dark chocolate or white chocolate drizzled over the whipped topping can create a stunning marbled effect, adding another layer of flavor and visual appeal.
Troubleshooting Common No-Bake Bar Hurdles
Even the best recipes can present minor challenges from time to time. Here are quick, actionable solutions to common issues you might encounter when making these no-bake bars.
My Layers Aren’t Setting Firmly
This issue is almost always due to insufficient chilling time. Each chilling step is absolutely vital, especially the final, long chill. Ensure your refrigerator is cold enough and give the bars ample time to firm up completely.
Also, double-check your ingredient ratios, particularly for heavy cream and powdered sugar. Too much liquid or not enough thickener can prevent proper setting. Ensure your cream cheese was properly softened, but not warm, before mixing.
The Crust is Still Soggy!
A soggy crust often happens if the initial graham cracker mixture wasn’t pressed firmly enough into the pan. Compacting it densely creates a protective barrier. Not chilling the initial crust long enough also contributes, as the butter needs to solidify to act as a shield against moisture.
Ensure your layers, particularly the cream cheese and peanut butter, are fully set from their respective chilling times before adding the next. Adding a warm or unset layer can easily transfer unwanted moisture to the crust below.
My Bars Are Difficult to Slice Neatly
The primary culprit here is insufficient chilling. The bars must be thoroughly chilled, preferably overnight, for all layers to fully set and become firm enough for clean, precise cuts. Patience is key for a beautiful presentation.
Remember the warm knife trick! A sharp knife, warmed under hot water and wiped completely dry between each slice, will glide through the layers cleanly without dragging or tearing, giving you perfect portions.
Storage & Make-Ahead Magic: Enjoying Them Longer
These No-Bake Peanut Butter Caramel Bars are fantastic for making ahead, and storing them properly ensures they stay fresh and delicious for days to come.
Storing Your Finished No-Bake Peanut Butter Caramel Bars
Store leftover bars in an airtight container in the refrigerator for up to 3-5 days. It’s crucial to ensure they are well-covered to prevent them from drying out or absorbing any unwanted odors from other foods in your fridge.
You can also place parchment paper between layers of bars if stacking them in a container. This prevents sticking and helps to maintain their pristine appearance and distinct layers.
The Joy of Making Ahead: Planning for Parties and Potlucks
This recipe is truly an entertainer’s dream, perfectly suited for making a day in advance. The extended chill time required for optimal setting is actually a benefit here, allowing you to prepare them without any last-minute rush.
Preparing them ahead means all the delicious flavors have more time to meld and deepen, resulting in an even more cohesive and intensely flavored dessert when it’s finally time to serve.
Frequently Asked Questions About These Layered Bars
Can I use natural peanut butter for this recipe?
While you can, natural peanut butter (especially the stir-before-using kind) is often runnier and can significantly affect the consistency of the peanut butter layer. If you use it, be sure to thoroughly stir it first, and you might need to slightly increase the powdered sugar by a tablespoon or two to achieve a firmer set.
Is there a dairy-free alternative for the cream cheese and whipped cream?
Absolutely! You can successfully make these No-Bake Peanut Butter Caramel Bars dairy-free. Look for reputable plant-based cream cheese alternatives and use full-fat canned coconut cream (chilled overnight, scoop out only the thick cream) or a store-bought vegan whipped topping. Be aware that flavors and textures might vary slightly but will still be delicious.
How long do the bars need to chill before serving?
A minimum of 4 hours in the refrigerator is essential for all the layers to firm up and properly meld. However, for the absolute best results-meaning cleaner slices, firmer layers, and richer flavor integration-chilling them overnight is highly recommended. Patience truly pays off with this decadent dessert!
Can I freeze these No-Bake Peanut Butter Caramel Bars?
Yes, you can absolutely freeze these delicious bars! To do so, first chill the bars thoroughly as directed. Then, slice them into individual portions. Wrap each bar tightly in plastic wrap, then place them in an airtight freezer-safe container or bag. They can be frozen for up to 1 month. Thaw individual bars in the refrigerator for a few hours before serving.
Indulge in Layered Bliss: Your Next Sweet Obsession Awaits!
These No-Bake Peanut Butter Caramel Bars are more than just a dessert; they’re a testament to how simple steps and a little patience can yield truly extraordinary results. With their guaranteed firm layers and irresistible combination of flavors, they are destined to become a beloved staple in your recipe collection.
Why not whip up a batch this week and experience the joy of a truly flawless no-bake treat? Don’t forget to explore our other delightful no-bake creations, like our easy no-bake strawberry dessert, for more effortless indulgence that will impress everyone!
Peanut Butter Caramel Bars
Course: DessertCuisine: AmericanDifficulty: easy9
servings30
minutes450
kcal240
minutesThis no-bake recipe solves the common problem of soggy crusts in layered desserts, ensuring beautifully firm and distinct layers every time. Enjoy a perfect balance of tender graham cracker crusts, creamy fillings, and rich caramel, all without turning on the oven.
Ingredients
For the Crust Layers:
2 cups graham cracker crumbs
1/2 cup unsalted butter, melted
For the Cream Cheese Layer:
1 (8-ounce) package cream cheese, softened
1/2 cup powdered sugar
1/2 cup heavy cream, cold
1 teaspoon vanilla extract
For the Peanut Butter Layer:
1 cup creamy peanut butter
1/2 cup powdered sugar
1/4 cup heavy cream, cold
For the Caramel Layer:
1 cup caramel sauce
For the Topping:
1 (8-ounce) container frozen whipped topping, thawed (or 2 cups homemade whipped cream)
1 tablespoon cocoa powder, for dusting
Directions
- Prepare the bottom crust to prevent sogginess: In a medium bowl, combine graham cracker crumbs and melted butter. Mix thoroughly until crumbs are evenly moistened. Press half of this mixture very firmly into the bottom of an 8×8 inch baking pan. Use the flat bottom of a glass or a measuring cup to compact it tightly. Place the pan in the freezer for 15 minutes or in the refrigerator for 30 minutes. This crucial chilling step helps create a sturdy, less permeable base against the moist layers to come.
- Make the cream cheese layer: In a large bowl, beat softened cream cheese, powdered sugar, and vanilla extract with an electric mixer until smooth and creamy. In a separate bowl, whip 1/2 cup cold heavy cream until soft peaks form. Gently fold the whipped cream into the cream cheese mixture until just combined. Spread this mixture evenly over the chilled graham cracker crust. Return the pan to the refrigerator for another 30 minutes to allow this layer to fully set before adding more moisture.
- Prepare the peanut butter layer: In another bowl, combine creamy peanut butter, 1/2 cup powdered sugar, and 1/4 cup cold heavy cream. Beat until smooth and well combined. Carefully spread this peanut butter mixture over the set cream cheese layer. Chill the pan again for 20 minutes. Each chilling step is key to locking in the layers and preventing excessive moisture migration.
- Add the caramel layer: Gently pour and spread the caramel sauce over the peanut butter layer. If your caramel is too thick to spread easily, warm it slightly until pourable. Return the pan to the refrigerator for 15 minutes.
- Create the middle crust layer, again preventing sogginess: Take the remaining half of the graham cracker crumb mixture. Sprinkle it evenly over the set caramel layer. Gently press it down just enough to adhere, without compressing it too much, as this layer is meant to soften slightly but still provide texture, not become mush.
- Top with whipped cream: Spread the thawed whipped topping over the final graham cracker layer. If desired, you can pipe it for a decorative finish as shown in the image. Dust generously with cocoa powder.
- The ultimate set for non-soggy results: Cover the pan loosely with plastic wrap and refrigerate for at least 4 hours, or ideally overnight. This extended chilling time is vital for all the layers to fully meld and firm up, ensuring the crusts tenderize beautifully without becoming soggy, making for perfectly clean and easy slices.
- To serve, use a sharp knife warmed under hot water (and dried) for cleaner cuts.
Notes
- Crucial chilling steps ensure firm, distinct layers and prevent sogginess. For clean slices, warm your knife under hot water and dry it before cutting.


