
For years, I faced the common kitchen frustration: dry, disappointing chicken breasts. It felt like a culinary riddle to achieve that elusive tender, juicy result. But through countless attempts and refinements, I’ve finally cracked the code, transforming a once-dreaded protein into a consistently succulent delight.
This recipe for
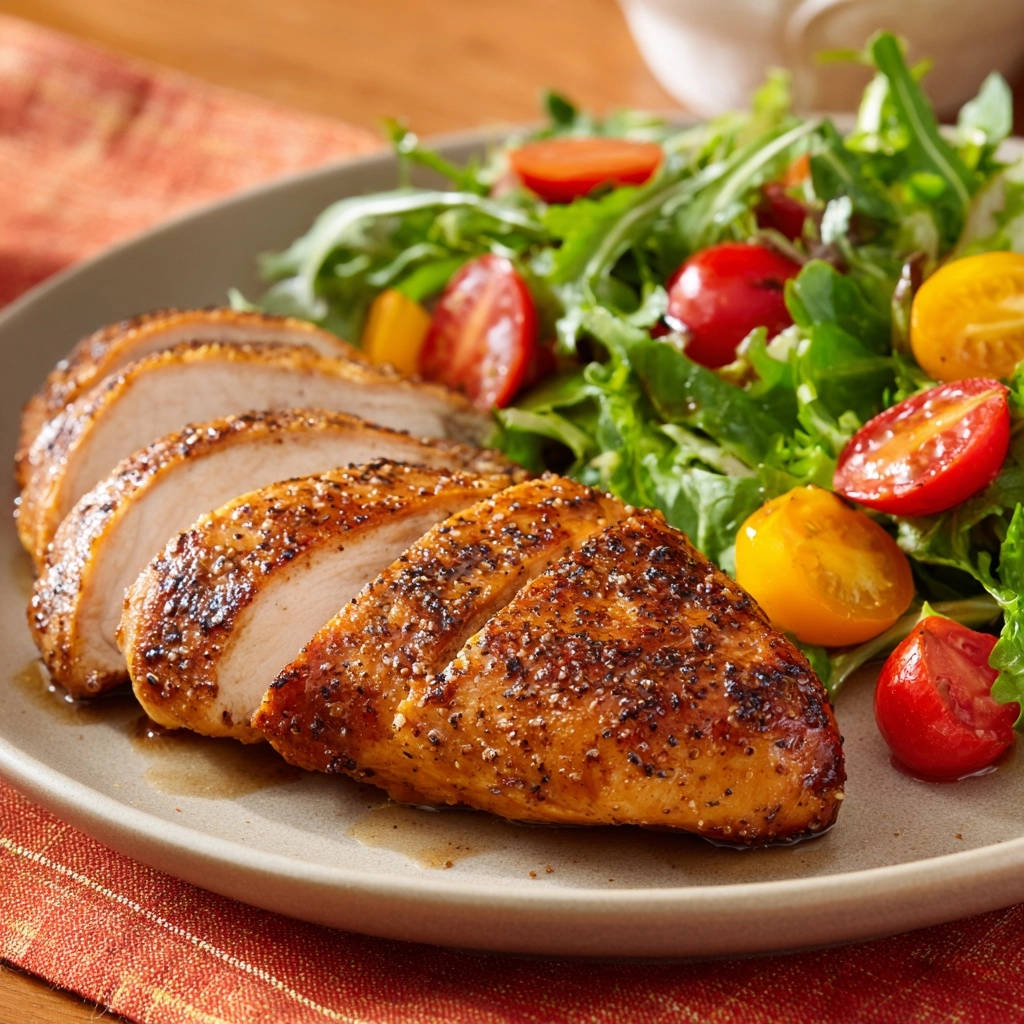
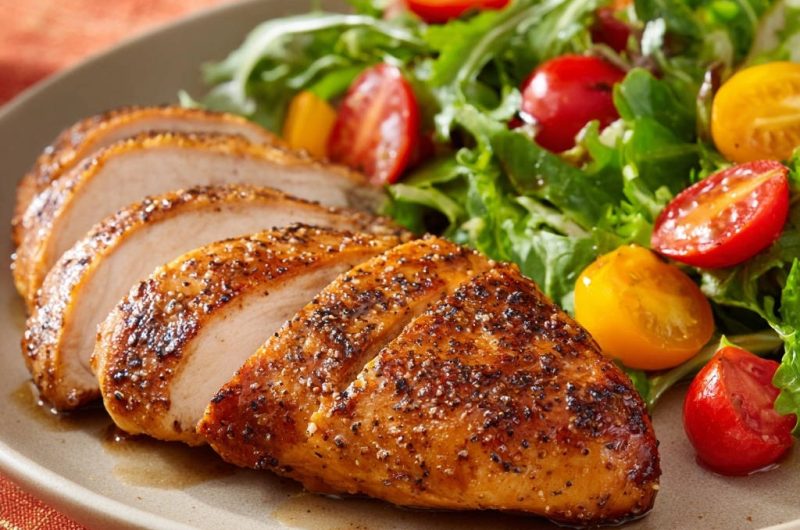
Pan-Seared Chicken Breast with Fresh Salad
isn’t just another meal; it’s a game-changer, guaranteeing perfectly cooked chicken every single time, beautifully complemented by a vibrant, fresh salad. Get ready to elevate your weeknight dinners with this reliable and incredibly delicious method.Why This Pan-Seared Chicken Breast with Fresh Salad Will Be Your New Go-To
The struggle with dry, rubbery chicken is real and widely experienced. Many home cooks give up on achieving that restaurant-quality tenderness at home, opting for less flavorful or more time-consuming methods.
For more ways to enjoy juicy chicken, consider these grilled chicken skewers.
This recipe offers a guaranteed solution, focusing on critical techniques that ensure succulent chicken every single time. It’s not just about cooking; it’s about mastering the sear and the crucial resting period that locks in all the flavorful juices.
Beyond its reliability, this dish champions speed and simplicity. In under 30 minutes, you can have a gourmet-tasting, healthy meal on the table, perfect for busy weeknights without compromising on flavor or quality.
For another quick meal option, try this Southwest chicken skewer salad.
The joy of biting into a perfectly tender
Pan-Seared Chicken Breast with Fresh Salad
, accompanied by crisp greens, is truly unmatched. It transforms a simple ingredient into a genuinely delicious and satisfying culinary experience, making it an instant favorite.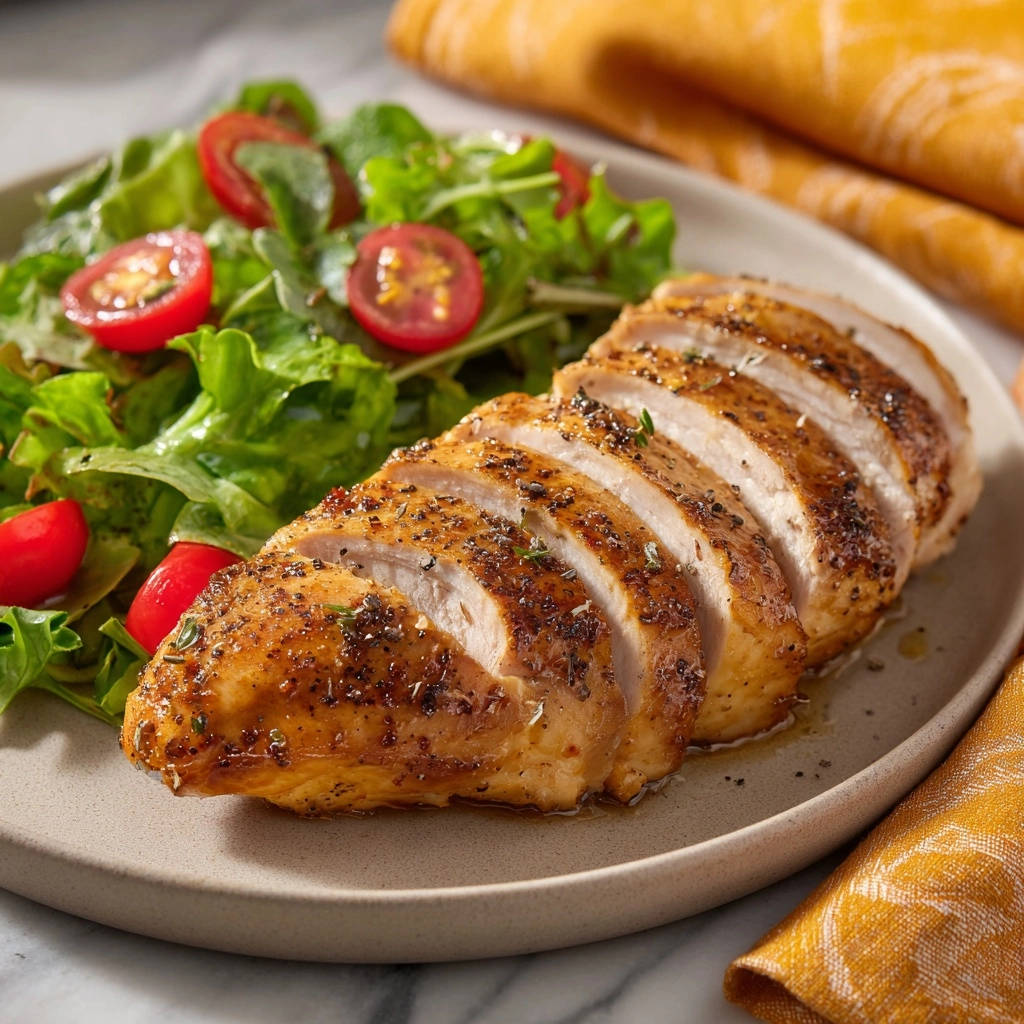
Gather Your Essentials: What You Need for Perfect Pan-Seared Chicken Breast
The Star of the Show: Chicken Breast
Opt for boneless, skinless chicken breasts, ideally around 6-8 ounces each, for even cooking. Fresh, good-quality chicken is paramount for the best flavor and texture.
The Flavor Foundation: Our Savory Spice Blend
Salt & Black Pepper: These are non-negotiable, enhancing the chicken’s natural flavors.
Garlic Powder & Onion Powder: They provide an aromatic, savory base that penetrates the meat deeply.
Paprika: Essential for a beautiful reddish hue and a touch of smoky depth, contributing to the golden crust.
For That Vibrant Fresh Salad
Mixed Salad Greens: Choose fresh, crisp varieties like arugula, spring mix, or even romaine for varying textures and peppery notes.
Cherry Tomatoes: Halved red and yellow cherry tomatoes add bursts of sweetness, color, and acidity, contrasting beautifully with the rich chicken.
Dressing Essentials: Simple & Tangy
Olive Oil: A good quality extra virgin olive oil is crucial for both searing the chicken and as the base for a light, flavorful salad dressing.
White Wine Vinegar (or Apple Cider Vinegar): This provides the necessary tang and brightness for the salad, cutting through the richness of the chicken.
Essential Tools for Pan-Seared Chicken Breast Mastery
Having the right equipment ensures a smooth and successful cooking process.
A heavy-bottomed skillet, such as cast iron or stainless steel, is non-negotiable. Its ability to retain and distribute heat evenly is crucial for achieving that perfect sear.
Tongs are essential for safely handling and flipping the chicken without tearing the delicate crust. They allow for precise movement in a hot pan.
An instant-read meat thermometer is your most valuable asset. It takes the guesswork out of cooking, guaranteeing the chicken is perfectly done without being overcooked or undercooked.
A sturdy cutting board is needed for seasoning the chicken and, critically, for resting and slicing it after cooking. Don’t underestimate its importance for prep and post-cook handling.
Your Culinary Journey: Crafting Pan-Seared Chicken Breast with Fresh Salad
- Prepare the Chicken for Searing:
Pat the chicken breasts thoroughly dry with paper towels. This crucial step removes surface moisture, which is essential for achieving a deep, golden-brown crust, not just steamed chicken.
Season both sides generously with salt, black pepper, garlic powder, onion powder, and paprika. Ensure an even coating for maximum flavor penetration.
- Heat Your Skillet to Perfection:
Place a heavy-bottomed skillet (cast iron or stainless steel works best) over medium-high heat for 2-3 minutes. You want it hot enough to sizzle but not smoke.
Add 1 tablespoon of olive oil, swirling to coat the bottom of the pan evenly. A thin, hot layer of oil helps create that irresistible sear.
- Sear for a Golden Crust:
Carefully place the seasoned chicken breasts in the hot skillet. Do not overcrowd the pan; cook in batches if necessary.
Sear for 5-7 minutes without moving the chicken. Resist the urge to peek or prod – this undisturbed time allows a beautiful golden-brown crust to form.
- Flip and Finish Cooking:
Flip the chicken breasts over and immediately reduce the heat to medium. Continue to cook for another 6-8 minutes, or until an internal temperature of 160 degrees F is reached.
Using a meat thermometer is key here. 160°F is the magic spot before resting, ensuring juicy results without overcooking.
- The Game-Changing Resting Period: Your Secret to Juiciness:
Immediately remove the chicken from the skillet and transfer it to a cutting board. Crucially, do not cut into it right away!
Tent it loosely with aluminum foil and let it rest for at least 5-7 minutes. This allows the juices, which have migrated to the center during cooking, to redistribute throughout the meat, guaranteeing a tender and incredibly juicy result every single time. The internal temperature will continue to rise a few degrees during this rest, reaching the safe 165°F.
- Assemble Your Vibrant Fresh Salad:
While the chicken rests, combine the mixed salad greens and halved cherry tomatoes in a medium bowl.
Drizzle with a little extra olive oil and white wine vinegar (or apple cider vinegar), then toss gently to coat the greens and tomatoes evenly.
- Slice and Serve Up Perfection:
Once rested, slice the chicken breasts against the grain into thick, succulent pieces. Slicing against the grain shortens the muscle fibers, making each bite even more tender.
Arrange the sliced chicken alongside the fresh salad on plates and serve immediately, savoring every juicy bite.
Chef’s Secrets: Unlock Truly Juicy Pan-Seared Chicken Every Time
The Dry Pat Difference: Don’t skip patting the chicken dry! Moisture on the surface lowers the pan’s temperature and prevents that coveted golden-brown crust from forming, leading to a less appealing texture and flavor.
Perfect Pan Temperature is Paramount: A skillet that’s too cool will “stew” the chicken, while one that’s too hot will burn the exterior before the inside cooks. Medium-high heat is ideal for the initial sear, ensuring a beautiful crust and even cooking.
Don’t Crowd the Pan: Cooking too many chicken breasts at once lowers the pan’s temperature dramatically, causing the chicken to steam instead of sear. Cook in batches if necessary to maintain optimal heat and achieve that perfect crust.
The Crucial Resting Rule (The Juiciness Secret): This is arguably the most vital step for juicy chicken. Resting allows the muscle fibers to relax and reabsorb juices, preventing them from escaping when you slice. Always tent loosely with foil and resist the urge to cut immediately.
Mastering Internal Temperature: An instant-read meat thermometer is your best friend. Aim for 160°F before resting, as the chicken will continue to cook to 165°F during the rest, ensuring safety and preventing overcooked dryness.
Beyond the Basic: Creative Twists for Your Pan-Seared Chicken Breast
Spice It Up: Chicken Flavor Profiles
Experiment with different spice blends beyond the basic. Try a smoky chipotle rub for a kick, a Mediterranean blend with oregano and lemon zest, or an Italian herb mix for a savory twist on your
Pan-Seared Chicken Breast with Fresh Salad
.A touch of cayenne pepper can add a subtle heat, while dried thyme or rosemary offer earthy, fragrant notes. Feel free to customize to your palate.
Salad Superchargers: Elevated Greens
Elevate your salad with more than just greens and tomatoes. Add crunch with toasted nuts like pecans or walnuts, or try creamy goat cheese or crumbled feta for a tangy element.
Fruits such as sliced strawberries, mandarin oranges, or thinly sliced apples bring a delightful sweetness and texture. Roasted vegetables like bell peppers or zucchini can also be a fantastic addition.
Dressing Dazzlers: Global Flavors
Move beyond olive oil and vinegar for your salad dressing. A simple balsamic vinaigrette adds a sweet-tart depth, while a lemon-tahini dressing offers a creamy, nutty profile.
For an Asian twist, a sesame-ginger dressing pairs wonderfully. A light cilantro-lime vinaigrette can also provide a fresh, zesty kick that complements the chicken perfectly.
What to Serve with Your Pan-Seared Chicken Breast and Fresh Salad
While the
Pan-Seared Chicken Breast with Fresh Salad
is a complete meal in itself, a few simple additions can further enhance your dining experience.Serve alongside a crusty loaf of bread or warm naan to soak up any delicious pan juices or dressing. This adds a satisfying carbohydrate component to your meal.
Round Out Your Meal
Consider these other chicken dishes to complement your pan-seared chicken breast.
- For a different take on chicken preparations, try this easy juicy grilled chicken salad.
- If you enjoy chicken cooked in a pan, give this pan-seared chicken salad a go.
For a heartier option, a scoop of fluffy quinoa or brown rice provides a nutritious grain base. These absorb flavors wonderfully and contribute to a feeling of fullness.
Lightly roasted or steamed vegetables like asparagus, broccoli, or green beans can add extra nutrients and texture. Their simplicity allows the main dish to shine.
A small portion of light pasta salad, dressed with a vinaigrette, can also be a delightful accompaniment, especially if you’re looking for something more substantial.
Plan Ahead: Storing and Prepping Your Pan-Seared Chicken Breast
Storing Leftover Chicken
To keep your cooked chicken fresh, allow it to cool completely before transferring it to an airtight container. Store it in the refrigerator for up to 3-4 days.
For longer storage, sliced or whole chicken can be frozen in an airtight container or freezer bag for up to 2-3 months. Thaw in the refrigerator overnight before reheating.
Keeping Salad Fresh for Later
Always store salad components separately. Keep the mixed greens un-dressed in a container lined with a paper towel to absorb moisture, and store chopped tomatoes in a separate container.
Prepare your dressing in a small jar. When ready to serve, simply combine the elements and toss. This prevents the greens from wilting and keeps everything crisp.
Help! My Pan-Seared Chicken Breast Isn’t Perfect: Common Issues Solved
Problem: Dry or Rubbery Chicken
Solution: The most common culprit is overcooking. Invest in an instant-read meat thermometer and pull the chicken at 160°F before resting. The resting period is crucial; it allows juices to redistribute, leading to tender, moist meat.
Problem: No Golden-Brown Crust
Solution: Ensure your chicken is thoroughly patted dry before seasoning; moisture prevents searing. Also, make sure your skillet is hot enough (medium-high heat) before adding the chicken, and don’t overcrowd the pan, which lowers the temperature.
Problem: Chicken Sticks to the Pan
Solution: This usually means the pan wasn’t hot enough or you tried to move the chicken too soon. Ensure the oil is shimmering and the pan is hot before adding the chicken. Let it sear undisturbed for the full recommended time; it will naturally release when a good crust has formed.
Your Pan-Seared Chicken Breast Questions Answered
What temperature should chicken breast be cooked to?
Chicken breast should be cooked to an internal temperature of 165°F (74°C) for food safety. In this recipe, we aim for 160°F (71°C) in the pan, knowing it will reach 165°F during the crucial resting period.
Can I use skin-on chicken breast for this recipe?
Yes, you can! Skin-on chicken breast will yield an even crispier skin and more flavor. Sear skin-side down first for a longer period (7-10 minutes) until deeply golden and crispy, then flip and finish cooking as directed.
How long can I store leftover Pan-Seared Chicken Breast?
Properly stored in an airtight container in the refrigerator, cooked
Pan-Seared Chicken Breast
remains delicious for 3-4 days. It’s excellent for meal prep or quick lunches.Can I prepare the chicken ahead of time?
You can season the chicken breasts up to 12 hours in advance and store them covered in the refrigerator. This allows the flavors to meld beautifully. However, for best results, cook the chicken and assemble the salad just before serving.
What’s the best way to reheat cooked chicken without drying it out?
For best results, gently reheat leftover chicken in a skillet over medium-low heat with a tablespoon of broth or water, covered, until just warmed through. You can also microwave it briefly with a damp paper towel over the top to help retain moisture.
Ready to Savor the Best Pan-Seared Chicken Breast with Fresh Salad?
You now possess the secrets to creating a truly exceptional
Pan-Seared Chicken Breast with Fresh Salad
– one that is consistently juicy, flavorful, and incredibly satisfying. No more dry chicken, only culinary triumphs!Give this recipe a try this week and experience the joy of a perfect, healthy, and quick meal. I’d love to hear about your creations; share your experiences and any delicious variations you discover in the comments below!
Pan-Seared Chicken Breast
Course: Main CourseCuisine: AmericanDifficulty: easy2
servings10
minutes15
minutes450
kcal25
minutesTired of dry chicken? This simple method guarantees succulent, perfectly pan-seared chicken breast every time. Paired with a vibrant fresh salad, it’s a meal you’ll actually look forward to!
Ingredients
2 boneless, skinless chicken breasts (about 6-8 ounces each)
1 tablespoon olive oil, plus more for salad
1/2 teaspoon salt
1/4 teaspoon black pepper
1/4 teaspoon garlic powder
1/4 teaspoon onion powder
1/2 teaspoon paprika
4 cups mixed salad greens (like arugula or spring mix)
1 cup cherry tomatoes, halved (red and yellow)
1 tablespoon white wine vinegar (or apple cider vinegar)
Directions
- Prepare the chicken: Pat chicken breasts thoroughly dry with paper towels. This step is crucial for a good sear. Season both sides generously with salt, black pepper, garlic powder, onion powder, and paprika.
- Heat the pan: Place a heavy-bottomed skillet (like cast iron or stainless steel) over medium-high heat for 2-3 minutes until hot. Add 1 tablespoon of olive oil to the pan, ensuring it coats the bottom.
- Sear the chicken: Carefully place the seasoned chicken breasts in the hot skillet. Sear for 5-7 minutes without moving, until a beautiful golden-brown crust forms.
- Flip and finish cooking: Flip the chicken breasts and reduce the heat to medium. Continue to cook for another 6-8 minutes, or until the internal temperature reaches 160 degrees F. This is the magic spot before they become overcooked.
- The Secret to Juiciness: Immediately remove the chicken from the skillet and transfer it to a cutting board. Do not cut into it right away! Tent it loosely with aluminum foil and let it rest for at least 5-7 minutes. This resting period allows the juices to redistribute throughout the meat, guaranteeing a tender and incredibly juicy result every single time. The internal temperature will rise a few more degrees during this rest.
- Assemble the salad: While the chicken rests, combine the mixed salad greens and halved cherry tomatoes in a medium bowl. Drizzle with a little olive oil and white wine vinegar, then toss gently to coat.
- Slice and serve: Once rested, slice the chicken breasts against the grain into thick pieces. Arrange the sliced chicken alongside the fresh salad on plates and serve immediately.
Notes
- Crucial to let chicken rest for 5-7 minutes after cooking for maximum juiciness.


