
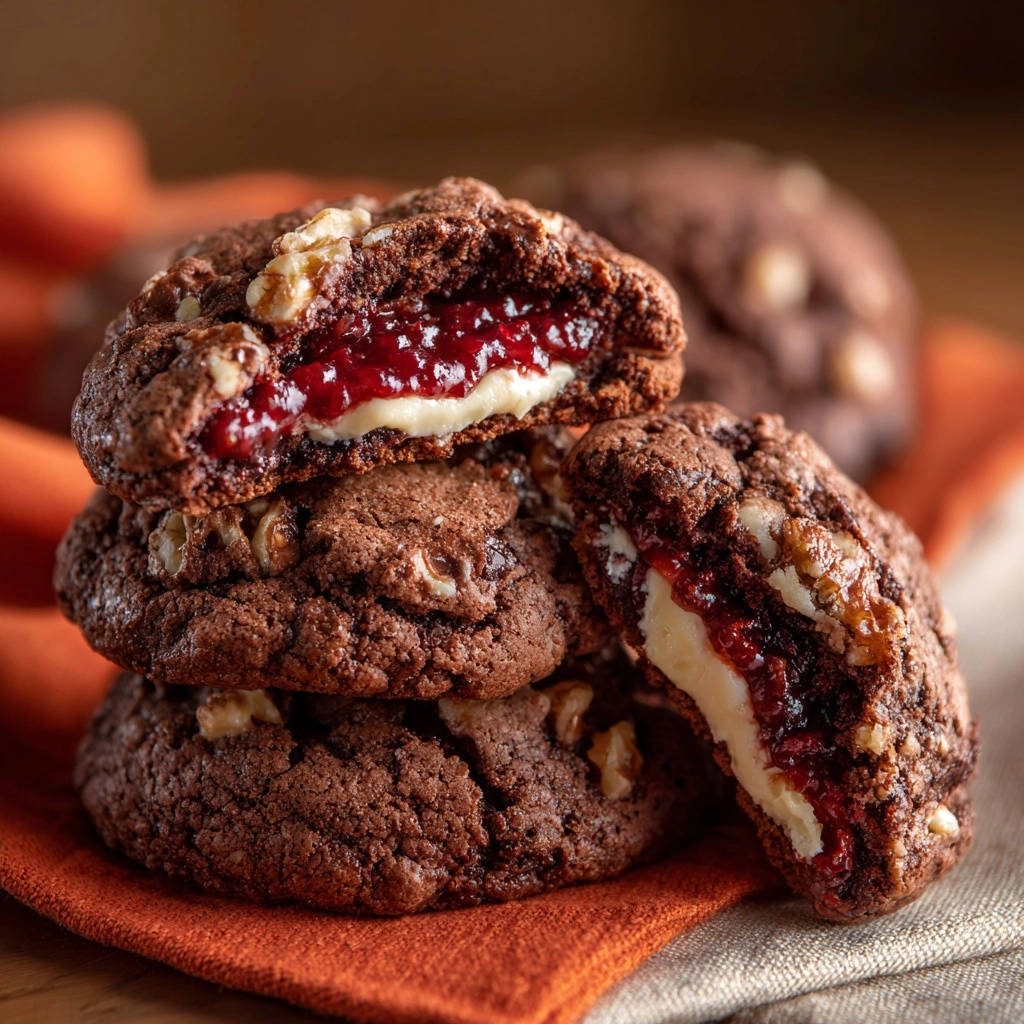
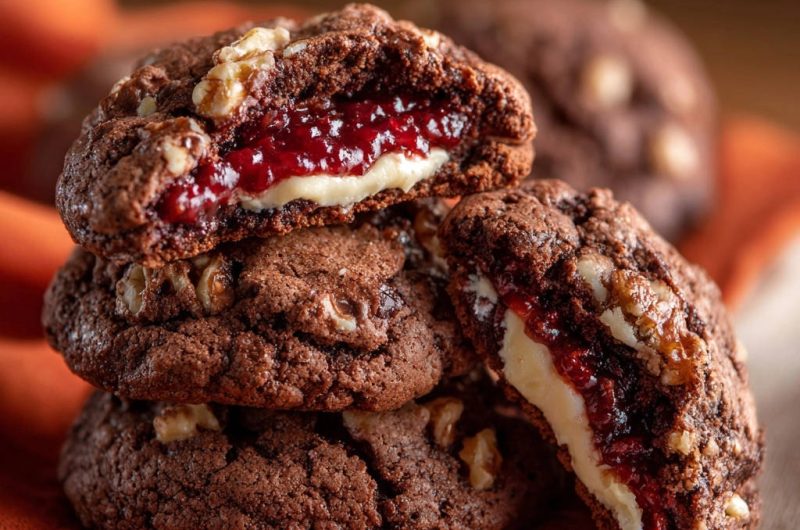
I remember the frustration of meticulously stuffing cookies, only for the delicious filling to melt and escape across the baking sheet. It felt like a culinary betrayal! But once I cracked the code to keeping those luscious centers perfectly contained, making these incredible Stuffed Chocolate Walnut Cookies became pure joy.
This recipe ensures every single cookie bakes up beautifully, delivering a delightful surprise of flavor and texture without any messy mishaps. Prepare to savor perfectly baked cookies every time.
Why This Recipe for Stuffed Chocolate Walnut Cookies is a Game-Changer
These aren’t just any cookies; they’re a testament to thoughtful baking. We address common pitfalls head-on, ensuring a consistently rewarding experience.
The “No Ooze” Guarantee: Perfectly Contained Fillings
The primary benefit of this recipe lies in its foolproof method for preventing filling leakage. Strategic chilling and a precise sealing technique mean your creamy, fruity centers stay exactly where they belong.
Each bite delivers the intended burst of flavor, perfectly encased within the rich chocolate cookie.
A Symphony of Flavors: Chocolate, Walnut, and Raspberry Bliss
The deep, slightly bitter notes of cocoa marry beautifully with the earthy crunch of walnuts. This forms the perfect contrast to the sweet-tart raspberry jam and creamy tang of the cream cheese filling.
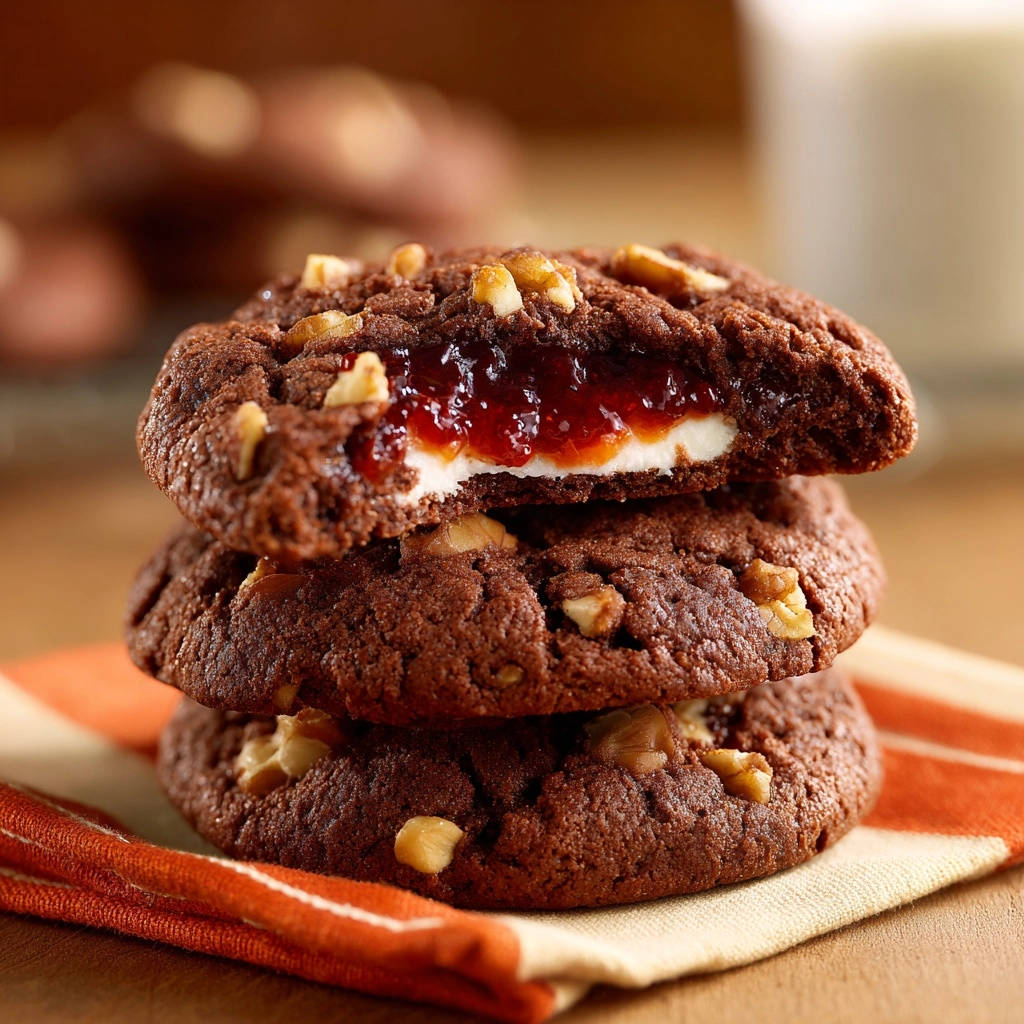
It’s a complex yet harmonious flavor profile that delights the palate with every bite of these gourmet cookies.
Effortless Elegance: Impress Without the Stress
Despite their sophisticated appearance and multi-layered flavors, these Stuffed Chocolate Walnut Cookies are surprisingly straightforward to make. The detailed instructions empower even novice bakers to achieve professional-looking results.
You can impress guests, delight family, or simply treat yourself to a bake that looks as good as it tastes, all without culinary stress.
Gathering Your Gourmet Ingredients
Success in baking begins with understanding your ingredients. Quality choices and thoughtful combinations build the foundation of these exceptional treats.
Building the Rich Chocolate Cookie Dough
Unsalted butter, softened: Essential for a tender crumb and rich flavor, ensuring the dough is pliable for stuffing.
Granulated and Light Brown Sugar: A blend creates chewiness from the brown sugar and crispness from the granulated, while contributing to overall sweetness.
Large egg: Acts as a binder, adding structure and moisture to the dough.
Vanilla extract: Enhances the chocolate flavor and adds a warm, aromatic depth.
All-purpose flour: Provides the necessary structure without making the cookies tough, allowing for a soft interior.
Unsweetened cocoa powder: Delivers the intense, deep chocolate flavor that defines the cookie base.
Baking soda & Salt: Baking soda helps the cookies rise slightly and contributes to chewiness, while salt balances the sweetness and enhances all flavors.
Chopped walnuts: Adds a delightful textural contrast and an earthy, nutty dimension to the chocolate dough.
Crafting the Irresistible Dual Fillings
Raspberry jam: Offers a vibrant, sweet-tart fruit burst that cuts through the richness of the chocolate and cream cheese. Its natural pectin helps it set.
Cream cheese, softened: Provides a creamy, tangy counterpoint that adds structure to the jam and prevents it from simply melting into the cookie. Ensure it’s full-fat for best texture.
Powdered sugar: Sweetens the cream cheese, creating a smooth, pipeable consistency perfect for stuffing.
Essential Tools for Cookie Baking Success
Having the right equipment at hand streamlines the baking process and contributes to consistent, beautiful results.
From Mixing Bowls to Baking Sheets
You’ll need a set of durable mixing bowls for both wet and dry ingredients, and for preparing the fillings. An electric mixer, either stand or hand-held, is invaluable for creaming butter and sugar effectively.
A sturdy rubber spatula is essential for scraping down bowls and gently folding in ingredients. Quality baking sheets are crucial for even heat distribution, preventing burnt bottoms.
Precision for Perfect Portions
A cookie scoop (about 1.5 tablespoons) ensures uniform cookie size, which is vital for even baking and consistent stuffing. Parchment paper is a non-negotiable for lining baking sheets.
It prevents sticking, makes cleanup a breeze, and helps regulate bottom browning. Measuring spoons are also critical for accurately portioning the fillings.
Your Journey to Perfect Stuffed Chocolate Walnut Cookies: Step-by-Step
Follow these detailed instructions carefully to achieve perfectly stuffed, leak-proof chocolate walnut treats.
Preparing Your Dry & Wet Foundations
Step 1: Combine Dry Ingredients. In a medium bowl, whisk together the flour, cocoa powder, baking soda, and salt. This step ensures leavening agents and flavorings are evenly distributed throughout the dry mixture, preventing pockets of unmixed ingredients later.
Step 2: Cream Wet Ingredients. In a large bowl, cream the softened butter, granulated sugar, and brown sugar together using an electric mixer until the mixture is light and fluffy. This aeration is key for tender cookies. Beat in the egg and vanilla extract until they are thoroughly combined, creating a smooth, emulsified base for the dough.
Combining Ingredients & the First Chill
Step 3: Form the Dough & Chill. Gradually add the whisked dry ingredient mixture to the wet ingredients, mixing on low speed until just combined. Overmixing at this stage can lead to tough cookies. Stir in the chopped walnuts by hand. Chill the cookie dough in the refrigerator for at least 30 minutes; this firming period makes the dough easier to handle and significantly reduces spreading during baking.
Whipping Up the Luscious Fillings
Step 4: Prepare Fillings. While the cookie dough chills, prepare your fillings. In a small bowl, beat the softened cream cheese and powdered sugar together until smooth and creamy. In another small bowl, have your raspberry jam ready. It is absolutely crucial that both fillings are chilled and firm before use; this stiffness is a primary defense against leaks during baking.
For more jam ideas that hold their shape, check out these raspberry thumbprint cookies.
The Masterful Stuffing Technique: Key to Leak-Proof Stuffed Chocolate Walnut Cookies
Step 5: Flatten and Fill. Take about 1.5 tablespoons of the chilled cookie dough and flatten it into a thin, even disc in the palm of your hand. Aim for about 2.5-3 inches in diameter. Place approximately 1/2 teaspoon of the firm cream cheese filling in the center of the dough disc, followed by about 1/2 teaspoon of raspberry jam directly on top of the cream cheese. Avoid overfilling, as this is a common cause of leaks.
Sealing for Success: Encasing Every Bit of Gooey Goodness
Step 6: Seal Completely. Carefully bring the edges of the cookie dough up and over the fillings, pinching them together firmly and completely to form a seamless ball. This step is critical: ensure there are absolutely no cracks, openings, or thin spots where the filling could escape. The filling must be entirely encased by the dough, creating a perfect, smooth sphere.
The Crucial Second Chill: A Barrier Against Leaks
Step 7: Final Chill. Place all the expertly sealed cookie dough balls onto a baking sheet lined with parchment paper. Once all cookies are formed, chill the entire tray of filled cookie dough balls in the refrigerator for another 15-20 minutes. This second chill allows the dough to set firmly around the filling, creating a robust, cold barrier that resists melting and keeps the filling intact during the initial oven heat.
Baking to Golden Perfection
Step 8: Preheat Oven. Preheat your oven to 350 degrees Fahrenheit (175°C).
Step 9: Bake. Bake the chilled cookies for 10-12 minutes, or until the edges are lightly set and the centers still look slightly soft. The cookies will continue to cook slightly from residual heat once removed. It is vital not to overbake, as this can dry out the crust and make it brittle, allowing the filling to push through.
The Art of Cooling: Patiently Achieving Ideal Texture
Step 10: Cool. Let the Stuffed Chocolate Walnut Cookies cool on the baking sheet for 5 minutes after removing them from the oven. This brief cooling period allows them to firm up slightly. After 5 minutes, carefully transfer them to a wire rack to cool completely. Cooling completely ensures the fillings set and the cookies maintain their structural integrity.
Elevate Your Stuffed Chocolate Walnut Cookies: Expert Tips
Take your cookie game to the next level with these insights from an experienced baker.
Why Chilling Dough Twice is Non-Negotiable
The double chill is your ultimate secret weapon against flat, spreading cookies and leaky fillings. The initial chill firms the dough for easier handling during stuffing, while the second chill solidifies the protective outer layer around the filling, creating a formidable barrier against high oven temperatures.
The Gentle Hand: Don’t Overmix Your Dough
Overmixing flour develops gluten excessively, which can result in tough, dense cookies. Mix until the dry ingredients are just incorporated, leaving a few streaks of flour. The final gentle folds to incorporate walnuts will complete the mixing without overworking the dough.
Reading Your Oven: Avoiding Over-Baking
Oven temperatures can vary significantly. Trust your eyes more than the timer: watch for edges that are just set and centers that still appear slightly moist. Cookies continue to bake from residual heat on the hot sheet, ensuring a perfectly moist and chewy interior.
Perfect Portioning for Even Results
Consistent cookie size is key for uniform baking and presentation. Using a cookie scoop for the dough and precise measuring spoons for the fillings ensures that every cookie is perfectly portioned, cooks evenly, and looks consistently beautiful on your serving platter.
Delicious Twists: Creative Variations for Your Cookies
Feel free to unleash your creativity and customize these delectable Stuffed Chocolate Walnut Cookies to your taste.
Explore Different Filling Combinations
While raspberry jam offers a classic, tangy contrast, consider other fruit preserves like apricot, cherry, or even a zesty lemon curd for a bright twist. For a richer experience, try a spoonful of dulce de leche or smooth peanut butter alongside the cream cheese.
Nutty Substitutions & Add-ins
If walnuts aren’t your preference, substitute them with toasted pecans, almonds, or even macadamia nuts for a different texture and flavor profile. For an extra chocolatey punch, mini chocolate chips can be folded into the dough instead of, or in addition to, the nuts.
Decadent Glazes and Toppings
Once your Stuffed Chocolate Walnut Cookies have cooled completely, elevate their presentation and flavor with a simple topping. Drizzle them with melted white chocolate, a dark chocolate ganache, or a simple dusting of powdered sugar for an elegant finish. A sprinkle of flaky sea salt can also beautifully enhance the chocolate notes.
Troubleshooting Stuffed Chocolate Walnut Cookies: Common Hurdles
Even expert bakers encounter challenges. Here’s how to navigate common issues when making your stuffed cookie treats.
“My Filling Exploded!” (Solving the Leakage Problem)
Filling explosions are almost always due to insufficient chilling or incomplete sealing. Ensure both your cookie dough and your fillings are very cold and firm before assembly. When sealing, pinch all edges tightly and thoroughly, making sure no part of the filling is visible through the dough.
“My Cookies Are Too Flat!”
Flat cookies typically result from butter that was too warm (melted, not just softened), dough that wasn’t chilled enough, or an imprecise flour measurement. Always use butter that is truly softened, not greasy or melted, and rigorously adhere to both chilling periods outlined in the recipe.
“Why Are My Cookies Dry?”
Dry, crumbly cookies are a clear indicator of overbaking. Keep a vigilant eye on your oven, as baking times can vary. Remove the cookies when the edges are just barely set and the centers still look slightly soft; they will continue to firm up as they cool on the baking sheet.
Maximizing Freshness: Storage and Make-Ahead Options
Plan ahead and keep your delightful Stuffed Chocolate Walnut Cookies fresh for longer with these expert tips.
Keeping Baked Stuffed Chocolate Walnut Cookies Fresh
Once completely cooled, store your baked Stuffed Chocolate Walnut Cookies in an airtight container at room temperature. They will retain their freshness and delicious texture for up to 3-4 days. For extended freshness, especially in warmer climates, you can refrigerate them for up to a week.
Freezing Unbaked Dough for Future Treats
For ultimate convenience, prepare and stuff the cookie dough balls as directed, then freeze them raw on a baking sheet until they are solid. Once frozen, transfer the solid dough balls to a freezer-safe bag or container, where they will keep well for up to 2-3 months. Bake directly from frozen, adding an extra 2-3 minutes to the specified baking time.
Can You Freeze Baked Cookies?
Yes, absolutely! Once your Stuffed Chocolate Walnut Cookies have cooled entirely, you can freeze them. Arrange them in a single layer on a baking sheet until firm, then transfer them to an airtight container or freezer bag, separated by parchment paper. They will maintain their quality for up to 1 month. Thaw at room temperature before indulging.
Frequently Asked Questions About Our Stuffed Chocolate Walnut Cookies
We’ve gathered answers to common questions to help you master this unique recipe.
What kind of jam works best?
While raspberry jam provides a fantastic tart counterpoint to the rich chocolate, any thick fruit jam will work well. Opt for a jam with good body, as a very runny jam might be more prone to leaking and could affect the cookie’s texture.
Is chilling the dough really necessary?
Absolutely, chilling the dough is non-negotiable for these Stuffed Chocolate Walnut Cookies! It’s the ultimate secret weapon against flat, spreading cookies and ensures that your exquisite fillings remain perfectly encased within the cookie dough, preventing any messy leaks.
Are walnuts essential?
Walnuts contribute a delightful crunch and an earthy, robust flavor that complements the chocolate beautifully. However, if you’re not a fan, have allergies, or simply prefer something different, you can omit them entirely or substitute with other chopped nuts like pecans, or even mini chocolate chips for an extra burst of sweetness.
How long do they last?
Properly stored in an airtight container at room temperature, these delightful Stuffed Chocolate Walnut Cookies will stay wonderfully fresh for about 3-4 days. Though, based on personal experience, they often disappear much, much faster!
Your Next Baking Adventure: Enjoy These Irresistible Treats!
With this comprehensive guide and foolproof method, you are now perfectly equipped to create the most incredible, leak-proof Stuffed Chocolate Walnut Cookies. Say goodbye to baking frustrations and hello to pure, unadulterated cookie bliss!
We absolutely encourage you to share your baking successes and any creative variations you try on social media. Tag us and spread the joy of perfectly stuffed, truly irresistible cookies!
Stuffed Chocolate Walnut Cookies
Course: DessertCuisine: AmericanDifficulty: medium18
cookies30
minutes10
minutes240
kcal45
minutesFrustrated by melting fillings in your cookies? Discover the secret to perfectly contained gooey goodness with these delicious stuffed chocolate walnut cookies. Enjoy a mess-free baking experience every time!
Ingredients
1/2 cup (1 stick) unsalted butter, softened
3/4 cup granulated sugar
1/2 cup packed light brown sugar
1 large egg
1 teaspoon vanilla extract
1 1/4 cups all-purpose flour
1/2 cup unsweetened cocoa powder
1/2 teaspoon baking soda
1/4 teaspoon salt
1/2 cup chopped walnuts
1/2 cup raspberry jam (or preferred fruit jam)
4 ounces cream cheese, softened
1/4 cup powdered sugar
Directions
- In a medium bowl, whisk together the flour, cocoa powder, baking soda, and salt. Set aside.
- In a large bowl, cream together the softened butter, granulated sugar, and brown sugar until light and fluffy. Beat in the egg and vanilla extract until well combined.
- Gradually add the dry ingredient mixture to the wet ingredients, mixing on low speed until just combined. Stir in the chopped walnuts. Chill the cookie dough in the refrigerator for at least 30 minutes.
- While the cookie dough chills, prepare the fillings. In a small bowl, beat the softened cream cheese and powdered sugar together until smooth. This is your cream cheese filling. In another small bowl, have your raspberry jam ready. Ensure both fillings are chilled and firm for best results.
- This is the key step to prevent leaks: Take about 1.5 tablespoons of chilled cookie dough and flatten it into a disc in the palm of your hand. Place about 1/2 teaspoon of the cream cheese filling in the center of the dough disc, followed by about 1/2 teaspoon of the raspberry jam on top of the cream cheese.
- Carefully bring the edges of the cookie dough up and over the fillings, pinching and sealing them completely to form a ball. Make sure there are no cracks or openings where the filling could escape. It’s crucial that the filling is entirely encased.
- Place the sealed cookie dough balls on a baking sheet lined with parchment paper. Once all cookies are formed, chill the entire tray of filled cookie dough balls in the refrigerator for another 15-20 minutes. This extra chill helps the dough set around the filling, creating a strong barrier during baking.
- Preheat your oven to 350 degrees Fahrenheit.
- Bake the chilled cookies for 10-12 minutes, or until the edges are set and the centers still look slightly soft. Do not overbake, as this can cause the filling to push through a drying crust.
- Let the cookies cool on the baking sheet for 5 minutes before transferring them to a wire rack to cool completely. Enjoy your perfectly stuffed, leak-free cookies!
Notes
- Ensure fillings and dough are thoroughly chilled for best results and to prevent leaks.


