
There’s nothing quite as disappointing as baking what you hope will be incredible cookie bars, only for them to emerge dry, crumbly, or lacking that essential gooey center. I understand the frustration; achieving that perfect chewy-gooey texture once felt like a mystery. After much experimenting, I finally unlocked the secrets to these Salted Caramel Chocolate Chip Cookie Bars, ensuring every batch is pure magic.
This recipe consistently delivers a rich, decadent, and perfectly moist treat that will have everyone asking for your secret. Get ready to impress with cookie bars that are wonderfully soft and infused with irresistible caramel and chocolate. Say goodbye to dry baked goods and hello to your new favorite dessert!
Beyond Basic: Why Our Salted Caramel Chocolate Chip Cookie Bars Shine
This isn’t just another cookie bar recipe; it’s designed to transform your baking with consistent, mouth-watering results. We focus on key techniques and ingredient choices that elevate these treats from good to extraordinary.
The Secret to That Irresistible Chewy-Gooey Center
The core of our success lies in a precise baking method: watching for golden edges while allowing the center to remain slightly underbaked. This crucial step ensures the cookie bars continue to set as they cool, locking in that wonderfully gooey, never-dry texture that everyone craves.
A Batch of Pure Magic: Moist, Rich, and Decadent
Each bite of these homemade cookie treats offers a symphony of flavors and textures. The combination of browned butter notes, rich chocolate chips, and swirls of salted caramel creates an unparalleled decadent experience.
The meticulous balance of sugars and fat contributes to an incredibly moist crumb, making these bars truly unforgettable. They are dense, yet tender, embodying a luxurious quality that feels truly indulgent.
Effortless Elegance for Any Occasion
Despite their sophisticated flavor and appearance, these salted caramel chocolate chip cookie bars are surprisingly simple to prepare. The straightforward steps make them accessible for bakers of all skill levels.
Whether you’re looking for an easy dessert for a weeknight indulgence or an impressive treat for a gathering, these bars fit the bill perfectly. They offer elegance without the fuss, ensuring you spend less time baking and more time enjoying.
Crafting the Perfect Batch: Essential Ingredients for Your Cookie Bars
The quality and preparation of your ingredients are paramount to achieving the best flavor and texture in these delightful bars.
The Foundation: Butter, Sugars, and Eggs
Unsalted butter, softened to room temperature, is critical for proper creaming, which builds the airy structure of the cookie bars. A blend of light brown sugar and granulated sugar provides depth of flavor and ensures optimal chewiness.
The brown sugar adds moisture and a subtle caramel note, while granulated sugar contributes to crisp edges. A large egg acts as a binder, adding richness and helping with emulsification.
Dry Mix: Flour, Baking Soda, and Salt
All-purpose flour provides the structural backbone of the bars. Baking soda is our leavening agent, reacting with the acidic brown sugar to create a tender, soft interior.
A touch of salt balances the sweetness and enhances all the other flavors, making each ingredient shine. Proper whisking of these dry components prevents pockets of leavener or salt in the final product.
The Stars: Chocolate Chips, Caramel, and Sea Salt
Semi-sweet chocolate chips are a classic choice, offering a balanced sweetness that pairs beautifully with the caramel. Feel free to use your favorite variety, from milk to dark chocolate, to customize the flavor.
If you appreciate the rich chocolate notes here, you’ll also enjoy the deep flavors in chocolate caramel cheesecake bars.
Caramel sauce, whether store-bought high-quality or homemade, provides the signature sticky, sweet layer. Finally, flaky sea salt is indispensable; its textural crunch and sharp salinity cut through the richness, elevating the entire experience.
Quality Matters: Choosing Your Ingredients Wisely
Opt for good quality chocolate chips that melt smoothly for the best flavor and texture. For caramel, a thick, rich sauce will adhere beautifully and provide that luxurious drizzle.
Fresh vanilla extract also makes a noticeable difference, adding warmth and depth to the overall profile of your chewy cookie bars.
Gear Up: Tools for Salted Caramel Chocolate Chip Cookie Bars Success
Having the right equipment ensures a smooth baking process and perfect results every time.
Standard Baking Essentials
Large Mixing Bowl: Essential for combining your wet ingredients and then incorporating the dry ones without mess.
Electric Mixer: A hand or stand mixer makes creaming butter and sugars much easier and ensures consistent fluffiness.
Measuring Cups and Spoons: Accurate measurements are crucial in baking, so ensure you have a reliable set.
Rubber Spatula: Perfect for scraping down the sides of the bowl and gently folding in chocolate chips.
Specialty Items for the Perfect Finish
8×8 Inch Baking Pan: The specific size is important for achieving the ideal thickness and gooey texture of these caramel desserts.
Parchment Paper: Lining the pan with parchment paper, leaving an overhang, is a game-changer for easy removal and clean slicing.
Wire Rack: Necessary for cooling the bars completely and ensuring proper air circulation, which helps them set evenly.
Your Step-by-Step Journey to Salted Caramel Chocolate Chip Cookie Bars Perfection
- Prepping Your Pan and Oven:
Preheat your oven to 350 degrees Fahrenheit (175 degrees Celsius) and prepare your 8×8 inch baking pan. Line it with parchment paper, leaving an overhang to easily lift the bars later, and lightly grease the paper.
This simple step ensures easy removal and clean-up, making your baking experience smoother and preventing sticking.
- Mastering the Creaming Method:
In a large bowl, cream together the softened unsalted butter, light brown sugar, and granulated sugar with an electric mixer until the mixture is light and fluffy, usually about 2-3 minutes.
This thorough creaming process incorporates air, which is crucial for achieving a tender crumb and light texture in your cookie bars.
- Incorporating Wet Ingredients:
Beat in the large egg and vanilla extract until they are well combined and the mixture is smooth, making sure to scrape down the sides of the bowl as needed to ensure everything is fully incorporated.
Vanilla extract adds a crucial layer of warm flavor, while the egg binds everything together and adds richness.
- Combining Dry Ingredients:
In a separate medium bowl, whisk together the all-purpose flour, baking soda, and salt. Whisking ensures these ingredients are evenly distributed, which is vital for a consistent rise and flavor throughout the bars.
- The Gentle Mix:
Gradually add the dry ingredients to the wet mixture, mixing on low speed until they are just combined. It’s crucial not to overmix the dough, as this can develop the gluten too much, leading to a tougher, cakey texture.
A few streaks of flour remaining are perfectly fine; you want to avoid toughness for that signature gooey center, making this a true chocolate chip bars recipe.
- Folding in the Chocolate Chips:
Gently fold the semi-sweet chocolate chips evenly throughout the dough using a spatula. This ensures every bite of your Salted Caramel Chocolate Chip Cookie Bars delivers a burst of chocolatey goodness and consistent flavor.
For more chocolatey indulgence, consider trying molten raspberry chocolate lava cookies.
- Pressing the Dough:
Press the prepared dough evenly into your lined 8×8 inch baking pan. Make sure it forms a uniform layer for even baking and a consistent bar thickness.
- The Ultimate Baking Secret:
Bake for 25-30 minutes, or until the edges are golden brown and set, but the center still looks slightly soft and almost underbaked. This is the ultimate secret to achieving that wonderfully gooey, never-dry texture.
The bars will continue to set as they cool, so absolutely do not overbake! This prevents a dry, crumbly result and ensures optimal chewiness.
- Crucial Cooling:
Remove the pan from the oven and let the bars cool completely in the pan on a wire rack before attempting to lift them out. This step is non-negotiable and can take at least 1-2 hours; it’s crucial for proper setting and clean, picture-perfect slicing.
Patience here ensures your easy dessert bars hold their shape and texture beautifully.
- The Finishing Touches:
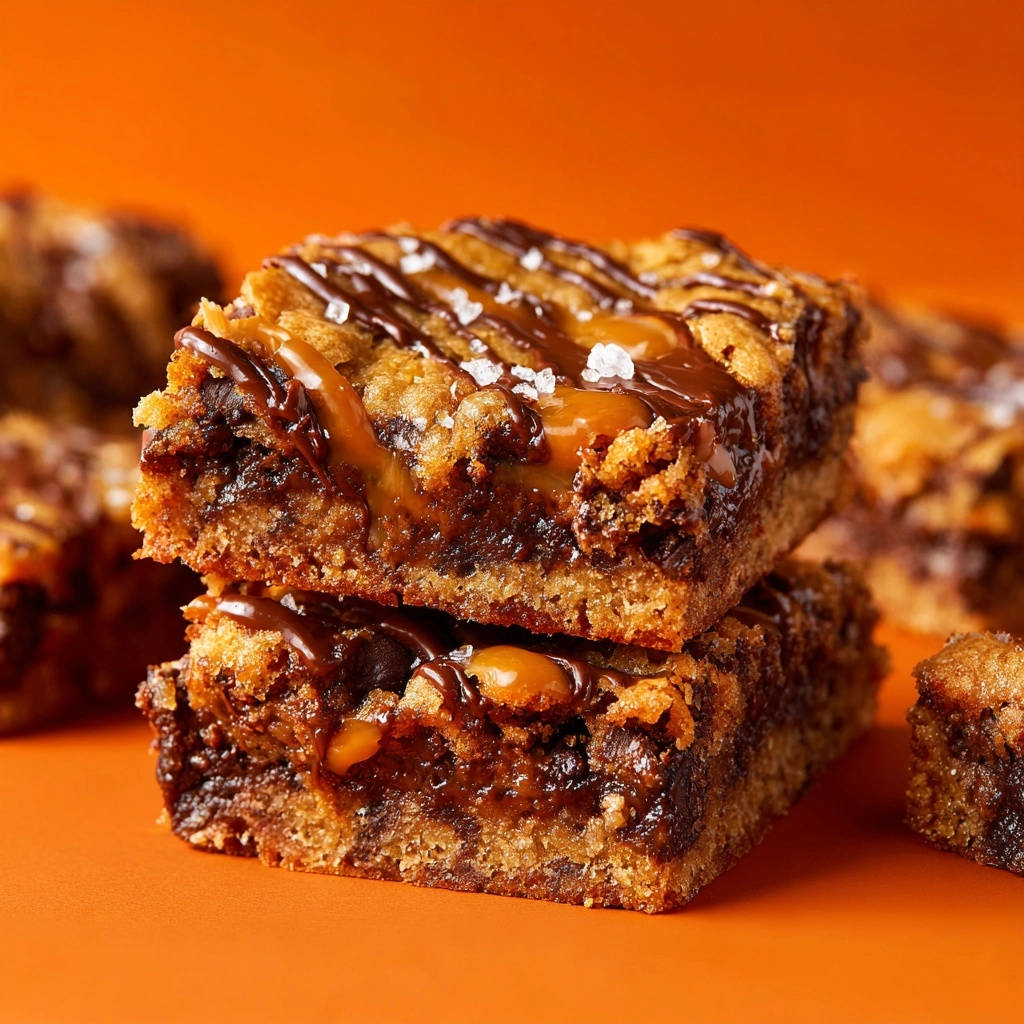
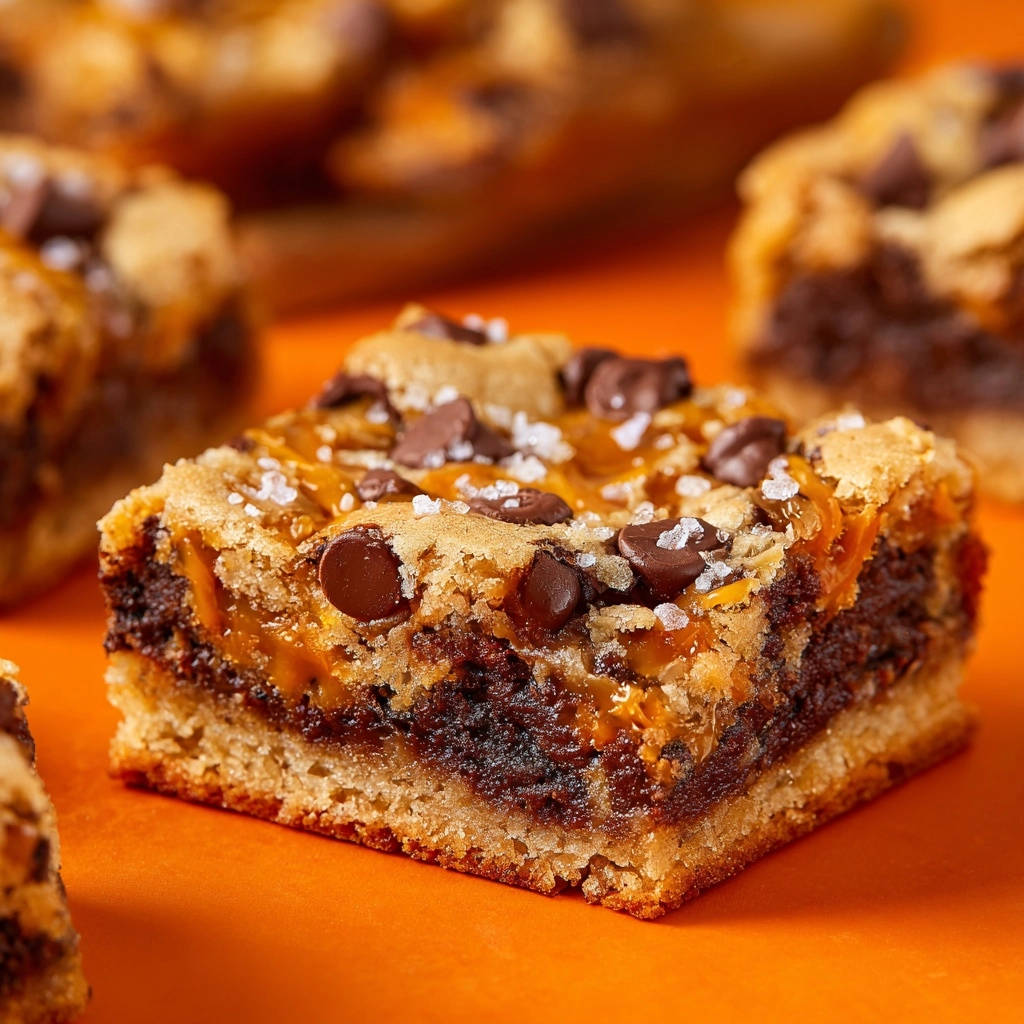
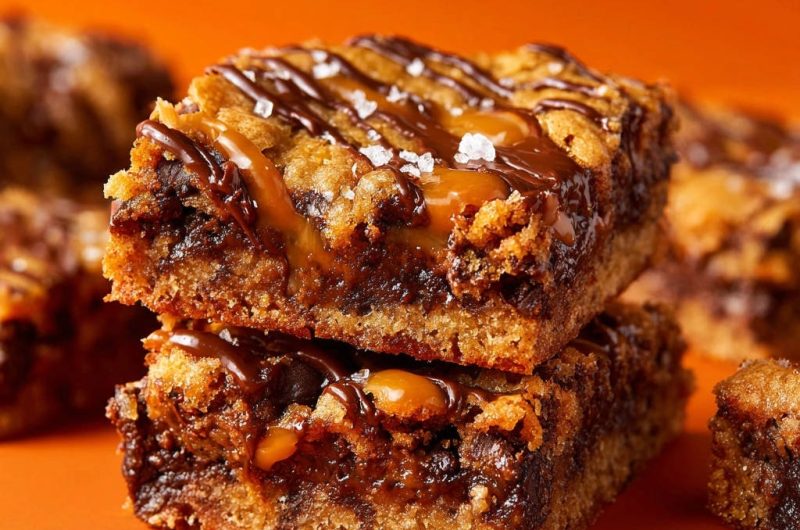
Once completely cooled, use the parchment paper overhang to lift the bars out of the pan. Drizzle generously with caramel sauce and then with melted semi-sweet chocolate. Finish by sprinkling with flaky sea salt before slicing into squares and serving.
The final drizzling and sea salt are what truly elevate these to Salted Caramel Chocolate Chip Cookie Bars perfection, adding visual appeal and a burst of contrasting flavor.
More Sweet Treats
Since you’re enjoying these Salted Caramel Chocolate Chip Cookie Bars, here are a couple more ideas for your sweet tooth.
- For crunchy, sweet, and salty goodness, try these Chocolate Peanut Caramel Corn Clusters, which share that great caramel flavor.
- If you love chewy bar cookies, you’ll appreciate these Chewy Chocolate Chip Oatmeal Bars for their satisfying texture.
Unlock the Secrets: Expert Tips for Flawless Salted Caramel Chocolate Chip Cookie Bars
Mastering these simple tips will ensure your cookie bars are consistently phenomenal, delivering that sought-after texture and flavor.
Achieving That Tender Crumb: Don’t Overmix! Overmixing develops gluten in the flour, which can lead to tough, cake-like bars instead of the desired chewy, tender texture. Stop mixing as soon as the dry ingredients are just incorporated.
The Ultimate Gooey Secret: The “Underbaked” Center. Trust the process! Removing the bars from the oven when the center still looks slightly soft and almost underbaked is key. They will continue to set as they cool, resulting in that perfectly gooey, never-dry interior that makes these Salted Caramel Chocolate Chip Cookie Bars so special.
Patient Cooling for Perfect Slices. It’s tempting to cut into them warm, but resist! Allowing the bars to cool completely in the pan for at least 1-2 hours is essential for them to set properly. This ensures clean, defined slices and prevents them from falling apart.
Elevating Flavor: The Power of Flaky Sea Salt. Don’t skip the flaky sea salt! A generous sprinkle after drizzling the caramel and chocolate provides a crucial counterpoint to the sweetness, enhancing all the flavors and adding a delightful textural crunch to your Salted Caramel Chocolate Chip Cookie Bars.
Soften Your Butter Properly. Ensure your butter is truly softened (room temperature, but not melted) for optimal creaming. This leads to a smoother, fluffier base for your cookie bars, contributing to their amazing texture.
Beyond the Bar: Creative Ways to Enjoy and Adapt Your Treat
Once you’ve mastered the basic recipe, feel free to get creative with how you serve and adapt these incredible cookie bars.
Irresistible Serving Ideas
These bars are fantastic on their own, but pairing them with a scoop of vanilla bean ice cream takes them to another level. The cold, creamy ice cream is a perfect contrast to the rich, gooey bars.
They also make an excellent addition to any dessert platter or a delightful accompaniment to a cup of coffee or tea. Consider warming them slightly before serving for an extra melty, gooey experience.
Flavor Swaps and Ingredient Innovations
Experiment with different types of chocolate chips – milk chocolate for extra sweetness, dark chocolate for a richer intensity, or even white chocolate for a creamy twist. You could also mix in chopped nuts like pecans or walnuts for added crunch and flavor, similar to what you’d find in classic caramel nut squares.
A hint of cinnamon or espresso powder in the dough can deepen the flavors, while a different extract like almond or even a touch of orange zest could add an unexpected twist to these gooey cookie bars.
Making It Dietary Friendly (Gluten-Free, Dairy-Free Options)
For a gluten-free version, simply substitute the all-purpose flour with a 1:1 gluten-free baking blend that contains xanthan gum. Ensure all other ingredients, like chocolate chips, are certified gluten-free.
To make them dairy-free, use a high-quality plant-based butter alternative and dairy-free chocolate chips. Many caramel sauces are already dairy-free, but always check labels.
Plan Ahead: Storing Your Cookie Bars and Enjoying Them Later
Proper storage ensures your delicious Salted Caramel Chocolate Chip Cookie Bars remain fresh and enjoyable for as long as possible.
Keeping Your Bars Fresh: Short-Term Storage
Store your cooled and sliced cookie bars in an airtight container at room temperature for up to 3-4 days. For optimal freshness and to prevent them from drying out, you can also refrigerate them.
If refrigerated, allow them to come to room temperature or warm them gently in the microwave for a few seconds before serving to restore their gooey texture.
Freezing for Future Indulgence
These bars freeze beautifully! Once completely cooled and sliced, arrange them in a single layer on a baking sheet and freeze until firm (about 1-2 hours). Then, transfer the frozen bars to a freezer-safe airtight container or bag, separating layers with parchment paper.
They can be stored in the freezer for up to 2-3 months. Thaw individual bars at room temperature for about 30 minutes, or warm briefly in the microwave for an instant warm treat.
Prepping Components for Easy Assembly
While the dough is best made fresh, you can melt the chocolate and have the caramel sauce ready for drizzling when the bars are completely cool. This minimizes last-minute fuss, making assembly a breeze.
Common Challenges Solved: Ensuring Your Cookie Bars are Always Perfect
Baking can sometimes present unexpected hurdles, but these solutions will help you troubleshoot and achieve perfect results every time.
Why Are My Salted Caramel Chocolate Chip Cookie Bars Dry or Crumbly?
The most common culprit for dry bars is overbaking. Keep a close eye on them and remove them from the oven when the edges are just golden and the center still looks slightly soft. Another cause can be too much flour; ensure you’re measuring correctly, preferably by weight.
My Bars Spread Too Much!
If your bars spread excessively, it might be due to butter that was too warm or melted, or your oven temperature might be inconsistent. Ensure your butter is softened, not liquid, and consider investing in an oven thermometer to verify accuracy.
Getting That Caramel and Chocolate Just Right
For smooth drizzling, ensure your caramel sauce is warmed slightly (microwave for 10-15 seconds) to make it more fluid. For the melted chocolate, melt it gently in a microwave or double boiler until just smooth. Avoid overheating, which can make it seize. Using a piping bag or a spoon for drizzling gives a neat finish.
Your Top Questions Answered: Salted Caramel Chocolate Chip Cookie Bars Edition
Here are some frequently asked questions to help you master this delicious recipe.
Can I use different types of chocolate in these Salted Caramel Chocolate Chip Cookie Bars?
Absolutely! While semi-sweet is classic, you can easily substitute with milk chocolate, dark chocolate, or even a mix. White chocolate chips or butterscotch chips would also add a delightful variation to these homemade cookie treats.
Is it okay to use pre-made caramel sauce, or should I make my own?
High-quality store-bought caramel sauce works perfectly and is a great time-saver. If you’re feeling ambitious, a homemade caramel sauce can add an extra layer of richness and flavor, similar to the amazing results you can achieve with homemade orange caramel candy.
Can I double this Salted Caramel Chocolate Chip Cookie Bars recipe?
Yes, you can easily double the recipe! Use a 9×13 inch baking pan and increase the baking time slightly, typically by 5-10 minutes, keeping an eye on the edges and gooey center. Ensure even pressing of the dough for consistent results.
How long do these Salted Caramel Chocolate Chip Cookie Bars last?
When stored properly in an airtight container at room temperature, these cookie bars will stay fresh for 3-4 days. Refrigeration can extend their freshness for up to a week. For longer storage, refer to the freezing instructions above.
Ready to Bake Your Best Batch? Share Your Salted Caramel Chocolate Chip Cookie Bars!
Now that you have all the insider tips and a foolproof recipe, it’s time to create your own unforgettable batch of Salted Caramel Chocolate Chip Cookie Bars. This recipe promises not just a dessert, but an experience – a perfect blend of chewy, gooey, sweet, and salty that will delight every palate.
I encourage you to bake these irresistible treats and share the joy with your loved ones. Don’t forget to share your creations and tell me how they turned out!
Salted Caramel Chocolate Chip Cookie Bars
Course: DessertCuisine: AmericanDifficulty: easy12
servings15
minutes25
minutes350
kcal40
minutesTired of dry cookie bars? This recipe cracks the code to achieving a perfect chewy-gooey center every time. Rich, decadent, and perfectly moist, these Salted Caramel Chocolate Chip Cookie Bars are pure magic and guaranteed to impress. Everyone will be asking for your secret recipe.
Ingredients
1/2 cup (1 stick) unsalted butter, softened
3/4 cup packed light brown sugar
1/4 cup granulated sugar
1 large egg
1 teaspoon vanilla extract
1 1/2 cups all-purpose flour
1/2 teaspoon baking soda
1/4 teaspoon salt
1 cup semi-sweet chocolate chips
1/4 cup caramel sauce, for drizzling
2 ounces semi-sweet chocolate, melted, for drizzling
1/2 teaspoon flaky sea salt, for sprinkling
Directions
- Preheat your oven to 350 degrees Fahrenheit (175 degrees Celsius). Line an 8×8 inch baking pan with parchment paper, leaving an overhang on two sides to easily lift the bars out later. Lightly grease the parchment paper.
- In a large bowl, cream together the softened butter, brown sugar, and granulated sugar with an electric mixer until light and fluffy, about 2-3 minutes. This step is important for a tender crumb.
- Beat in the egg and vanilla extract until well combined and smooth, scraping down the sides of the bowl as needed.
- In a separate medium bowl, whisk together the all-purpose flour, baking soda, and salt.
- Gradually add the dry ingredients to the wet ingredients, mixing on low speed until just combined. Be careful not to overmix the dough, as overmixing can lead to a tougher, cakey texture. A few streaks of flour are okay.
- Fold in the chocolate chips evenly throughout the dough.
- Press the dough evenly into the prepared 8×8 inch baking pan.
- Bake for 25-30 minutes, or until the edges are golden brown and set, but the center still looks slightly soft and almost underbaked. This is the ultimate secret to achieving that wonderfully gooey, never-dry texture. The bars will continue to set as they cool. Do not overbake!
- Remove the pan from the oven and let the bars cool completely in the pan on a wire rack before attempting to lift them out. This can take at least 1-2 hours and is crucial for proper setting and clean slicing.
- Once cooled, use the parchment paper overhang to lift the bars out of the pan. Drizzle generously with caramel sauce and then with melted chocolate. Sprinkle with flaky sea salt before slicing into squares and serving.
Notes
- Do not overbake; the center should look slightly soft for a gooey texture. Cool completely for 1-2 hours before slicing to allow for proper setting.


