
Ever baked what you hoped would be beautiful cookies, only to find them spread into sad, flat disks, or emerge from the oven hard as rocks? I’ve been there, too. But after countless tests, I cracked the code for Chewy Strawberry Crumb Cookies that are consistently plump, delightfully soft, and packed with flavor every single time.
This recipe isn’t just about mixing ingredients; it’s about a few simple, often overlooked techniques that guarantee bakery-style results right in your own kitchen. You’re about to discover the secrets to a truly irresistible strawberry treat, perfect for any occasion or just a cozy afternoon delight.
Why These Chewy Strawberry Crumb Cookies Are a Must-Bake
The “Never-Flat, Always-Chewy” Secret Unveiled
The biggest challenge in cookie baking is often preventing excessive spread. Our secret for these strawberry crumb cookies lies in a strategic chilling step. This technique solidifies the butter, ensuring your cookies hold their shape beautifully in the oven.
For those who appreciate a perfectly crisp edge, explore classic cinnamon snickerdoodles next.
The result? Cookies that are wonderfully thick, delightfully plump, and possess that signature chewy texture everyone craves, never thin or brittle.
Bakery-Style Bliss, Homemade Effort
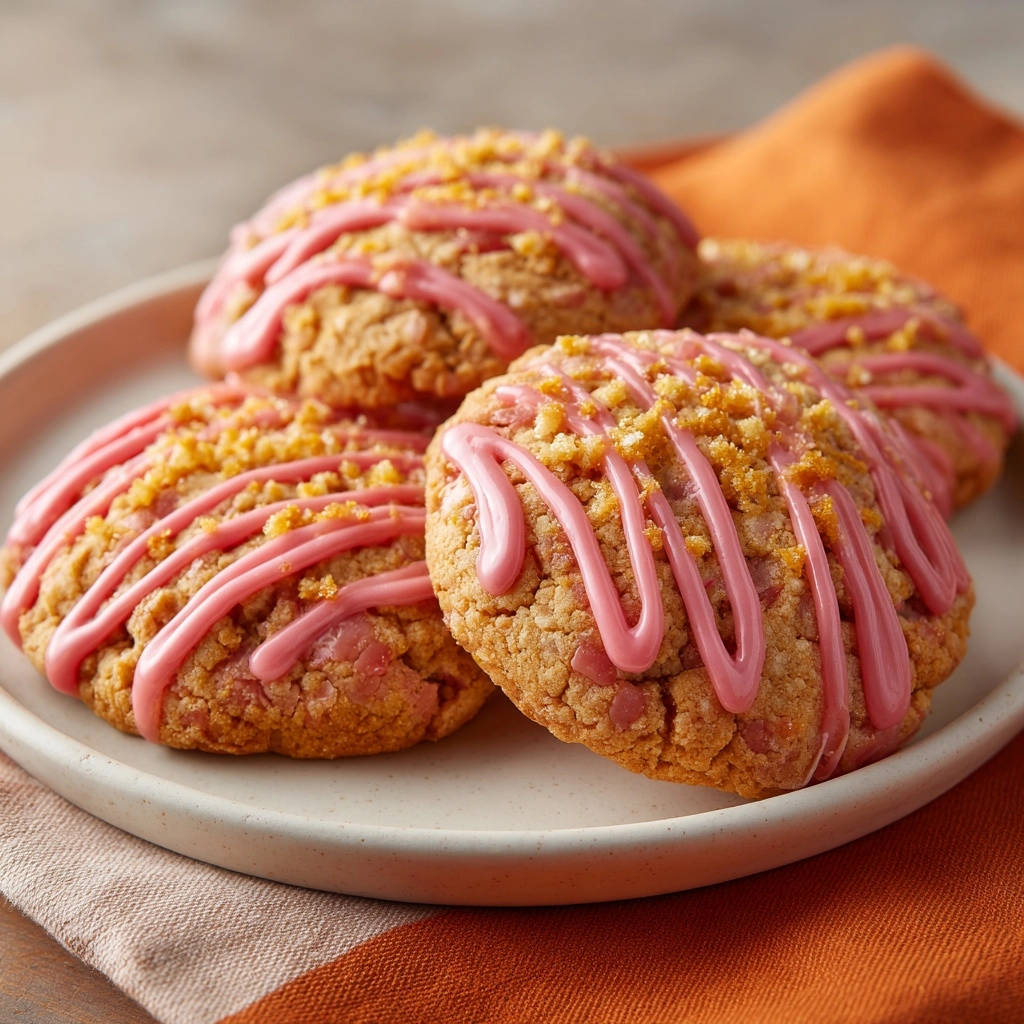
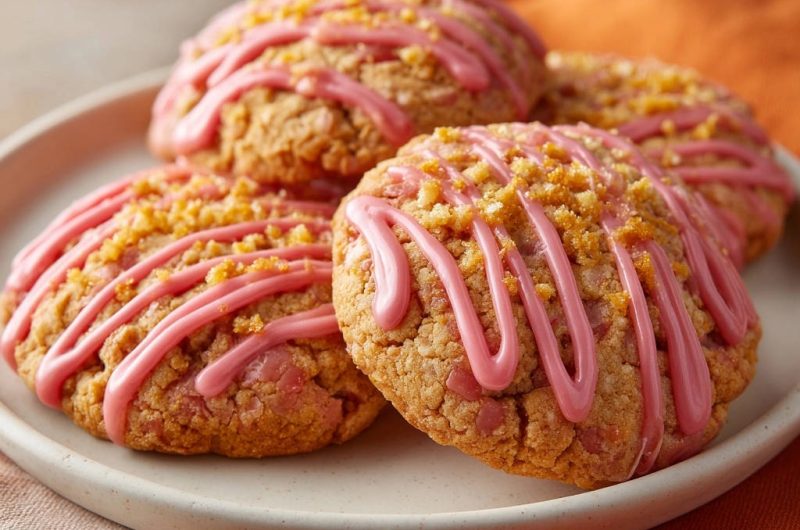
Imagine the cookies you’d pick up from a gourmet bakery – soft, flavorful, and perfectly finished. This recipe delivers exactly that experience, but with the satisfaction of baking them yourself. The combination of the rich cookie base, sweet crumb topping, and a delicate strawberry glaze creates a harmonious flavor profile.
You’ll achieve professional-looking and tasting cookies without needing specialized equipment or advanced baking skills.

Simple Steps, Stunning Results
Despite their impressive appearance and complex flavors, these Chewy Strawberry Crumb Cookies are surprisingly straightforward to make. Each step is clearly defined, with “why” explanations to help you understand the process.
Even if you’re a novice baker, you’ll find this cookie recipe approachable and incredibly rewarding, leading to stunning results that will impress everyone.
Equipping Your Kitchen for Cookie Success
Basic Baking Essentials
Before you begin, gather your standard baking tools. Having everything ready streamlines the process and ensures a smooth baking experience.
Mixing Bowls: You’ll need at least two – one for dry ingredients and a larger one for creaming butter and sugar.
Measuring Cups and Spoons: Accurate measurements are crucial for consistent cookie texture.
Electric Mixer: A hand mixer or stand mixer is highly recommended for properly creaming butter and sugar, which is key for a light texture.
Spatula or Wooden Spoon: For scraping down the sides of the bowl and gently incorporating ingredients.
Specialty Items for the Crumb Topping & Glaze
A few additional items will make preparing the crumb topping and glaze effortless, contributing to the final presentation.
Parchment Paper: Lining your baking sheets prevents sticking and ensures even baking, making cleanup a breeze.
Wire Rack: Essential for cooling cookies completely, preventing them from becoming soggy on the bottom.
Whisk: A small whisk is perfect for blending the glaze ingredients into a smooth, drizzleable consistency.
The Heart of the Cookie: Key Ingredients Explained
Understanding the role of each ingredient will elevate your baking from simply following instructions to truly mastering the craft. Quality ingredients make a noticeable difference in the final taste and texture of your Chewy Strawberry Crumb Cookies.
For the Irresistible Cookie Base
All-Purpose Flour: Provides the structure for our cookies. Measure it correctly by spooning it into the measuring cup and leveling it off.
Baking Soda & Salt: Baking soda helps the cookies spread and rise slightly, while salt balances the sweetness and enhances flavor.
Unsalted Butter, Softened: Crucial for creaming with sugars, creating air pockets that contribute to a light, chewy texture. Ensure it’s at room temperature.
Granulated Sugar & Light Brown Sugar: The combination provides a balanced sweetness and contributes to the chewiness. Brown sugar also adds moisture and a hint of molasses flavor.
Large Eggs: Act as binders, adding moisture and richness to the cookie dough. Make sure they are at room temperature for better emulsion.
Vanilla Extract: A universal flavor enhancer, vanilla brings out the best in the strawberry and buttery notes.
Strawberry Baking Chips or Chopped Freeze-Dried Strawberries: These deliver concentrated strawberry flavor without adding excess moisture that fresh fruit would. Baking chips melt nicely, while freeze-dried berries offer a more intense, natural strawberry burst.
For similar rich fruit flavors, explore these molten raspberry chocolate lava cookies.
Crafting the Perfect Crumb Topping
All-Purpose Flour, Granulated Sugar, & Light Brown Sugar: These form the base of the crumble, providing structure and sweetness.
Unsalted Butter, Melted: Binds the dry crumb ingredients together, creating those delicious, moist clusters that define a crumb topping. Using melted butter ensures easy mixing and the right crumb consistency.
The Dazzling Glaze Elements
Powdered Sugar: The base for the glaze, dissolving smoothly to create a fine, sweet finish.
Milk or Water: Used to achieve the ideal drizzleable consistency. Milk adds a touch of creaminess, while water keeps it dairy-free.
Strawberry Extract or Red Food Coloring: Strawberry extract boosts the flavor theme, while food coloring provides that appealing pink hue. You can use one or both.
Your Step-by-Step Journey to Strawberry Crumb Cookie Perfection
Follow these steps carefully, paying attention to the tips, and you’ll achieve the perfect batch of Chewy Strawberry Crumb Cookies.
Phase 1: Building the Chewy Cookie Dough
Begin by whisking together the flour, baking soda, and salt in a medium bowl. This ensures these dry ingredients are evenly distributed for consistent leavening and seasoning throughout your cookies.
In a separate, larger bowl, use an electric mixer to cream the softened butter with both granulated and light brown sugars. Beat this mixture for 2-3 minutes until it’s noticeably light and fluffy. This aeration process is vital; it incorporates air, which contributes significantly to the final cookie’s chewy texture and helps prevent denseness.
Next, beat in the eggs one at a time, allowing each to fully incorporate before adding the next. This creates a stable emulsion. Stir in the vanilla extract until just combined. Gradually add the whisked dry ingredients to the wet mixture, mixing on low speed only until no streaks of flour remain. Be cautious not to overmix the dough, as developing the gluten too much will lead to tough, hard cookies instead of the desired chewy result.
Finally, gently fold in your strawberry baking chips or chopped freeze-dried strawberries. Distribute them evenly throughout the dough for bursts of strawberry flavor in every bite.
Phase 2: The Essential Dough Chill (Don’t Skip This!)
This is arguably the most crucial step for achieving perfectly plump, chewy cookies that never spread excessively. Cover your cookie dough bowl tightly with plastic wrap and refrigerate it for at least 30 minutes, and up to 2 hours.
Chilling the dough accomplishes two key things: it solidifies the butter, which helps the cookies hold their shape and prevents them from melting too quickly in the oven. Additionally, it allows the flour to fully hydrate, resulting in a more uniform and tender texture. Skipping this step often leads to thin, flat, and less flavorful cookies.
For even more robust flavor and chew, an overnight chill (up to 24 hours) can deepen the taste and texture beautifully.
Phase 3: Crumb Topping Creation
While your cookie dough is chilling, you can prepare the delicious crumb topping. In a small bowl, combine the flour, granulated sugar, and light brown sugar. Pour in the melted butter and use a fork to mix everything together.
Continue stirring until moist crumbs form. The mixture should resemble coarse sand with some larger clumps. Set this aside, ready to adorn your cookie dough balls.
Phase 4: Shaping, Baking, and Cooling
Preheat your oven to 375 degrees Fahrenheit (190°C) and line your baking sheets with parchment paper. Parchment paper ensures easy release and prevents over-browning on the bottom.
Scoop rounded tablespoons of the chilled cookie dough and roll them into neat balls. Place them about 2 inches apart on the prepared baking sheets to allow for proper air circulation and expansion. Generously sprinkle the prepared crumb topping over the top of each cookie dough ball, gently pressing it down slightly to help it adhere.
Bake for 10-12 minutes, or until the edges are lightly golden and the centers appear just set but still look slightly soft. Remember that cookies continue to cook for a few minutes on the hot baking sheet after they are removed from the oven. For a truly chewy cookie, it’s better to slightly underbake than overbake. Overbaking leads to hard, dry cookies.
Allow the baked cookies to cool on the baking sheets for 5 minutes before carefully transferring them to a wire rack. This initial cooling period allows them to firm up without breaking, and the wire rack ensures air circulation for complete cooling.
Phase 5: The Finishing Glaze Flourish
Once your Chewy Strawberry Crumb Cookies are completely cool, it’s time for the final touch. In a small bowl, whisk together the powdered sugar, milk or water, and strawberry extract or a few drops of red food coloring.
Mix until the glaze is smooth and drizzleable. If it’s too thick to drizzle, add a tiny bit more liquid (a teaspoon at a time). If it’s too thin, whisk in a tablespoon more powdered sugar until you reach the perfect consistency. Drizzle the pink glaze over the cooled cookies in a zigzag pattern for a beautiful and delicious finish. Let the glaze set for a few minutes before serving to avoid smudging.
Chef’s Secrets for Flawless Chewy Strawberry Crumb Cookies
Beyond the basic steps, these professional tips will elevate your baking and ensure your strawberry treats are always a hit.
More Sweet Ideas
Round out your sweet creations with these complementary baked goods.
- For a breakfast treat that mirrors the warm spice of the cookies, consider these warm cinnamon swirl coffee cake.
- If you enjoy fruit-filled pastries, you might like to try making these cinnamon sugar jam-filled waffles.
The Golden Rule of Mixing: Avoid Tough Cookies
Once you add the flour, mix only until the ingredients are just combined. Overmixing develops the gluten in the flour, which leads to a dense, tough cookie. Stop mixing as soon as you no longer see dry streaks of flour.
Mastering the Bake: Don’t Overcook for Chewy Perfection
The visual cue for doneness is key: look for lightly golden edges and centers that still appear slightly soft. The residual heat from the baking sheet will continue to cook the cookies after they’re removed from the oven.
Pulling them out at this stage guarantees that desired chewy, soft center, avoiding a dry or crumbly texture. An extra minute can make all the difference between perfect and overbaked.
Ingredient Spotlight: Maximizing Strawberry Flavor
Strawberry baking chips melt into pockets of sweet strawberry goodness, offering a milder, sweeter flavor. Freeze-dried strawberries, on the other hand, provide a more intense, natural strawberry punch and a slightly chewy texture when rehydrated by the cookie dough.
Feel free to use a mix of both for a multi-layered strawberry experience. For other berry-inspired delights, you might enjoy these creamy berry crumble cheesecake bars.
The Art of Glazing: Achieving That Perfect Drizzle
For a beautifully uniform glaze, ensure your cookies are completely cool before drizzling. Warm cookies will cause the glaze to melt and soak in rather than set on top.
Use a spoon or a whisk to drizzle the glaze. A consistent, slow motion will create neat lines. For a more controlled application, you can transfer the glaze to a small piping bag or a ziptop bag with a tiny corner snipped off.
Solving Common Cookie Conundrums
Even experienced bakers face challenges. Here’s how to troubleshoot common issues when making your homemade cookies.
Why Are My Cookies Spreading Too Much?
Excessive spreading is typically due to warm butter, warm dough, or incorrect measurements. Ensure your butter is softened but still cool to the touch, not melted or greasy. The chilling step is paramount: don’t shorten it.
Also, accurately measure your flour; too little flour means less structure and more spread. Lastly, check your oven temperature with an oven thermometer to ensure it’s not running low.
My Cookies Are Hard and Dry – What Went Wrong?
This is almost always a sign of overbaking or overmixing. Remember to pull the cookies from the oven when the centers still look slightly soft.
Mixing the dough too long after adding the flour can develop gluten, leading to a tough, dry texture. Mix just until combined.
Glaze Too Thin or Too Thick?
Adjusting glaze consistency is simple. If it’s too thin and runny, whisk in powdered sugar, one tablespoon at a time, until it reaches your desired thickness. If it’s too thick, add milk or water, one teaspoon at a time, until it’s smooth and drizzleable. Consistency is key for that perfect finish on your dessert recipe.
Your Most Asked Chewy Strawberry Crumb Cookie Questions
Can I Use Fresh Strawberries in This Recipe?
While tempting, fresh strawberries are generally not recommended for these particular cookies. They contain too much moisture, which can lead to a soggy cookie texture and prevent proper spreading and baking. Stick to baking chips or freeze-dried strawberries for the best results.
How Do I Store These Cookies?
Store these strawberry treats in an airtight container at room temperature for up to 3-4 days. Placing a slice of plain bread in the container can help keep them soft, as the cookies will absorb moisture from the bread.
Can I Make the Dough Ahead of Time?
Absolutely! The dough can be prepared up to 2-3 days in advance and stored tightly covered in the refrigerator. This can actually enhance the flavors as the ingredients meld together over time. For more make-ahead sweet treats, consider trying classic apple crumble bars.
Can I Freeze Strawberry Crumb Cookies?
Yes, both the baked cookies and the raw dough can be frozen. To freeze baked cookies, allow them to cool completely, then place them in a single layer on a baking sheet to flash freeze for an hour. Once solid, transfer them to a freezer-safe bag or container for up to 2-3 months. Thaw at room temperature.
To freeze raw dough, scoop individual balls onto a parchment-lined baking sheet and flash freeze. Transfer the frozen dough balls to a freezer-safe bag. When ready to bake, place frozen dough on a baking sheet and bake for a few extra minutes (approximately 14-16 minutes) without thawing.
Are There Any Gluten-Free or Dairy-Free Substitutions?
For gluten-free, you can try a 1:1 gluten-free all-purpose flour blend, ensuring it contains xanthan gum. The texture might be slightly different. For dairy-free, use a high-quality plant-based butter alternative and plant-based milk for the glaze. Be aware that these substitutions can alter the final texture and taste of the cookie.
Serving Suggestions & Sharing Your Delicious Creation
Perfect Pairings for Your Strawberry Crumb Cookies
These Chewy Strawberry Crumb Cookies are delightful on their own, but they also pair beautifully with simple accompaniments. A tall glass of cold milk is a classic choice, perfect for dipping.
For a warm beverage, a cup of coffee or herbal tea complements the sweet fruit flavors. For an indulgent dessert, serve them warm with a scoop of vanilla bean ice cream, allowing the cookie’s warmth to slightly melt the ice cream for a heavenly combination.
Optimal Storage for Freshness
To maintain their chewiness and fresh flavor, always store your baked cookies in an airtight container. This prevents them from drying out and becoming stale. Keep them at room temperature, away from direct sunlight or heat sources.
Gifting Your Homemade Delights
These beautiful cookies make wonderful homemade gifts. Arrange them in a decorative box or tin, perhaps with a pretty ribbon. They’re perfect for holiday baskets, hostess gifts, or as a thoughtful gesture for friends and family.
Ready to Bake Your Best Batch Yet?
Now that you’re armed with all the knowledge, tips, and secrets, you’re ready to create the most incredible Chewy Strawberry Crumb Cookies. Say goodbye to flat, hard cookies and hello to perfectly plump, delightfully chewy, and utterly delicious homemade goodness.
Don’t wait another moment to experience the joy of baking and sharing these fantastic cookie recipe results. Dive in, get baking, and savor every last bite!
Strawberry Crumb Cookies
Course: DessertCuisine: AmericanDifficulty: easy24
cookies20
minutes12
minutes240
kcal32
minutesEver baked a batch of cookies only to have them spread into sad, flat disks, or come out hard as rocks? This recipe reveals the secret to perfectly plump and deliciously soft cookies every single time. Get ready for bakery-style chewy strawberry crumb cookies right in your own kitchen, complete with a delightful crumb topping and glaze.
Ingredients
For the Cookies:
2 and 1/4 cups all-purpose flour
1 teaspoon baking soda
1/2 teaspoon salt
1 cup (2 sticks) unsalted butter, softened
3/4 cup granulated sugar
3/4 cup packed light brown sugar
2 large eggs
1 teaspoon vanilla extract
1 cup strawberry baking chips or chopped freeze dried strawberries
For the Crumb Topping:
1/2 cup all-purpose flour
1/4 cup granulated sugar
1/4 cup packed light brown sugar
1/4 cup (1/2 stick) unsalted butter, melted
For the Glaze:
1 cup powdered sugar
2 tablespoons milk or water
1/4 teaspoon strawberry extract or a few drops of red food coloring
Directions
- Prepare the Cookie Dough: In a medium bowl, whisk together the flour, baking soda, and salt. Set aside. In a large bowl, using an electric mixer, cream together the softened butter, granulated sugar, and light brown sugar until light and fluffy, about 2-3 minutes. This aeration is important for texture. Beat in the eggs one at a time, then stir in the vanilla extract. Gradually add the dry ingredients to the wet ingredients, mixing on low speed just until combined. Be careful not to overmix, as this can lead to tough cookies. Stir in the strawberry baking chips or chopped freeze dried strawberries.
- Chill the Dough (Crucial Step!): This is the secret to preventing flat, hard cookies. Cover the cookie dough bowl tightly with plastic wrap and refrigerate for at least 30 minutes, or up to 2 hours. Chilling the dough solidifies the butter, which helps the cookies hold their shape and prevents them from spreading too much in the oven. This ensures a thick, chewy result.
- Prepare the Crumb Topping: While the dough chills, prepare the crumb topping. In a small bowl, combine the flour, granulated sugar, and light brown sugar. Pour in the melted butter and stir with a fork until moist crumbs form. Set aside.
- Preheat Oven and Prepare Baking Sheets: Preheat your oven to 375 degrees Fahrenheit. Line baking sheets with parchment paper.
- Form and Bake Cookies: Scoop rounded tablespoons of chilled cookie dough and roll them into balls. Place them about 2 inches apart on the prepared baking sheets. Sprinkle the crumb topping generously over the top of each cookie, gently pressing it down slightly to adhere. Bake for 10-12 minutes, or until the edges are lightly golden and the centers are just set but still look slightly soft. Remember, cookies continue to cook a bit on the hot baking sheet after they come out of the oven, so avoid overbaking if you want them chewy and not hard.
- Cool Cookies: Let the cookies cool on the baking sheets for 5 minutes before transferring them to a wire rack to cool completely.
- Make the Glaze: In a small bowl, whisk together the powdered sugar, milk or water, and strawberry extract or food coloring until smooth and drizzleable. If it’s too thick, add a tiny bit more milk or water; if too thin, add more powdered sugar.
- Decorate and Serve: Once the cookies are completely cool, drizzle the pink glaze over them in a zigzag pattern. Let the glaze set for a few minutes before serving. Enjoy your perfectly chewy, never-flat cookies!
Notes
- Chilling the dough is crucial for preventing flat, hard cookies and ensuring a thick, chewy result.


