

Have you ever been disappointed by a dry, crumbly slice of red velvet cake that promised so much but delivered so little? I know the feeling, and it’s why I’ve perfected this exceptional Red Velvet Cheesecake Layer Cake, designed to banish dryness forever.
This recipe isn’t just a cake; it’s a show-stopping experience, bringing together rich chocolate, creamy cheesecake, and that iconic, velvety red velvet crumb.
If you appreciate the rich chocolate here, you’ll also enjoy the chocolate caramel cheesecake bars.
Get ready to create a dessert masterpiece that will leave everyone asking for your secret to its incredible moisture and balanced flavors.
Why This Red Velvet Cheesecake Layer Cake is Truly Unforgettable
The Secret to Unrivaled Moisture and Tenderness
Forget dry, crumbly cake. Our recipe uses a careful balance of buttermilk, vegetable oil, and a crucial touch of white vinegar in the red velvet layer.
These ingredients work together to create a delicate, velvety crumb that remains incredibly moist, ensuring every bite is pure pleasure.
A Tri-Layered Marvel: Chocolate, Cheesecake, and Red Velvet Harmony
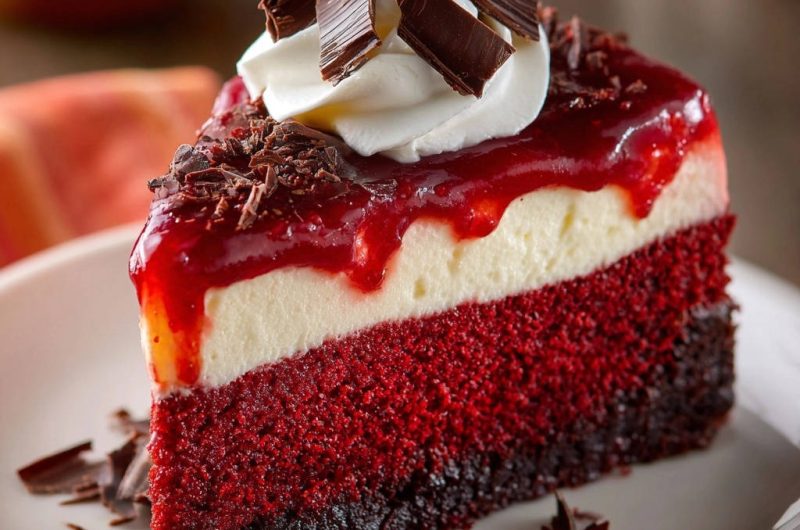
This isn’t just one cake; it’s three distinct, harmonious layers. A rich dark chocolate base provides a deep, satisfying counterpoint.
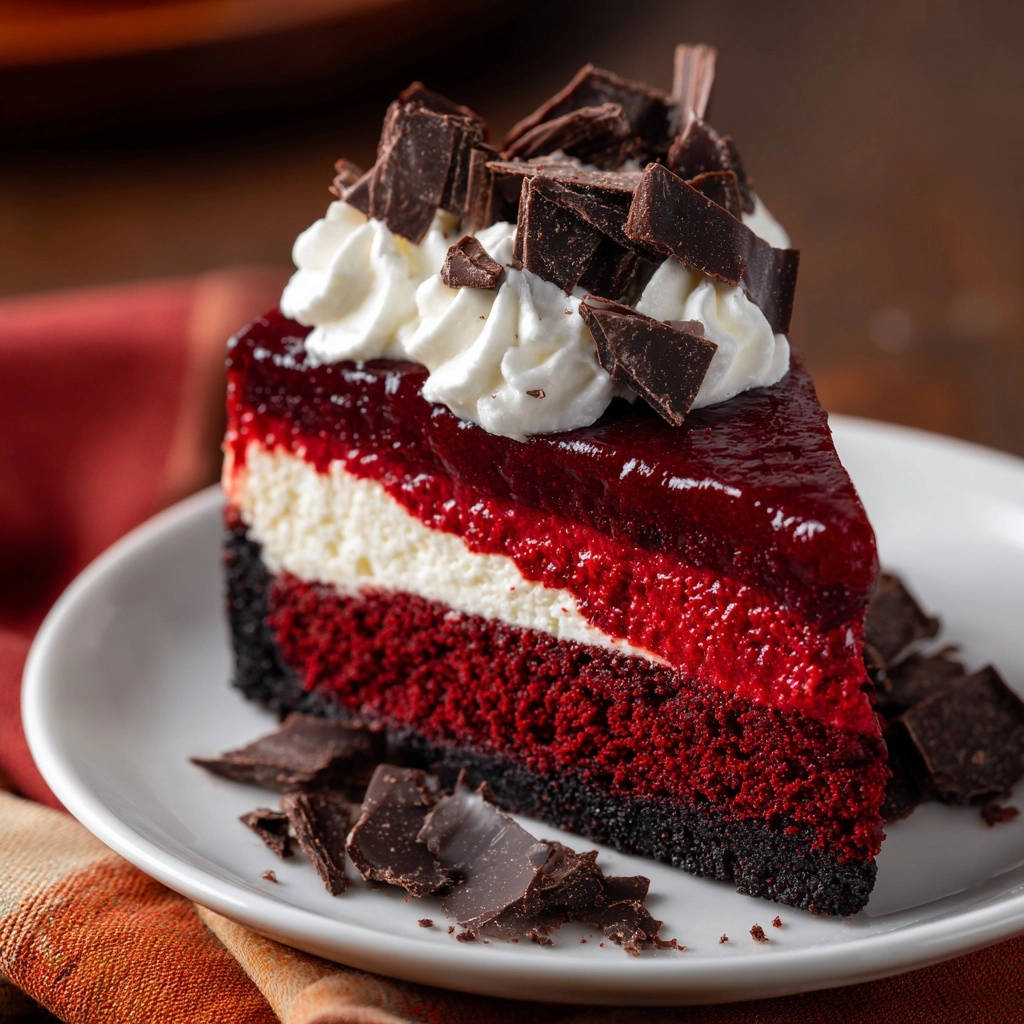
Nestled above is a creamy, tangy cheesecake, perfectly balanced with the iconic, tender red velvet on top.
Each forkful offers a delightful interplay of textures and flavors, making it a truly unique layered dessert.
Impress Your Guests: A Show-Stopping Dessert for Any Occasion
Visually stunning with its vibrant red layers, creamy white frosting, and fresh fruit topping, this cake is a guaranteed showstopper.
It’s perfect for birthdays, holidays, or any gathering where you want to impress and delight with a homemade cheesecake that looks professionally made.
Your Timeline to Deliciousness: Prep, Bake, and Chill
Prep Time: 45 minutes of active preparation, focusing on mixing the distinct batters.
Cook Time: 50 minutes for the layered cake to bake to perfection.
Total Time: Approximately 2 hours 35 minutes, plus a critical minimum of 4 hours (preferably overnight) for chilling, which is essential for setting and flavor development.
Servings: This impressive cake generously serves 12.
Gather Your Gourmet Ingredients: Crafting Each Distinct Layer
For the Dark Chocolate Cake Base: The Rich Foundation
Unsalted butter, softened: Provides richness and ensures a tender, melt-in-your-mouth texture.
Granulated sugar: Adds sweetness and helps create a moist crumb.
Large eggs: Act as a binder, contributing structure and richness to the base.
Unsweetened cocoa powder: Delivers deep, intense chocolate flavor, essential for the base.
All-purpose flour: Forms the cake’s structure; ensure it’s accurately measured.
Vanilla extract: Enhances the overall chocolate flavor with a warm, aromatic note.
Salt: Balances the sweetness and amplifies the chocolate’s depth.
For the Velvety Red Velvet Layer: The Iconic Centerpiece
All-purpose flour: The primary structural component for that classic red velvet texture.
Granulated sugar: Sweetens and helps keep the cake moist.
Baking soda: Reacts with acidic ingredients like buttermilk and vinegar for lift and tenderness.
Unsweetened cocoa powder: Just a touch provides the subtle chocolate undertone and reacts with the red color.
Salt: Essential for balancing flavors in the red velvet dessert.
Buttermilk: Key for tenderness and moisture, its acidity reacts with baking soda for a fluffy result.
Vegetable oil: Contributes to an incredibly moist crumb, unlike butter which can dry out a cake.
Large eggs: Bind the batter and add richness to this layered cake.
Red food coloring: Essential for that vibrant, classic red velvet hue.
Vanilla extract: Adds aromatic depth to the iconic red velvet flavor.
White vinegar: Reacts with baking soda and buttermilk, tenderizing the crumb and enhancing the red color.
For the Creamy Cheesecake Core: The Tangy Delight
Cream cheese, softened: The star ingredient, ensuring a smooth, rich, and tangy homemade cheesecake texture.
Granulated sugar: Sweetens the cheesecake, balancing its tang.
Large eggs: Provide structure and richness to the creamy cheesecake filling.
Sour cream: Adds an extra layer of tang and contributes to the cheesecake’s silky smooth consistency.
For another take on creamy goodness, explore the caramel pecan cheesecake.
Vanilla extract: Aromatic and complements the creamy flavors beautifully.
For the Vibrant Red Fruit Topping: A Burst of Freshness
Frozen mixed berries: Offer a sweet-tart contrast and a beautiful jewel-toned finish.
Granulated sugar: Sweetens the berries, balancing their natural tartness.
Cornstarch: Acts as a thickening agent, creating a glossy, spoonable sauce.
Water: Used to dissolve the cornstarch and thin the berry mixture slightly for optimal texture.
For the Dreamy Whipped Cream & Elegant Garnish: The Finishing Touches
Heavy cream, cold: Whips up into a light, airy, and stable topping.
Powdered sugar: Sweetens the cream and helps stabilize it for piping.
Vanilla extract: Infuses the whipped cream with classic aromatic sweetness.
Dark chocolate bar, for shavings: Adds a sophisticated touch and a hint of extra chocolate flavor to the show-stopping cake.
Essential Tools for a Seamless Baking Experience
9-inch Springform Pan: Crucial for assembling and easily releasing the layered cake.
Electric Mixer (Stand or Handheld): Speeds up creaming butter, beating cream cheese, and whipping cream.
Large Mixing Bowls: For keeping separate batters and mixtures organized.
Wire Cooling Rack: Essential for proper air circulation to prevent a soggy bottom.
Small Saucepan: For preparing the fruit topping.
Vegetable Peeler: To create elegant chocolate shavings for garnish.
Your Step-by-Step Journey to Red Velvet Cheesecake Layer Cake Perfection
Crafting the Decadent Dark Chocolate Base
Start by preheating your oven to 350°F (175°C), then thoroughly grease and flour a 9-inch springform pan. This vital step prevents sticking and ensures an easy release later.
In a large bowl, cream the softened unsalted butter and granulated sugar with an electric mixer until light and fluffy – aim for about 2-3 minutes of beating.
Beat in the eggs one at a time, ensuring each is fully incorporated before adding the next. This helps create an even emulsion.
Finally, stir in the cocoa powder, flour, vanilla extract, and salt just until combined. Avoid overmixing, as this can develop gluten and lead to a tougher cake.
Press the batter evenly into the bottom of your prepared springform pan. Bake for 15 minutes to set the base, then remove it from the oven to cool slightly while you prepare the cheesecake layer.
Crucially, reduce your oven temperature to 325°F (160°C) immediately after removing the chocolate base, as the cheesecake layer bakes at a lower heat.
Layering in the Smooth & Tangy Cheesecake
In a separate large bowl, beat the softened cream cheese and granulated sugar together until the mixture is completely smooth and free of lumps. This can take a few minutes with an electric mixer.
Add the eggs one at a time, mixing only until just combined after each addition. Overmixing eggs can incorporate too much air, leading to cracks in your cheesecake.
Gently stir in the sour cream and vanilla extract until barely incorporated. The goal is a uniform, creamy consistency without excess air.
Carefully pour this luscious cheesecake batter evenly over the partially baked chocolate cake base in your springform pan, gently smoothing the top with an offset spatula.
The “Moisture Secret” Revealed: Preparing the Red Velvet Batter
In a large bowl, whisk together the dry ingredients: flour, granulated sugar, baking soda, cocoa powder, and salt. Ensure they are well combined for even distribution.
In a separate bowl, whisk the wet ingredients: buttermilk, vegetable oil, eggs, red food coloring, and vanilla extract until uniform.
Gradually add the wet ingredients to the dry ingredients, mixing on low speed with an electric mixer or by hand. The most critical step here is to mix only until just combined.
Do not overmix! Overmixing develops gluten rapidly, which is the enemy of a tender red velvet crumb, leading instead to a dry, tough cake.
Finally, gently stir in the white vinegar. This ingredient is your “moisture secret” for the velvety crumb, as it reacts with the baking soda and buttermilk to create tiny air pockets, ensuring a tender, airy cake.
Pour the vibrant red velvet batter evenly over the cheesecake layer in the springform pan, spreading gently to cover.
The Perfect Bake & Chill: Ensuring Structure and Tenderness
Place your springform pan on a baking sheet to catch any potential drips, preventing a messy oven cleanup. Bake at 325°F (160°C) for 35-45 minutes.
The cake is done when the cheesecake layer is set, and a wooden skewer inserted into the center of the red velvet layer comes out with moist crumbs, not wet batter. A slight jiggle in the center is normal and will firm up upon cooling.
Remove the cake from the oven and let it cool completely on a wire rack for at least 2-3 hours. This gradual cooling process is crucial for preventing cracks in the cheesecake and maintaining moisture.
After cooling, transfer the cake to the refrigerator and chill for at least 4 hours, or preferably overnight. This extended chilling allows all the layers to set firmly, making for clean slices and enhancing the flavors.
Simmering the Sweet & Tart Red Fruit Topping
In a small saucepan, combine the frozen mixed berries, granulated sugar, and 1/4 cup of water. Bring this mixture to a gentle simmer over medium heat, stirring occasionally.
While the berries simmer, whisk the cornstarch with 2 tablespoons of cold water in a small bowl to create a smooth slurry. This ensures the cornstarch dissolves without lumps.
Stir the cornstarch slurry into the simmering berry mixture. Continue to cook and stir constantly for about 2-3 minutes until the sauce visibly thickens and becomes glossy.
Remove the pan from the heat and allow the red fruit topping to cool completely before using. A cool topping prevents the whipped cream from melting.
The Grand Assembly: Whipped Cream, Garnish, and Serve
Once your cake is thoroughly chilled, carefully run a thin knife or offset spatula around the edge of the springform pan before releasing the sides.
Pour the cooled red fruit topping over the top of the cake, allowing some to artfully drip down the sides for a visually stunning presentation.
In a clean, chilled bowl, whip the cold heavy cream, powdered sugar, and vanilla extract using an electric mixer until stiff peaks form. Chilled bowls and cream are key for stable whipped cream.
Pipe or spoon elegant dollops of whipped cream onto the cake’s surface. For the ultimate finishing touch on this show-stopping dessert, use a vegetable peeler to shave delicate curls from a dark chocolate bar.
Sprinkle these chocolate shavings over the whipped cream and around the base of the cake. Slice with a hot, clean knife and serve your magnificent Red Velvet Cheesecake Layer Cake!
Mastering the Craft: Expert Tips for Your Layer Cake Success
Room Temperature Magic: Why It Matters for Creaminess: Using softened butter and cream cheese, along with room temperature eggs, is crucial. These ingredients emulsify much better, creating smoother, lump-free batters and a more even, tender bake.
The Gentle Mix: Avoiding a Tough Red Velvet Crumb: Resist the urge to overmix the red velvet batter. Over-developing the gluten in the flour leads to a dense, dry cake, completely undermining the velvety texture this recipe promises.
Patience is Key: Cooling and Chilling for Flawless Layers: Follow the cooling instructions meticulously. Gradual cooling on a wire rack and extended refrigeration not only prevents the cheesecake from cracking but also allows all layers to set firmly, ensuring beautifully clean slices and superior moisture.
Preventing Cracks: Cheesecake Best Practices: To further prevent cracks, avoid opening the oven door frequently during baking. Once baked, let the cheesecake cool gradually in the oven with the door ajar for an hour before transferring to the counter.
Enhancing That Iconic Red Hue Naturally (or Artificially): For a vibrant red, a high-quality gel food coloring is most effective. If you prefer natural options, a small amount of beet powder can be used, but be aware it might result in a more muted, earthy red hue for your red velvet dessert.
For more baking insights, explore our guide to creating decadent chocolate cakes that are never dry.
Troubleshooting Common Red Velvet Cheesecake Challenges
“My Red Velvet Layer is Dry or Dense!”
This is almost always due to overmixing the batter, which overdevelops the gluten. Mix only until the wet and dry ingredients are just combined.
Another culprit can be overbaking; ensure you remove the cake once a skewer comes out with moist crumbs, not wet batter.
“My Cheesecake Layer Cracked!”
Cracking often happens from sudden temperature changes. Ensure the cheesecake cools gradually on a wire rack, then in the refrigerator.
Overbaking can also cause cracks; the center should still have a slight jiggle when removed from the oven, as it will continue to set.
“The Fruit Topping is Too Runny (or Too Thick)!”
If too runny, make a small slurry of cornstarch and water, add a tablespoon to the simmering topping, and cook for another minute. Repeat if needed.
If too thick, simply stir in a tablespoon or two of water until it reaches your desired consistency.
“Difficulty Removing Cake from Springform Pan”
Ensure you thoroughly grease and flour the springform pan before adding the chocolate base. Chilling the cake completely is also key, as cold cake layers are much firmer.
Run a very thin knife or offset spatula gently around the edges of the pan before unclipping to help release the sides cleanly.
Planning Ahead: Storage & Make-Ahead Tips
Storing Leftover Red Velvet Cheesecake Layer Cake
Store any leftover Red Velvet Cheesecake Layer Cake tightly covered with plastic wrap or in an airtight container in the refrigerator.
It will remain fresh and delicious for up to 4-5 days, though the whipped cream is best enjoyed within 2-3 days.
Can I Prepare This Cake in Advance?
Absolutely! This layered cake benefits greatly from being made ahead. The assembled cake, without the whipped cream and fresh fruit topping, can be chilled for up to 2 days.
Add the fresh fruit topping, whipped cream, and chocolate shavings just before serving for the best presentation and texture.
Freezing Your Layer Cake for Future Enjoyment
You can freeze individual slices or the entire assembled cake (without the fruit topping and whipped cream). Wrap tightly in plastic wrap, then a layer of aluminum foil.
It will keep well in the freezer for up to 1 month. Thaw in the refrigerator overnight before decorating and serving. For more delightful desserts that freeze well, explore our mini caramel cheesecakes recipe.
Your Questions Answered: Red Velvet Cheesecake Layer Cake FAQs
Can I substitute ingredients for a dairy-free version?
While possible, dairy-free substitutions can alter the flavor and texture significantly, especially for the cheesecake layer. Dairy-free cream cheese, buttermilk alternatives (e.g., plant milk + vinegar), and whipped coconut cream can be used.
However, results may vary, and the classic rich taste of this homemade cheesecake might not be fully replicated.
Is it possible to make smaller individual cakes?
Yes, you can adapt this recipe for mini springform pans or even muffin tins (for a cupcake-style red velvet dessert). You will need to adjust baking times significantly, reducing them by half or more.
Keep a close eye on them, as smaller portions bake much faster. Individual servings are charming for parties!
What’s the best way to get clean slices?
For perfectly neat slices, ensure your cake is thoroughly chilled. Use a long, sharp knife, warming it under hot water and wiping it clean between each cut.
This helps glide through the layers without dragging or smudging the filling, creating a beautiful presentation every time.
Why is white vinegar used in red velvet cake?
White vinegar plays a crucial role! It reacts with the baking soda and the acidity in the buttermilk, creating carbon dioxide bubbles that give the red velvet cake its characteristic light, tender, and airy crumb.
It also helps to enhance the vibrant red color, making it truly iconic.
Your Culinary Masterpiece Awaits: Share and Enjoy!
You’ve now unlocked the secrets to crafting a truly spectacular Red Velvet Cheesecake Layer Cake – a dessert that promises to be moist, tender, and utterly unforgettable.
Beyond the Red Velvet
Explore more satisfying baked goods that complement a sweet treat.
- For a savory start to your meal, consider this cheesy sausage biscuit bake, offering a comforting counterpoint.
- If you’re drawn to similar textures and flavors, give the cheesy sausage crescent ring a try for its golden, crisp finish.
There’s immense satisfaction in bringing such a show-stopping cake to life, knowing every bite is a testament to your baking prowess.
Don’t just make it; savor it, share it with loved ones, and prepare for the inevitable requests for the recipe. I can’t wait for you to experience the joy of this magnificent creation!
Red Velvet Cheesecake Layer Cake
Course: DessertCuisine: AmericanDifficulty: medium12
servings45
minutes50
minutes550
kcal120
minutesSay goodbye to dry Red Velvet cake! This recipe unlocks the secret to an incredibly moist and tender Red Velvet Cheesecake Layer Cake, featuring a dark chocolate base and creamy cheesecake layer. Topped with a vibrant red fruit topping and whipped cream, it’s a show-stopping dessert.
Ingredients
For the Dark Chocolate Cake Base:
1/2 cup unsalted butter, softened
1 cup granulated sugar
2 large eggs
1/2 cup unsweetened cocoa powder
1 cup all-purpose flour
1 teaspoon vanilla extract
1/2 teaspoon salt
For the Red Velvet Cake Layer:
2 cups all-purpose flour
1 3/4 cups granulated sugar
1 teaspoon baking soda
1 teaspoon unsweetened cocoa powder
1/2 teaspoon salt
1 cup buttermilk
1/2 cup vegetable oil
2 large eggs
2 tablespoons red food coloring
1 teaspoon vanilla extract
1 teaspoon white vinegar
For the Cheesecake Layer:
16 ounces cream cheese, softened
3/4 cup granulated sugar
2 large eggs
1/2 cup sour cream
1 teaspoon vanilla extract
For the Red Fruit Topping:
2 cups frozen mixed berries
1/2 cup granulated sugar
2 tablespoons cornstarch
1/4 cup water
For the Whipped Cream and Garnish:
1 1/2 cups heavy cream, cold
1/4 cup powdered sugar
1 teaspoon vanilla extract
1 ounce dark chocolate bar, for shavings
Directions
- Prepare the Dark Chocolate Cake Base: Preheat oven to 350°F (175°C). Grease and flour a 9-inch springform pan. In a large bowl, cream together the softened butter and granulated sugar until light and fluffy. Beat in the eggs one at a time, then stir in the cocoa powder, flour, vanilla extract, and salt until just combined. Press the batter evenly into the bottom of the prepared springform pan. Bake for 15 minutes. Remove from oven and set aside to cool slightly while preparing the cheesecake layer. Reduce oven temperature to 325°F (160°C).
- Prepare the Cheesecake Layer: In a large bowl, beat the softened cream cheese and granulated sugar together until smooth. Add the eggs one at a time, mixing well after each addition until just combined. Stir in the sour cream and vanilla extract. Pour the cheesecake batter evenly over the partially baked chocolate cake base in the springform pan.
- Prepare the Red Velvet Cake Layer (The Moisture Secret!): In a large bowl, whisk together the flour, granulated sugar, baking soda, cocoa powder, and salt. In a separate bowl, whisk together the buttermilk, vegetable oil, eggs, red food coloring, and vanilla extract. Gradually add the wet ingredients to the dry ingredients, mixing on low speed or by hand until just combined. Do not overmix! Overmixing develops gluten too much, leading to a dry, tough cake. Gently stir in the white vinegar last; this reacts with the baking soda to create tender crumbs. Pour the red velvet batter evenly over the cheesecake layer in the springform pan.
- Bake the Layer Cake: Place the springform pan on a baking sheet to catch any drips. Bake at 325°F (160°C) for 35-45 minutes, or until the cheesecake layer is set and a wooden skewer inserted into the center of the red velvet layer comes out with moist crumbs, not wet batter. The center may jiggle slightly but will firm up as it cools. Remove from oven and let cool completely on a wire rack for at least 2-3 hours before chilling in the refrigerator for at least 4 hours, or preferably overnight, to allow all layers to set firmly. This gradual cooling prevents cracking and ensures the cake remains incredibly moist.
- Prepare the Red Fruit Topping: In a small saucepan, combine the frozen mixed berries, granulated sugar, and water. Bring to a simmer over medium heat. In a small bowl, whisk the cornstarch with 2 tablespoons of water to create a slurry. Stir the slurry into the simmering berry mixture and cook, stirring constantly, until the sauce thickens, about 2-3 minutes. Remove from heat and let cool completely.
- Assemble and Garnish: Once the cake is thoroughly chilled, carefully remove it from the springform pan. Pour the cooled red fruit topping over the top of the cake, allowing some to drip down the sides for a beautiful presentation. In a clean, chilled bowl, whip the cold heavy cream, powdered sugar, and vanilla extract until stiff peaks form. Pipe or spoon dollops of whipped cream on top of the cake. Shave curls from the dark chocolate bar using a vegetable peeler and sprinkle them over the whipped cream and around the base of the cake. Slice and serve!
Notes
- Requires significant chilling time (at least 4 hours, preferably overnight) for layers to set properly.


